1. Introduction
This manual provides instructions for the COMTEC ZDR037 dashcam, a high-resolution recording device designed for vehicle use. The ZDR037 features a 360-degree front camera and a dedicated rear camera, ensuring comprehensive coverage of your vehicle's surroundings. It incorporates advanced technologies such as STARVIS for enhanced night vision and HDR/WDR for clear imaging in varying light conditions. This device is equipped with GPS, parking surveillance capabilities, and various recording modes to capture critical driving events.

Figure 1: COMTEC ZDR037 Dashcam main unit and rear camera.
Video 1: A brief product introduction to the COMTEC ZDR037 dashcam, highlighting its key features and design.
2. Key Features
2.1. 360° Front Camera & Rear Camera
The ZDR037 is equipped with an 8-megapixel 360-degree front camera and a 2-megapixel Full HD rear camera. This dual-camera system records the front, sides, interior, and rear of your vehicle, eliminating blind spots that traditional dashcams might miss. The front camera offers a wide vertical viewing angle of 235 degrees, ensuring traffic signals are captured.

Figure 2: Overview of the 360-degree front camera and dedicated rear camera system.

Figure 3: Visual representation of the extensive recording coverage provided by the 360-degree front camera and 168-degree rear camera.
Video 2: Sample footage demonstrating the ZDR037's recording quality during daytime driving conditions.
2.2. STARVIS Night Vision
Both the front and rear cameras are equipped with Sony's STARVIS CMOS sensors, which utilize back-illuminated technology. This enables clear recording in low-light environments such as at night or inside tunnels, significantly improving visibility compared to conventional sensors.

Figure 4: Visual comparison showing the improved clarity of night recordings with STARVIS technology.
Video 3: Sample footage demonstrating the ZDR037's recording quality during night driving conditions, showcasing STARVIS performance.
2.3. HDR/WDR Technology
The ZDR037 features HDR (High Dynamic Range) and WDR (Wide Dynamic Range) functions to correct brightness differences. This ensures clear recording in challenging lighting conditions, such as strong backlighting, tunnels, or areas with significant light and dark contrasts, preventing overexposure or underexposure. Note: When the front camera recording size is set to 8M, only WDR is active. The rear camera is fixed to HDR.
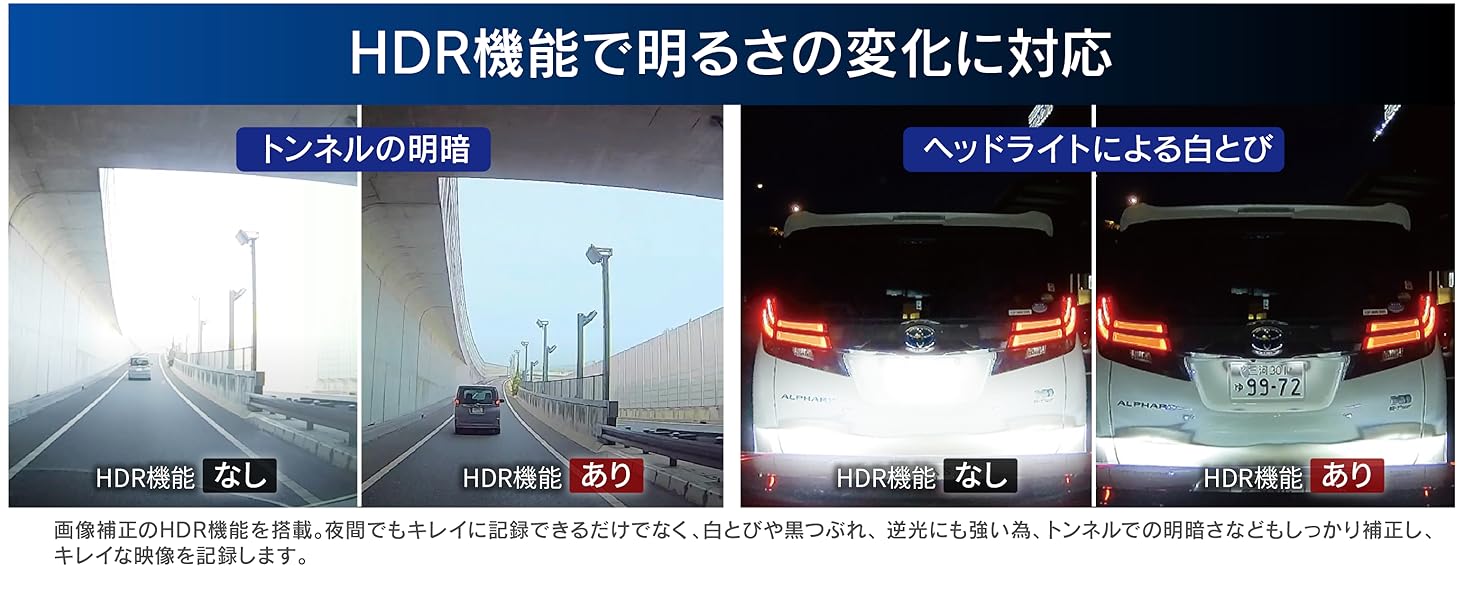
Figure 5: Visual comparison illustrating the effectiveness of HDR technology in maintaining clear video quality in tunnels and against bright headlights.
2.4. Rear Vehicle Approach Alert
This function detects vehicles approaching from the rear and alerts you with a voice or alarm. This helps prevent potential trouble by notifying you of tailgating vehicles. Depending on settings, detected approaches can also be recorded as 'Rear Vehicle Approach Recording Data'.

Figure 6: Illustration of how the dashcam detects and alerts the driver about vehicles approaching from the rear.
2.5. Parking Surveillance Function
With the optional parking surveillance/direct wiring cord [HDROP-14], the ZDR037 can continue recording for up to 24 hours even after the engine is turned off. It detects impacts and records video before and after the event. Continuous recording during parking is also possible. Rear camera footage is also recorded. Parking surveillance videos are saved in a dedicated folder for easy identification.

Figure 7: Diagram showing the parking surveillance function, including impact detection and recording coverage.
2.6. Recording Modes
- Continuous Recording: Records video from engine ON to OFF. Recording duration varies based on settings. Older footage is automatically overwritten when the storage limit is reached.
- Impact Recording: Activated by the built-in G-sensor detecting an impact. The video around the impact event is saved as 'Impact Recording Data'. Older impact data is overwritten when the dedicated storage limit is reached.
- Manual Recording: Pressing a button allows you to manually record video at any desired timing. The video around the button press is saved as 'Manual Recording Data'. Older manual data is overwritten when the dedicated storage limit is reached.
2.7. Time-Lapse Recording
This feature compresses still images recorded at 1-second intervals into a short video, enabling long-duration recording. This is available in both normal and parking surveillance modes, making it easy to review extended periods of footage.
2.8. High-Speed Recording Start
The newly developed high-speed startup system allows recording to begin immediately after the engine is turned ON, ensuring no moments are missed from the start of your drive.
2.9. SD Card Check & Backup Functions
- SD Card Check: Upon startup, the device checks the microSD card for damage. If an abnormality is detected, an alert is displayed on the LCD, preventing missed recordings due to a faulty card.
- Backup Function: In case of power interruption due to an accident, the built-in super capacitor prevents file corruption and protects recorded footage.
2.10. GPS Functionality
The integrated GPS records vehicle speed and location information along with video data. Date and time information are automatically corrected via GPS, eliminating the need for manual adjustments.
2.11. Display Options
The main unit's LCD screen offers multiple display patterns: Clock, Round, Front, Interior, Rear, 2-split, and 3-split. The 2-split display can show Front & Interior, Front & Rear, or Interior & Rear. The 3-split display shows Front, Interior, and Rear simultaneously. These options allow for on-device confirmation of various camera views without dedicated viewer software.
2.12. Dedicated Viewer Software
Downloadable from the COMTEC homepage, the dedicated viewer software allows you to review recorded data on a computer. It displays video, audio, G-sensor information, and vehicle trajectory on Google Maps (due to GPS integration). Recorded data can also be converted and saved as video or still image files.
Video 4: Demonstration of the dedicated viewer software interface and its functionalities for reviewing recorded footage.
2.13. National LED Signal Light Support
The device is designed to record clearly regardless of the different power frequencies (East Japan / West Japan) used by LED traffic signals across the country.
2.14. Noise Countermeasures
The ZDR037 incorporates noise countermeasures to prevent interference with digital TV reception and car navigation GPS signals.
3. Setup & Installation
The COMTEC ZDR037 dashcam is designed for adhesive mounting. For optimal performance and safety, professional installation is recommended. Ensure the device is mounted securely and does not obstruct the driver's view or interfere with airbag deployment.
3.1. Mounting the Main Unit
- Clean the windshield area where the dashcam will be mounted.
- Attach the main unit to the windshield using the provided adhesive mount. Ensure it is positioned centrally and does not block your view.
- Adjust the camera angle to capture the desired view of the road and vehicle interior.
3.2. Mounting the Rear Camera
- Clean the rear window area.
- Attach the rear camera to the rear window using its adhesive mount.
- Route the connecting cable from the rear camera to the main unit, ensuring it does not interfere with vehicle operations or passenger safety.
3.3. Power Connection
- Connect the power cable to the main unit.
- Plug the power cable into your vehicle's 12V power outlet (cigarette lighter socket). For parking surveillance, an optional direct wiring cord [HDROP-14] is required and should be professionally installed.
3.4. Inserting the MicroSD Card
- Ensure the dashcam is powered off.
- Insert the microSD card into the designated slot on the main unit until it clicks into place.
4. Operation Guide
4.1. Starting and Stopping Recording
Recording automatically begins when the vehicle's engine is turned ON and stops when the engine is turned OFF. The device will display a recording indicator on the screen.
4.2. Changing Display Modes
Use the navigation buttons on the device to cycle through the available display patterns (Clock, Round, Front, Interior, Rear, 2-split, 3-split) on the LCD screen.
4.3. Manual Recording
To initiate a manual recording, press the designated manual recording button on the device. This will save the current footage as an event file.
4.4. Parking Surveillance Mode
If the optional [HDROP-14] is installed, parking surveillance mode can be activated. Refer to the detailed instructions provided with the [HDROP-14] for specific setup and operation of this mode.
- Impact Quick Recording: This mode conserves power by only activating and recording when an impact is detected, allowing for extended parking surveillance.
- One-Time Parking Surveillance Mode: Temporarily activate parking surveillance even if it's normally set to OFF. Useful for specific situations like parking at an unfamiliar location.
- Parking Surveillance Mode Pass Function: Temporarily disable parking surveillance mode when parking in areas prone to frequent impacts (e.g., mechanical parking lots, windy days) to avoid unnecessary recordings.
4.5. Audio Recording
The device supports audio recording. This feature can be enabled or disabled through the device settings menu.
5. Maintenance
5.1. MicroSD Card Management
Regularly format the microSD card to maintain optimal recording performance and prevent data corruption. The frequency of formatting depends on usage. It is recommended to back up important footage before formatting.
5.2. Cleaning the Device
Wipe the device and camera lenses with a soft, dry cloth. Avoid using abrasive cleaners or solvents that could damage the unit.
6. Troubleshooting
- Device not powering on: Check the power cable connection and the vehicle's 12V power outlet. Ensure the engine is running or the ignition is in the ACC position.
- Recording not starting: Verify that a functional microSD card is inserted. Check the recording settings.
- Poor video quality: Ensure camera lenses are clean. Check for obstructions in the camera's field of view. Adjust HDR/WDR settings if necessary.
- SD card error message: The microSD card may be damaged or require formatting. Try formatting the card or replacing it with a new, compatible one.
- GPS not acquiring signal: Ensure the device has a clear view of the sky. Avoid mounting near metallic objects that could interfere with the signal.
For further assistance, please refer to the COMTEC official website or contact customer support.
7. Specifications
| Feature | Detail |
|---|---|
| Main Camera Image Sensor | 1/2.3 inch CMOS sensor (STARVIS technology) |
| Main Camera Effective Pixels | Max 8 million pixels |
| Main Camera Lens Angle | Horizontal 360°, Vertical 235° |
| Main Camera F-value | 2.2 |
| Rear Camera Image Sensor | 1/2.8 inch CMOS sensor (STARVIS technology) |
| Rear Camera Effective Pixels | Max 2 million pixels |
| Rear Camera Lens Angle | Horizontal 138°, Vertical 70°, Diagonal 168° |
| Rear Camera F-value | 2.0 |
| Frame Rate | Main Camera 27.5fps / Rear Camera 27.5fps |
| Power Voltage | DC12V |
| Max Current Consumption | Normal: <510mA / Super Capacitor Charging: <980mA |
| Operating Temperature | -10°C to 60°C |
| Main Unit Dimensions (WxHxD) | 74mm x 78mm x 35.1mm |
| Rear Camera Dimensions (WxHxD) | 38mm x 40.2mm x 27.5mm |
| Product Weight | 54g |
| Display Type | LCD |
| Mounting Type | Adhesive |
| Connectivity | Wired |
| Included Components | None (main unit only) |
8. Warranty & Support
8.1. Product Warranty
The COMTEC ZDR037 comes with a 3-year product warranty from the date of purchase. This warranty covers manufacturing defects under normal use conditions.

Figure 8: Promotional image highlighting the product's Japanese origin and 3-year warranty.
8.2. Accident Compensation Service
This product includes an accident compensation service. Upon registration within one month of purchase, COMTEC will provide a uniform compensation of 20,000 JPY for one year in the event of an accident. This service can be renewed annually for a fee, up to a maximum of 3 years. Note: The service cannot be renewed if compensation has been received once.
8.3. Data Recovery Warranty Service
For one year from the date of purchase, COMTEC offers a free data recovery warranty service. This service aims to recover recorded data from damaged main units or SD cards, making it playable again. Note: Data overwritten or unrecordable due to SD card lifespan cannot be recovered. Please refer to the COMTEC homepage for detailed terms and conditions.
For more information on warranty, services, and support, please visit the official COMTEC website: www.comtec.co.jp


