1. Introduction
This manual provides detailed instructions for the installation, operation, and maintenance of your PEMP F30 Android Screen. This device is designed to upgrade the infotainment system in compatible BMW F-series vehicles manufactured between 2012 and 2017, specifically those equipped with NBT or CIC systems. Please read this manual thoroughly before installation and use to ensure proper function and to avoid damage.

Image 1.1: PEMP F30 Android Screen with CarPlay interface.
2. Safety Information
- Professional Installation Recommended: Installation of this product requires technical knowledge and experience with automotive electronics. If you are unsure, seek professional assistance.
- Disconnect Battery: Always disconnect the vehicle's battery before beginning any electrical installation to prevent short circuits or damage.
- Handle with Care: The screen is a delicate electronic component. Avoid dropping or applying excessive force.
- Proper Wiring: Ensure all connections are secure and correctly routed to prevent interference or damage.
- Driving Safety: Do not operate the device in a manner that distracts you from driving. Always prioritize road safety.
3. Package Contents
Verify that all items listed below are included in your package:
- PEMP F30 Android Screen Unit
- ISO Wiring Harness
- Disassembly Tools (Pry tool)
- 4G Antenna
- GPS Antenna
- USB Cable
- Audio Cable
- User Manual (Printed)
- Installation Manual (Printed)

Image 3.1: Included accessories and screen dimensions.
4. Specifications
| Feature | Detail |
|---|---|
| Model Number | AL-5213 |
| Operating System | Android 10 |
| Processor | Qualcomm Snapdragon 625 (MSM8953), 8-Core, up to 2.0GHz |
| RAM | 4 GB (LPDDR3) |
| Internal Storage | 64 GB (eMMC5.1) |
| Display Size | 10.25 inches |
| Display Type | HD IPS Multi-Point Capacitive Touch Screen |
| Resolution | 1920 x 720 |
| Wireless Connectivity | 4G (External Nano SIM), Wi-Fi (2.4G & 5.0G), Bluetooth |
| Special Features | Built-in Wireless CarPlay, Wired Android Auto, Touchscreen, OEM Bluetooth Audio Integration |
| Compatible Devices | iPhone and Android phones |
| Audio Output Mode | Stereo (4.0 Surround Sound Channel Configuration) |
| Product Dimensions | 11.3 x 0.98 x 5.75 inches |
| Item Weight | 4.62 pounds |

Image 4.1: Core specifications and features.
5. Setup and Installation
5.1. Pre-Installation Checks
- Vehicle Compatibility: Ensure your BMW F-series vehicle is from the 2012-2017 model years and has either an NBT or CIC infotainment system.
- LVDS Connection: Carefully check the LVDS connection socket on the back of your original OEM display and identify its type (e.g., 4-pin or 6-pin) and the OEM display interface (CIC UI). This is crucial for correct wiring.

Image 5.1: Identifying the correct LVDS connection and OEM display interface.
5.2. Physical Installation
- Disconnect Battery: Before starting, disconnect the negative terminal of your vehicle's battery.
- Remove OEM Display: Use the provided disassembly tools to carefully remove the original display unit from your dashboard.
- Install Brackets: Depending on your vehicle model (F20 or F30), use the appropriate bracket for secure mounting of the new Android screen.
- Mount Android Screen: Position the PEMP Android Screen in the dashboard opening and secure it using the original mounting points.

Image 5.2: Bracket compatibility for F20 and F30 models.

Image 5.3: Visual comparison of OEM screen vs. upgraded Android screen.
5.3. Wiring Connections
- ISO Harness: Connect the provided ISO wiring harness to the vehicle's main wiring.
- Fiber Optic Cable Transfer: It is critical to correctly transfer the 2-pin green optical fiber cable from the original vehicle's ISO plug to the new Android harness. Failure to do so may result in loss of sound or other functionalities.

Image 5.4: Correct transfer of the fiber optic cable.
- Antennas: Connect the GPS and 4G antennas. Route them to locations that provide optimal signal reception.
- USB and Audio Cables: Connect the USB and audio cables as needed.
5.4. Initial Power-Up
After all connections are made, reconnect the vehicle's battery. The system should power on. The device can be configured to boot directly into the Android system or to the OEM system. Refer to the settings menu for this option.
6. Operating Instructions
6.1. Basic Functions
- Touchscreen Control: The 10.25-inch HD IPS display supports multi-point capacitive touch for intuitive navigation.
- OEM System Integration: The Android screen integrates with your vehicle's existing OEM system. You can switch between the Android interface and the original BMW interface.
6.2. CarPlay and Android Auto
The unit features built-in wireless CarPlay and wired Android Auto functionality.
- Connection: Connect your iPhone for wireless CarPlay or your Android phone via USB for wired Android Auto.
- Audio Output: To obtain audio for CarPlay or Android Auto phone calls and music, utilize the vehicle's OEM Bluetooth connection. This ensures high-quality sound without delay.

Image 6.1: CarPlay and Android Auto in operation.

Image 6.2: Using OEM Bluetooth for audio output.
6.3. Network and Storage
- 4G Connectivity: Insert a Nano SIM card into the top-mounted card slot to enable 4G network access.
- Wi-Fi: The unit supports 2.4G and 5.0G Wi-Fi for internet access.
- Expandable Storage: A Micro SD card slot is available for additional storage.
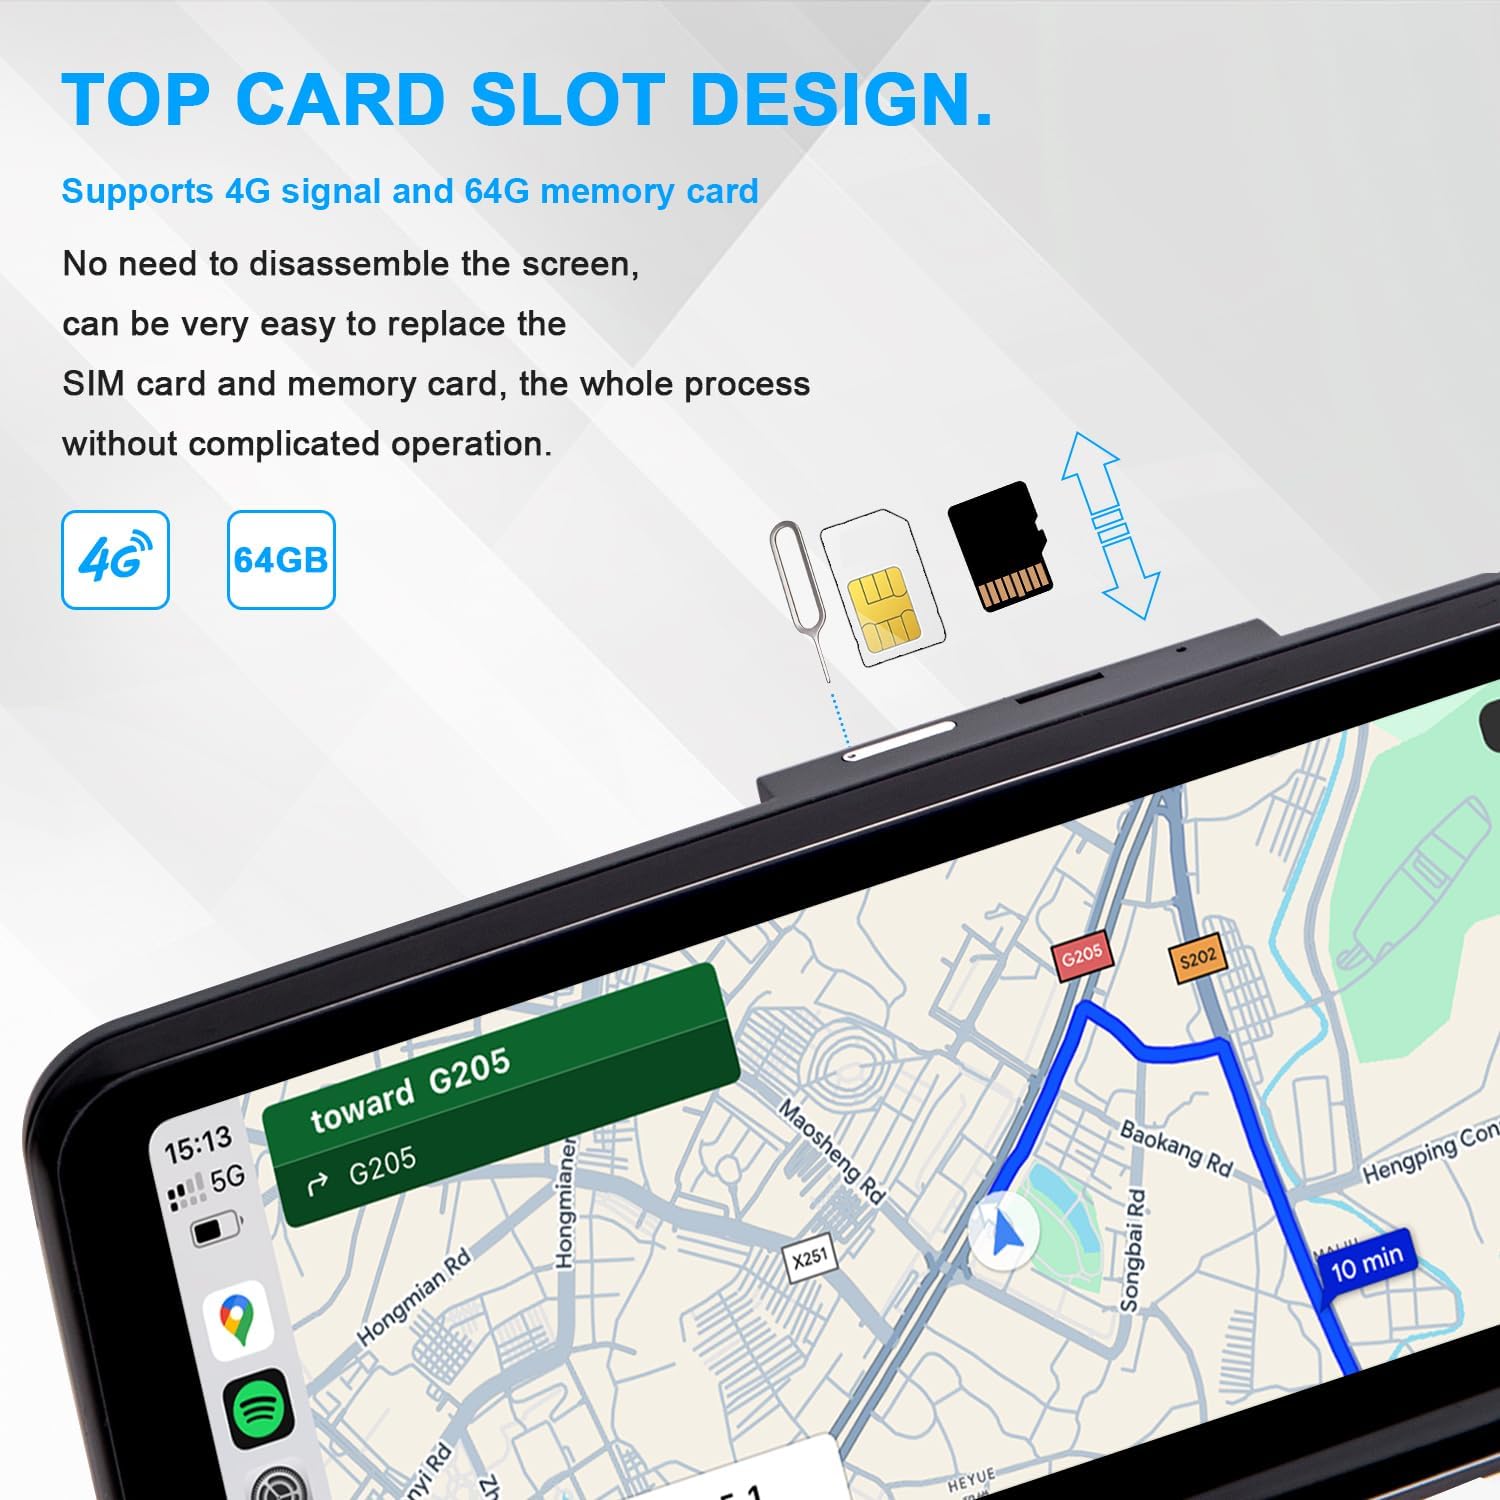
Image 6.3: Top-mounted SIM and SD card slot.
6.4. Applications
As an Android-based system, you can install various applications such as Google Maps, YouTube, Spotify, and others directly onto the device.
6.5. Manual Transmission Reverse Image Settings
For vehicles with manual transmission, the reverse camera image may require a specific setting to display correctly. Navigate to the system settings and adjust the gear type.
- Setting Adjustment: In the system settings, locate Factory Settings, then Vehicle, and finally Gear Selection. Set the gear type to 2 or 3 for normal reverse image display.

Image 6.4: Adjusting gear type for manual transmission reverse image.
7. Maintenance
- Cleaning the Screen: Use a soft, lint-free cloth to gently wipe the screen. For stubborn smudges, slightly dampen the cloth with water or a screen-safe cleaner. Avoid harsh chemicals or abrasive materials.
- Software Updates: Periodically check for software updates to ensure optimal performance and access to new features. Updates can typically be found through the system settings or the manufacturer's support channels.
- Environmental Conditions: Avoid exposing the device to extreme temperatures or direct sunlight for prolonged periods, as this can affect its lifespan and performance.
8. Troubleshooting
8.1. Common Issues and Solutions
| Problem | Possible Cause / Solution |
|---|---|
| No sound from CarPlay/Android Auto | Ensure the OEM Bluetooth is connected and selected as the audio source. Verify the fiber optic cable is correctly transferred. |
| Screen is dim during the day | Check brightness settings in both the Android system and your vehicle's OEM iDrive settings. Ensure ambient light sensors are not obstructed. If headlights are on during the day, the screen may dim; consider adjusting vehicle light settings if possible. |
| Connectivity issues (Bluetooth/Wi-Fi) | Ensure all Bluetooth devices are removed from OEM iDrive. If issues persist, try resetting the Android Bluetooth process in developer options. Avoid connecting to home Wi-Fi while CarPlay is active, as this can interfere. |
| Reverse camera image not displaying (manual transmission) | Adjust the 'Gear Selection' setting in Factory Settings > Vehicle to type 2 or 3. |
| Microphone quality is poor | The unit uses a small built-in microphone. Ensure it is not obstructed. Consider using an external microphone if available and compatible for improved call quality. |
| OEM functions not working (e.g., service menu) | Verify that the green fiber optic cable from the original harness was correctly transferred to the new Android harness. |
9. Warranty and Support
9.1. Warranty Information
For specific warranty details, including duration and coverage, please refer to the documentation provided with your purchase or contact the seller directly. Keep your proof of purchase for warranty claims.
9.2. Technical Support
If you encounter any issues not covered in this manual or require further assistance, please contact PEMP customer support. The support team aims to respond to inquiries within 24 hours.
For vehicle fitment questions, it is recommended to send a photo of your car's dashboard and model year to avoid compatibility issues.


