
Introduction
Thank you for choosing the Oster Planetary Stand Mixer. This manual provides essential information for the safe and efficient operation, maintenance, and care of your new appliance. Please read it thoroughly before first use and keep it for future reference.
This stand mixer features a powerful 1000-watt motor, 10 speed settings, and a generous 5.2-liter stainless steel bowl, designed for a variety of mixing tasks from light batters to heavy doughs.
Important Safety Instructions
- Read all instructions before using the appliance.
- To protect against electrical shock, do not immerse the mixer base, cord, or plug in water or other liquids.
- Close supervision is necessary when any appliance is used by or near children.
- Unplug from outlet when not in use, before putting on or taking off parts, and before cleaning.
- Avoid contact with moving parts. Keep hands, hair, and clothing, as well as spatulas and other utensils, away from beaters during operation to reduce the risk of injury to persons and/or damage to the mixer.
- Do not operate any appliance with a damaged cord or plug, or after the appliance malfunctions or has been dropped or damaged in any manner.
- The use of attachments not recommended or sold by the manufacturer may cause fire, electric shock, or injury.
- Do not use outdoors.
- Do not let cord hang over edge of table or counter.
- Do not let cord contact hot surfaces, including the stove.
- Always operate the mixer with the bowl in place.
- Do not use the appliance for other than intended use.
Product Components
Familiarize yourself with the parts of your Oster Planetary Stand Mixer:
- Die-cast Metal Exterior: Provides stability during operation.
- Powerful 1000W Motor: Ensures efficient and quick processing.
- LED Light: Integrated into the head for improved visibility of ingredients in the bowl.
- Tilt-Head Release Lever: For easy access to the bowl and attachments.
- Speed Control Dial: Offers 10 precise speed settings.
- 5.2L Stainless Steel Bowl: Large capacity for various recipes.
- Attachments:
- Flat Beater: For normal to heavy mixtures such as cakes, cookies, frostings, and mashed potatoes.
- Wire Whisk: For mixtures that need air incorporated, such as eggs, egg whites, heavy cream, and dips.
- Dough Hook: For mixing and kneading yeast doughs like bread, pizza dough, and pasta dough.
- Flexible Edge Beater: Designed to scrape the sides of the bowl during mixing for more uniform results.
- Splash Guard: Helps prevent ingredients from splashing out of the bowl during mixing.

Image: Overview of the Oster Planetary Stand Mixer, highlighting key components such as the LED light, die-cast metal exterior, 1000W motor, 5.2L stainless steel bowl, tilt-head lever, and 10-speed control dial.

Image: All included accessories for the Oster Stand Mixer: splash guard, stainless steel bowl, wire whisk, dough hook, flat beater, and flexible edge beater.
Setup
- Unpack: Carefully remove all parts from the packaging. Retain packaging for storage or future shipping.
- Clean: Before first use, wash the stainless steel bowl, splash guard, and all attachments (flat beater, wire whisk, dough hook, flexible edge beater) in warm, soapy water. Rinse thoroughly and dry. Wipe the mixer base with a damp cloth. Do not immerse the mixer base in water.
- Position: Place the mixer on a clean, dry, flat, and stable surface. Ensure there is enough space around the mixer for operation and ventilation.
- Attach Bowl: Place the stainless steel bowl onto the base, aligning the tabs on the bowl with the slots on the base. Turn the bowl clockwise until it locks securely into place.
- Lift Head: Press the tilt-head release lever and lift the mixer head until it locks in the tilted position.
- Attach Beater: Select the desired attachment. Insert the shaft of the attachment into the attachment port on the mixer head. Turn the attachment counter-clockwise until it locks into place.
- Lower Head: Press the tilt-head release lever again and gently lower the mixer head until it clicks into the locked operating position. Ensure it is fully lowered and secured.
- Attach Splash Guard (Optional): If using, slide the splash guard onto the mixer head after the attachment is in place and the head is lowered.
Operating Instructions
Follow these steps for safe and effective operation of your stand mixer:
- Add Ingredients: Ensure the mixer is unplugged. Lift the mixer head and add your ingredients to the stainless steel bowl.
- Select Attachment: Choose the appropriate attachment for your recipe (flat beater for batters, wire whisk for aerating, dough hook for kneading).
- Secure Head: Lower and lock the mixer head into place.
- Plug In: Plug the mixer into a standard electrical outlet.
- Select Speed: Turn the speed control dial to the desired speed setting (1-10). Start with a low speed to prevent splashing, then gradually increase as needed. The integrated LED light will illuminate when the mixer is operating, providing better visibility of the mixing process.
- Mix: Allow the mixer to operate until ingredients are thoroughly combined or the desired consistency is achieved. The planetary mixing action ensures homogeneous results by reaching close to the bowl's walls.
- Stop: Turn the speed control dial to the "0" (off) position. Unplug the mixer from the outlet.
- Remove Ingredients: Press the tilt-head release lever and lift the mixer head. Scrape down the attachment and bowl sides with a spatula if necessary. Remove the attachment by turning it clockwise and pulling down. Unlock and remove the bowl by turning it counter-clockwise.
Mixing Tips:
- For best results, ensure butter and eggs are at room temperature.
- Always start mixing at a low speed and gradually increase to avoid splashing and ensure ingredients are well incorporated.
- The 5.2L bowl capacity allows for preparing large batches, such as up to 10 dozen cookies (based on 14.2g raw dough balls per cookie) in a single batch.
- Use the flexible edge beater for recipes where scraping the bowl sides is frequently required, ensuring all ingredients are mixed evenly.

Image: A hand adjusting the speed control dial, demonstrating the 10 available speed settings for precise mixing.

Image: Illustration of the planetary mixing action, showing how the flexible edge beater reaches close to the bowl walls for uniform mixing.
Maintenance and Cleaning
Proper cleaning and maintenance will ensure the longevity and optimal performance of your mixer.
- Always Unplug: Before cleaning, always ensure the mixer is unplugged from the electrical outlet.
- Attachments and Bowl: The stainless steel bowl, flat beater, wire whisk, dough hook, flexible edge beater, and splash guard are not dishwasher safe. Wash them in warm, soapy water, rinse thoroughly, and dry immediately.
- Mixer Base: Wipe the mixer base, including the speed control dial and tilt-head mechanism, with a soft, damp cloth. For stubborn spots, use a mild, non-abrasive cleaner. Do not use abrasive pads or cleaners. Never immerse the mixer base in water or any other liquid.
- Storage: Ensure all parts are clean and dry before storing. Store the mixer in a clean, dry place. The compact design makes it easy to store.

Image: A person carrying the Oster Stand Mixer, demonstrating its manageable size for easy storage.
Troubleshooting
If you encounter any issues with your mixer, refer to the following common problems and solutions:
| Problem | Possible Cause | Solution |
|---|---|---|
| Mixer does not turn on. | Not plugged in; power outlet not working; mixer head not fully lowered and locked. | Ensure the mixer is securely plugged into a working outlet. Check that the mixer head is fully lowered and locked into position (listen for a "click"). |
| Attachments are difficult to install or remove. | Attachment not aligned correctly; debris in the attachment port. | Ensure the mixer head is in the tilted position. Align the attachment shaft with the port and turn to lock/unlock. Check for any obstructions in the port. |
| Mixer vibrates excessively or makes unusual noise. | Bowl or attachment not properly secured; too much mixture; mixer on an uneven surface. | Ensure the bowl and attachment are securely locked. Reduce the amount of ingredients if exceeding capacity. Place the mixer on a stable, flat surface. |
| Ingredients are not mixing evenly. | Incorrect attachment used; insufficient mixing time; ingredients stuck to bowl sides. | Ensure the correct attachment is used for the mixture type. Increase mixing time. Use the flexible edge beater or stop the mixer and scrape down the sides of the bowl with a spatula. |
| Motor feels hot during operation. | Normal operation for heavy loads; prolonged use. | It is normal for the motor to warm up during heavy mixing tasks or extended use. If it becomes excessively hot or emits smoke/burning smell, turn off and unplug immediately, then contact customer service. Allow the mixer to cool down between uses. |
If the problem persists after trying these solutions, please contact Oster customer support.
Specifications
| Feature | Detail |
|---|---|
| Brand | Oster |
| Model Number | FPSTSMPL3R-013 |
| Color | Red |
| Power | 1000 Watts |
| Number of Speeds | 10 |
| Bowl Capacity | 5.2 Liters |
| Bowl Material | Stainless Steel |
| Body Material | Die-cast Metal |
| Dimensions (D x W x H) | 33 cm x 44 cm x 40 cm (approx. 13 in x 17.3 in x 15.7 in) |
| Weight | 9 Kilograms (approx. 19.8 lbs) |
| Dishwasher Safe Parts | No (for bowl and attachments) |
| Included Components | Flat Beater, Wire Whisk, Dough Hook, Flexible Edge Beater, Splash Guard |
| UPC | 053891143844 |
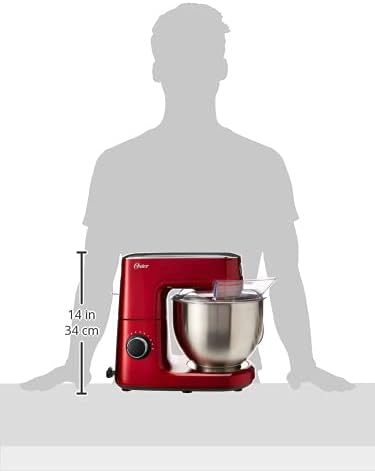
Image: Diagram illustrating the approximate dimensions of the Oster Stand Mixer.
Warranty and Support
Manufacturer's Warranty: This Oster Planetary Stand Mixer comes with a 1-year manufacturer's warranty from the date of purchase. This warranty covers defects in materials and workmanship under normal household use.
What is Not Covered: This warranty does not cover damage resulting from misuse, abuse, accident, alteration, lack of proper care, or normal wear and tear. It also does not cover commercial use.
To Obtain Service: If your product requires service during the warranty period, please contact Oster customer support. You may be required to provide proof of purchase.
For further assistance, product information, or to inquire about replacement parts, please visit the official Oster website or contact their customer service department. Contact information can typically be found on the product packaging or the brand's official website.

