
1. Introduction
This manual provides essential information for the safe and effective operation, maintenance, and care of your Parkside PMZS 50 A1 Rotary Tool Set. This 30-piece set is designed for various applications including working with metal, plastic, and wood. Please read these instructions thoroughly before using the tool set and keep them for future reference.
2. Safety Instructions
Always observe basic safety precautions to reduce the risk of fire, electric shock, and personal injury. Failure to follow these instructions may result in serious injury.
- Eye Protection: Always wear safety goggles or safety glasses with side shields when operating the rotary tool.
- Respiratory Protection: Wear a dust mask, especially when sanding or cutting materials that produce fine dust.
- Secure Workpiece: Always secure the workpiece firmly with clamps or a vise. Never hold the workpiece by hand.
- Proper Ventilation: Ensure adequate ventilation in your work area.
- Correct Accessories: Use only accessories that are rated for the speed of your rotary tool and are appropriate for the task.
- Inspect Accessories: Before each use, inspect accessories for damage. Do not use damaged accessories.
- Avoid Contact: Keep hands and body parts away from rotating accessories.
- Unplug When Changing Accessories: Always unplug the tool from the power source before changing accessories or making adjustments.
- Keep Work Area Clean: Cluttered work areas invite accidents.
3. Package Contents
Your Parkside PMZS 50 A1 Rotary Tool Set includes the following items:
- 1x Rotary Tool
- 30x Assorted Rotary Tool Accessories, which may include:
- Grinding stones (for metal, stone)
- Cutting discs (for metal, plastic)
- Sanding bands and discs (for wood, plastic)
- Polishing wheels (for various materials)
- Engraving bits (for various materials)
- Mandrels for mounting accessories
- Instruction Manual
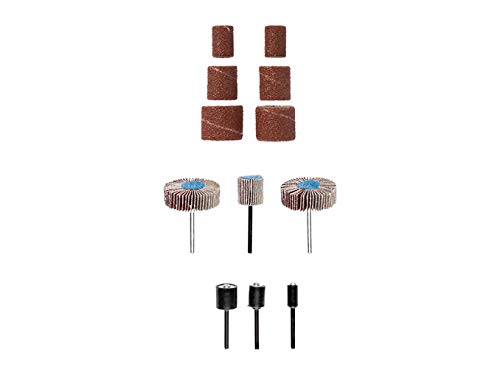
Image 1: The Parkside PMZS 50 A1 Rotary Tool Set, showcasing the tool and a selection of its 30 included accessories for diverse applications.
4. Setup
Before operating the rotary tool, ensure it is unplugged from the power source.
- Select Accessory: Choose the appropriate accessory for your task and material (e.g., grinding stone for metal, sanding band for wood).
- Insert Accessory: Depress the spindle lock button (if present) and insert the accessory shank into the collet. Ensure the accessory is inserted as far as possible without the working part touching the collet nut.
- Tighten Collet Nut: While holding the spindle lock button, use the collet wrench to securely tighten the collet nut. Do not overtighten.
- Check Security: Gently pull on the accessory to ensure it is firmly seated and will not slip during operation.
5. Operating
Always wear appropriate personal protective equipment (PPE) as outlined in the safety instructions.
- Power On: Plug the tool into a suitable power outlet. Turn the tool on using the power switch.
- Adjust Speed: If your tool has variable speed control, select an appropriate speed for your material and accessory. Lower speeds are generally for polishing, delicate work, and some plastics. Higher speeds are for cutting, grinding, and sanding.
- Begin Work: Bring the rotating accessory into contact with the workpiece gently. Apply light, consistent pressure. Let the tool do the work; excessive force can damage the tool, accessory, or workpiece.
- Material-Specific Tips:
- Metal: Use grinding stones or cutting discs. Maintain a steady hand and avoid overheating the metal.
- Wood: Use sanding bands, carving bits, or engraving bits. Work with the grain for smoother results.
- Plastic: Use lower speeds to prevent melting. Cutting discs or sanding accessories can be used carefully.
- Power Off: When finished, turn off the tool and unplug it from the power source. Allow the accessory to stop completely before setting the tool down.
6. Maintenance
Regular maintenance ensures optimal performance and extends the life of your tool.
- Cleaning: After each use, unplug the tool and use a soft brush or compressed air to clean dust and debris from the ventilation openings and around the collet. Do not use solvents.
- Accessory Storage: Store accessories in their designated case or a dry, secure location to prevent damage and loss.
- Cord Inspection: Periodically inspect the power cord for any signs of damage. If damaged, have it repaired by a qualified technician.
- Collet Maintenance: Keep the collet and collet nut clean. If accessories are difficult to insert or remove, clean the collet thoroughly.
7. Troubleshooting
If you encounter issues with your rotary tool, refer to the following common problems and solutions:
- Tool Does Not Start:
- Check if the tool is properly plugged into a working power outlet.
- Ensure the power switch is in the 'ON' position.
- Check for tripped circuit breakers or blown fuses.
- Accessory Wobbles or Vibrates Excessively:
- Ensure the accessory shank is fully inserted into the collet.
- Tighten the collet nut securely with the wrench.
- Inspect the accessory for damage or bending; replace if necessary.
- Tool Overheats:
- Reduce the pressure applied to the workpiece.
- Ensure ventilation openings are clear of debris.
- Allow the tool to cool down during prolonged use.
If problems persist, contact customer support.
8. Specifications
| Model | PMZS 50 A1 |
| Brand | Lidl |
| Material Compatibility | Metal, Wood, Plastic |
| Accessory Count | 30 pieces |
| ASIN | B08V92KZH9 |
9. Warranty and Support
Your Parkside PMZS 50 A1 Rotary Tool Set is covered by a manufacturer's warranty. Please refer to the warranty card included with your purchase for specific terms and conditions, including the warranty period and coverage details.
For technical support, spare parts, or warranty claims, please contact the customer service department of your retailer or the manufacturer directly. Contact information can typically be found in the packaging or on the manufacturer's official website.