
auomii KLK-2001A
auomii Smart WiFi Ceiling Fan Remote Control Kit Instruction Manual
Brand: auomii | Model: KLK-2001A
Introduction
This manual provides detailed instructions for the installation, operation, and maintenance of your auomii Smart WiFi Ceiling Fan Remote Control Kit. This universal kit allows control of your ceiling fan and light via a dedicated remote, smartphone app (Smart Life), and voice assistants like Alexa and Google Assistant. Please read this manual thoroughly before installation and use to ensure proper function and safety.
Important Safety Information
- Installation must be performed by a professional electrician.
- Do not damage the antenna surface; it contains live wiring and is dangerous.
- Ensure the device is compatible with your fan's wiring and motor type (AC motor only).
- This device supports 2.4GHz WiFi only; 5GHz networks are not supported.
- The light function is ON/OFF only and is not dimmable.
- Always disconnect power at the circuit breaker before installation or maintenance.
Package Contents
Verify that all items listed below are included in your package:
- 1x Smart WiFi Receiver
- 1x Remote Control
- 1x Remote Control Wall Mount Bracket
- Wiring Nuts
- Mounting Screws
- Instruction Manual

Image: The auomii Smart WiFi Ceiling Fan Remote Control Kit, including the receiver, remote control, and a smartphone displaying the Smart Life app interface.
Setup and Installation
Note: Ensure power is disconnected at the circuit breaker before beginning installation.
1. Wiring the Receiver
- Remove Fan Canopy: Carefully remove the fan canopy to access the existing wiring.
- Remove Original Receiver (if applicable): Disconnect and remove any existing fan remote receiver.
- Identify Wires: You will typically find three wires from the ceiling (Live, Neutral, Ground) and three wires from the fan (Fan Live, Light Live, Neutral, Ground). The auomii receiver has corresponding wires.
- Connect Receiver:
- Connect the receiver's red wire to the ceiling's red (live) wire.
- Connect the receiver's white wire (from the 2-wire end) to the ceiling's white (neutral) wire.
- Connect the receiver's blue wire to the fan's blue (light live) wire.
- Connect the receiver's white wire (from the 3-wire end) to the fan's white (neutral) wire.
- Connect the receiver's black wire to the fan's black (fan live) wire.
- Connect all green ground wires together (from ceiling, fan, and bracket).
- Secure Receiver: Insert the new receiver into the fan bracket, ensuring all wires are securely connected with wiring nuts.
- Reattach Canopy: Carefully reattach the fan canopy.
Video: Installation guide for the smart remote control kit receiver, demonstrating wire connections and placement within the fan canopy.

Image: Detailed wiring diagram showing connections for the receiver to the ceiling and fan wires (Live, Neutral, Light, Fan, Ground).
2. Remote Control Setup
- Insert 2 AAA batteries into the remote control.
- Mount the remote control bracket to a convenient wall location using the provided screws.
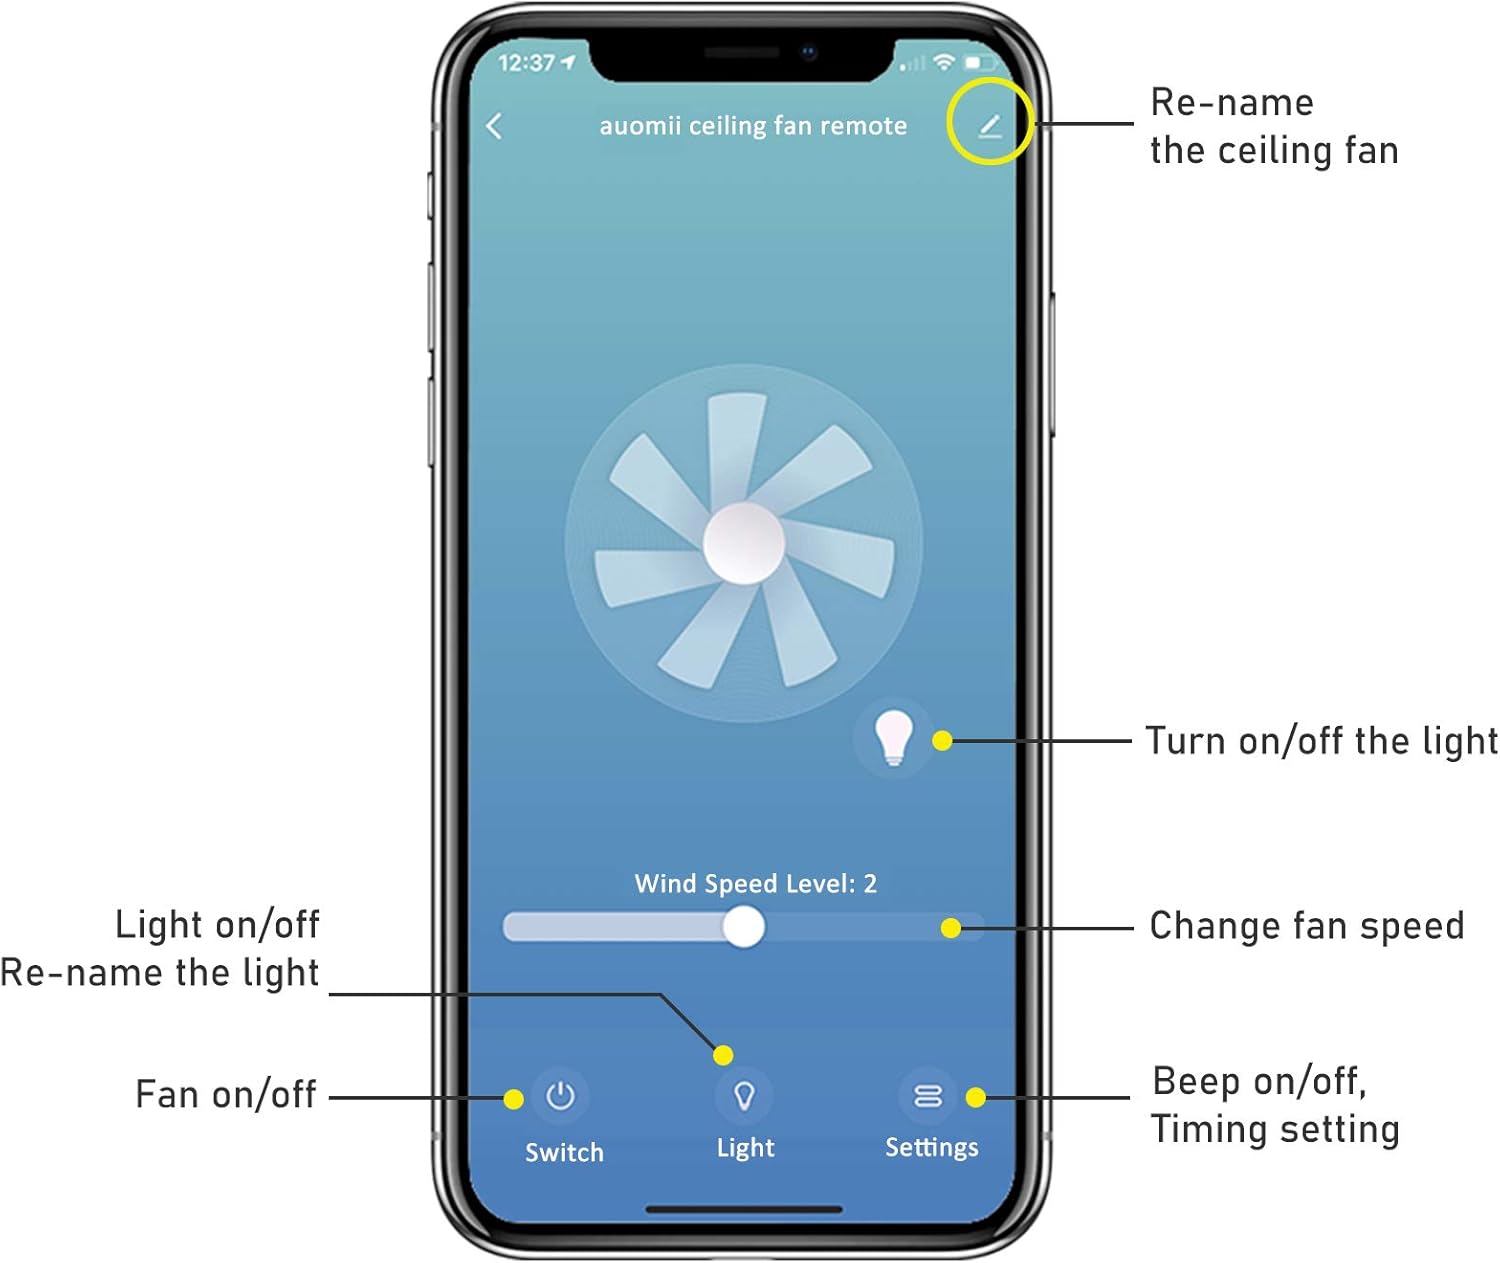
Image: The auomii remote control with its wall-mount bracket, illustrating its design and how it can be stored.
3. Smart Life App Connection
- Power Cycle: After installing the receiver and confirming the remote can control the fan, turn off the ceiling fan power at the wall switch or circuit breaker for 5 seconds, then turn it back on. Do not use the remote control to power off for this step.
- Enter Pairing Mode: Within 30 seconds of restoring power, press and hold the "Fan power" button on the remote control for 5 seconds. The fan light will flash twice, indicating it is in network distribution mode.
- Connect to 2.4GHz WiFi: Ensure your smartphone is connected to a 2.4GHz WiFi network. This device does not support 5GHz WiFi.
- Open Smart Life App: Access the "Smart Life" app on your mobile phone or smart device.
- Add Device: Click the "+" icon in the app and then select "Add Device". The app should automatically search for and discover the remote control device. If not, manually select "Fan (BLE)" under "Small Home Appliances".
- Confirm Connection: Once the device is discovered, click "Add". Enter your 2.4GHz WiFi password and click "NEXT". The device will be added to your app.
Video: Guide on how to connect the auomii Smart WiFi Ceiling Fan Remote Control Kit to the Smart Life app, including power cycling and app pairing steps.
Video: Demonstrates the process of connecting the Senroyal Smart Remote to the Smart Life app, highlighting the 2.4GHz WiFi requirement and device discovery.
Operating Instructions
Remote Control Functions
- Fan Speed: Buttons for LOW, MED (Medium), HI (High), and STOP.
- Light Control: LIGHT ON/OFF button to toggle the fan light.
- Timing: Buttons for 1H, 2H, 4H, 8H to set a fan timer.
- Beep ON/OFF: Control the audible feedback from the receiver.

Image: The auomii remote control detailing its buttons for fan speed (Low, Med, High, Stop), light control (On/Off), and timing settings (1H, 2H, 4H, 8H).
Smart Life App Control
Once connected, the Smart Life app provides comprehensive control:
- Fan ON/OFF: Toggle the fan power.
- Light ON/OFF: Toggle the fan light.
- Change Fan Speed: Adjust fan speed via a slider or predefined levels.
- Timing Setting: Set countdown timers for fan operation (1H-12H).
- Beep ON/OFF: Control the audible feedback.
- Rename Device: Customize the name of your ceiling fan within the app.

Image: Screenshot of the Smart Life app interface showing controls for the auomii ceiling fan, including fan speed, light on/off, and settings for timing and renaming.
Voice Control
The auomii Smart WiFi Ceiling Fan Remote Control Kit is compatible with Alexa and Google Assistant. After linking the Smart Life app to your voice assistant, you can use commands such as:
- "Alexa, turn on the ceiling fan."
- "Hey Google, set ceiling fan speed to 2."
- "Alexa, turn off the ceiling fan light."
Compatibility
- Light Bulbs: Compatible with LED bulbs (1.5A/150W Max), Tungsten bulbs (4.2A/500W Max), and CFL bulbs (1.5A/150W Max). Note: No dimming function is available.
- Fan Motors: Compatible with all kinds of AC motors. Not compatible with DC motors.

Image: Visual guide illustrating compatibility with various light bulb types (LED, Tungsten, CFL) and specifying compatibility with AC fan motors only.
Specifications
| Feature | Detail |
|---|---|
| Product Dimensions | 3 x 2.07 x 1 inches (Receiver) |
| Item Weight | 6.3 ounces |
| Model Number | KLK-2001A |
| Brand | auomii |
| Power Source | AC (for receiver) |
| Remote Batteries | 2 AAA batteries required (not included) |
| Special Features | 12 Countdown timing, Beep on/off setting |
| Max Number of Supported Devices | 2 |
| Compatible Devices | Ceiling Fans (AC motor only) |
| WiFi Compatibility | 2.4GHz WiFi only |
Maintenance
To ensure the longevity and optimal performance of your auomii Smart WiFi Ceiling Fan Remote Control Kit, follow these general maintenance guidelines:
- Cleaning: Wipe the remote control and visible parts of the receiver with a soft, dry cloth. Do not use liquid cleaners or aerosols.
- Battery Replacement: Replace remote control batteries (2 AAA) when the remote's performance diminishes.
- Firmware Updates: Periodically check the Smart Life app for any available firmware updates for the receiver to ensure optimal performance and security.
- Environmental Conditions: Avoid exposing the device to extreme temperatures, humidity, or direct sunlight.
Troubleshooting
If you encounter issues with your auomii Smart WiFi Ceiling Fan Remote Control Kit, refer to the following common solutions:
- Remote Not Responding:
- Check and replace the remote control batteries.
- Ensure the receiver is properly installed and receiving power.
- App Connection Issues:
- Verify your smartphone is connected to a 2.4GHz WiFi network. The device does not support 5GHz.
- Ensure the device is in pairing mode (light flashes twice after power cycle).
- Restart your router and try the connection process again.
- If the device is not discovered, try resetting it by turning off the power source for 5 seconds, restoring power, and then within 30 seconds, pressing the Fan power button for another 5 seconds until it pops up in the app.
- Fan or Light Not Working:
- Confirm all wiring connections are secure and correct according to the wiring diagram.
- Check the circuit breaker to ensure power is supplied to the fan.
- Ensure your fan has an AC motor, as DC motors are not compatible.
- Voice Control Not Working:
- Ensure the Smart Life app is correctly linked to your Alexa or Google Assistant account.
- Check your internet connection.
Warranty and Support
For warranty information or technical support, please refer to the contact details provided with your purchase or visit the auomii official website. Keep your purchase receipt as proof of purchase for warranty claims.
Ask a question about this manual
Ask about setup, troubleshooting, compatibility, parts, safety, or missing instructions. Manuals+ will review the question and use this page’s manual context to help answer it.