
1. Introduction
The Hormann ProMatic (Series 3) garage door opener is a high-quality replacement device designed to provide reliable and efficient operation for your garage door. Constructed from durable carbon steel, this drive unit requires no assembly and is engineered for straightforward installation. It ensures dependable opening and closing functionality, enhancing the convenience and security of your garage.
2. Safety Information
- Always disconnect power to the garage door opener before performing any installation, maintenance, or repair work.
- Ensure all moving parts are clear of obstructions during operation.
- Keep children and pets away from the garage door area, especially during operation.
- Do not attempt to repair or modify the device if you are not qualified. Contact a professional technician.
- Read and understand all instructions before installation and use.
3. Package Contents
The package contains the Hormann ProMatic 4512505 Garage Door Opener Replacement Device (Series 3) main unit. Please inspect the contents upon receipt to ensure all components are present and undamaged.
4. Compatibility
This replacement device offers all the functionalities of a modern garage door operator and is compatible with the following Hormann rail systems:
- Hormann ProMatic
- EcoMatic
- EcoStar Liftronic 700 and 800
- SupraMatic
Important Compatibility Notes:
- This device is NOT suitable for rails from other manufacturers.
- It is NOT compatible with rails from older drive systems such as SupraMatic S, GTD, GTS, GTO, Liftronic 500, or EcoStar C.
5. Setup and Installation
The Hormann ProMatic Series 3 replacement device is designed for easy installation and requires no prior assembly. Follow these general guidelines for installation. For detailed, model-specific instructions, refer to the documentation provided with your garage door rail system.
- Preparation: Ensure the garage door is in the closed position and disconnect power to the existing opener (if any).
- Mounting: Securely attach the ProMatic replacement device to the compatible Hormann rail system. The device features a robust metal mounting plate with pre-drilled holes for this purpose.
- Electrical Connection: Connect the device to the power supply according to local electrical codes and the instructions provided with your rail system.
- Testing: After installation, carefully test the opener's functionality, including safety reversal features, before regular use.
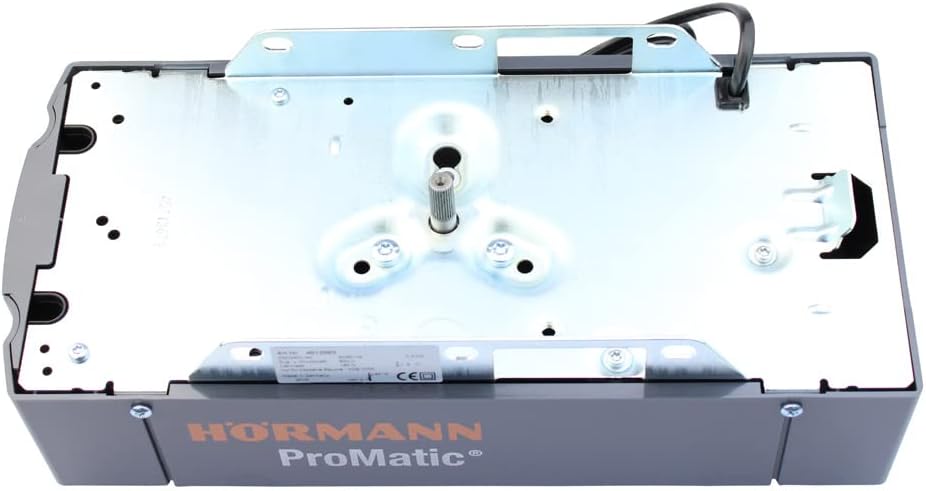
Figure 1: Underside view of the Hormann ProMatic Series 3 garage door opener. This image displays the metal mounting plate with pre-drilled holes for secure attachment, along with visible internal components and wiring connections. This view is crucial for understanding how the device is to be mounted to the garage door rail system.

Figure 2: Line drawing of the Hormann ProMatic Series 3 garage door opener. This diagram provides a simplified, isometric view of the unit, showing its overall shape and the cable extending from one end. This type of illustration is often used to clarify assembly steps or component orientation during installation.
6. Operating Instructions
Once installed and powered, the Hormann ProMatic Series 3 garage door opener provides reliable open and close functionality. Operation is typically performed via a remote control or a wall-mounted push button, depending on your specific setup.
- Opening the Door: Press the designated button on your remote control or wall switch. The door will automatically open to its fully open position.
- Closing the Door: Press the designated button again. The door will automatically close. Ensure the path of the door is clear before closing.
- Stopping the Door: Pressing the button while the door is in motion will stop it. Pressing it again will reverse its direction.
7. Maintenance
Regular maintenance ensures the longevity and safe operation of your garage door opener. Perform the following checks periodically:
- Visual Inspection: Check the opener, rail, and all connections for signs of wear, damage, or loose components.
- Safety Reversal Test: Place a 2x4 piece of wood flat on the floor in the path of the garage door. When the door closes and contacts the wood, it should automatically reverse. If it does not, adjust the safety settings or contact a professional.
- Lubrication: Lubricate moving parts of the garage door (hinges, rollers, springs) as recommended by your garage door manufacturer. The opener itself is generally maintenance-free.
- Cleanliness: Keep the area around the opener and sensors clean and free of debris.
8. Troubleshooting
If you encounter issues with your Hormann ProMatic opener, consider the following common troubleshooting steps:
- Opener Not Responding: Check if the opener is plugged in and receiving power. Verify that the circuit breaker has not tripped. Replace remote control batteries if applicable.
- Door Not Closing Fully: Inspect the safety sensors (photo eyes) for obstructions or misalignment. Clean the sensor lenses.
- Door Reverses Unexpectedly: This often indicates an obstruction in the door's path or misaligned safety sensors. Check for anything blocking the door or interfering with the sensors.
- Unusual Noises: Squeaking or grinding noises may indicate a need for lubrication of the garage door's moving parts (not the opener itself) or a worn component.
- Remote Control Issues: Ensure the remote is programmed correctly. Refer to your remote control's specific instructions for programming.
If problems persist after attempting these steps, it is recommended to contact a qualified service technician.
9. Specifications
| Feature | Specification |
|---|---|
| Manufacturer | HÖrmann |
| Model Number | 4512505 |
| Product Dimensions (L x W x H) | 10 x 10 x 10 cm |
| Size | 320 cm x 1 cm (referring to compatible rail length/thickness) |
| Color | Grey |
| Material | Carbon Steel |
| Batteries Included | No |
| Assembly Required | No |
10. Warranty and Support
For warranty information and technical support, please refer to the documentation provided with your original purchase or contact Hormann customer service directly. Keep your proof of purchase for any warranty claims.


