Introduction
This manual provides essential instructions for the safe assembly, operation, and maintenance of your RIF6 Indoor Cycling Exercise Bike. Please read this manual thoroughly before using the product and retain it for future reference. Proper use and care will ensure optimal performance and longevity of your exercise bike.

Figure 1: RIF6 Indoor Cycling Exercise Bike. This image displays the complete RIF6 exercise bike from a front-left angle, highlighting its black frame, flywheel, adjustable seat, handlebars with an LCD monitor, and pedal system.
Important Safety Information
Before beginning any exercise program, consult with your physician. This is especially important for individuals over the age of 35 or those with pre-existing health conditions. Read all warnings and instructions before using this equipment.
- Keep children and pets away from the equipment.
- Place the exercise bike on a level surface with at least 2 feet (0.6 meters) of clear space around it.
- Inspect the equipment before each use for loose parts or signs of wear. Do not use if damaged.
- Wear appropriate exercise clothing and athletic shoes. Avoid loose clothing that could get caught in moving parts.
- Do not exceed the maximum user weight of 275 pounds (125 kg).
- Adjust the seat and handlebars to a comfortable and safe position before starting your workout.
- Stop exercising immediately if you feel faint, dizzy, or experience pain.
- This equipment is for indoor use only.
Parts List
Ensure all components are present before assembly. If any parts are missing or damaged, contact customer support.
- Main Frame with Flywheel
- Front Stabilizer
- Rear Stabilizer
- Seat Post
- Seat
- Handlebar Post
- Handlebar Assembly with LCD Monitor
- Pedals (Left and Right)
- Water Bottle Holder
- Tablet Mount
- Hardware Kit (bolts, washers, nuts, tools)
Assembly Instructions
Follow these steps carefully to assemble your RIF6 Exercise Bike. It is recommended to have two people for certain steps due to the weight of the main frame.
- Attach Stabilizers: Secure the front and rear stabilizers to the main frame using the provided bolts and washers. Ensure they are tightened securely.
- Install Pedals: Identify the left (L) and right (R) pedals. The left pedal threads counter-clockwise, and the right pedal threads clockwise. Carefully screw each pedal into its corresponding crank arm and tighten firmly with a wrench.
- Mount Seat Post and Seat: Insert the seat post into the main frame. Adjust to the desired height and secure with the adjustment knob. Attach the seat to the top of the seat post.
- Install Handlebar Post and Handlebars: Insert the handlebar post into the main frame. Adjust to the desired height and secure. Attach the handlebar assembly, including the LCD monitor, to the top of the handlebar post. Connect any necessary sensor wires for the monitor.
- Attach Accessories: Install the water bottle holder and tablet mount to their designated positions on the handlebars or frame.
Operating Instructions
Adjusting Riding Position
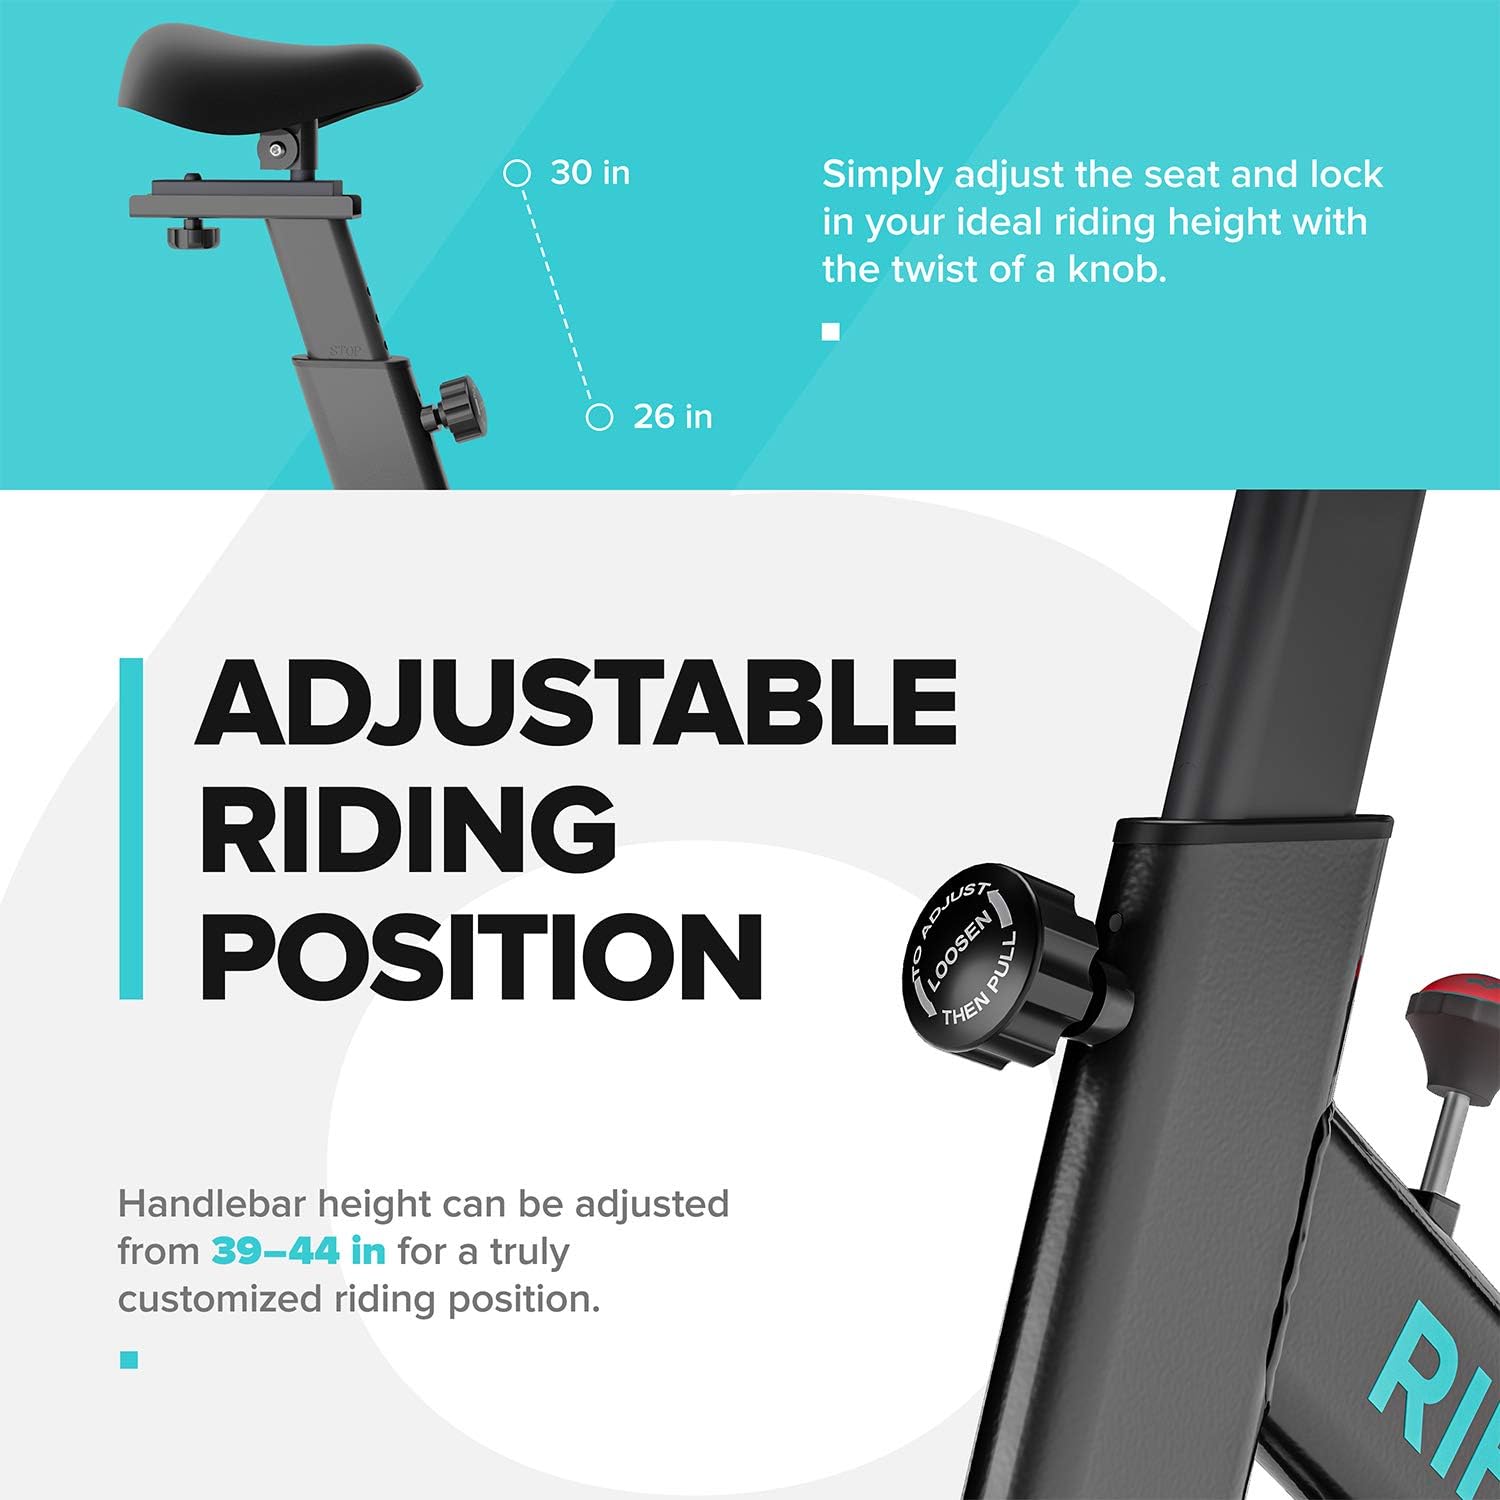
Figure 2: Adjustable Seat and Handlebar. This image illustrates how to adjust the seat height (from 26 to 30 inches) and handlebar height (from 39 to 44 inches) using adjustment knobs for a customized riding position.
- Seat Adjustment: Loosen the adjustment knob below the seat. Slide the seat post up or down to your preferred height (26-30 inches). Ensure your leg has a slight bend at the knee when the pedal is at its lowest point. Tighten the knob securely. The seat can also be adjusted horizontally.
- Handlebar Adjustment: Loosen the adjustment knob on the handlebar post. Raise or lower the handlebars to a comfortable height (39-44 inches). Ensure your back is straight and your arms are slightly bent. Tighten the knob securely.
Tension Control
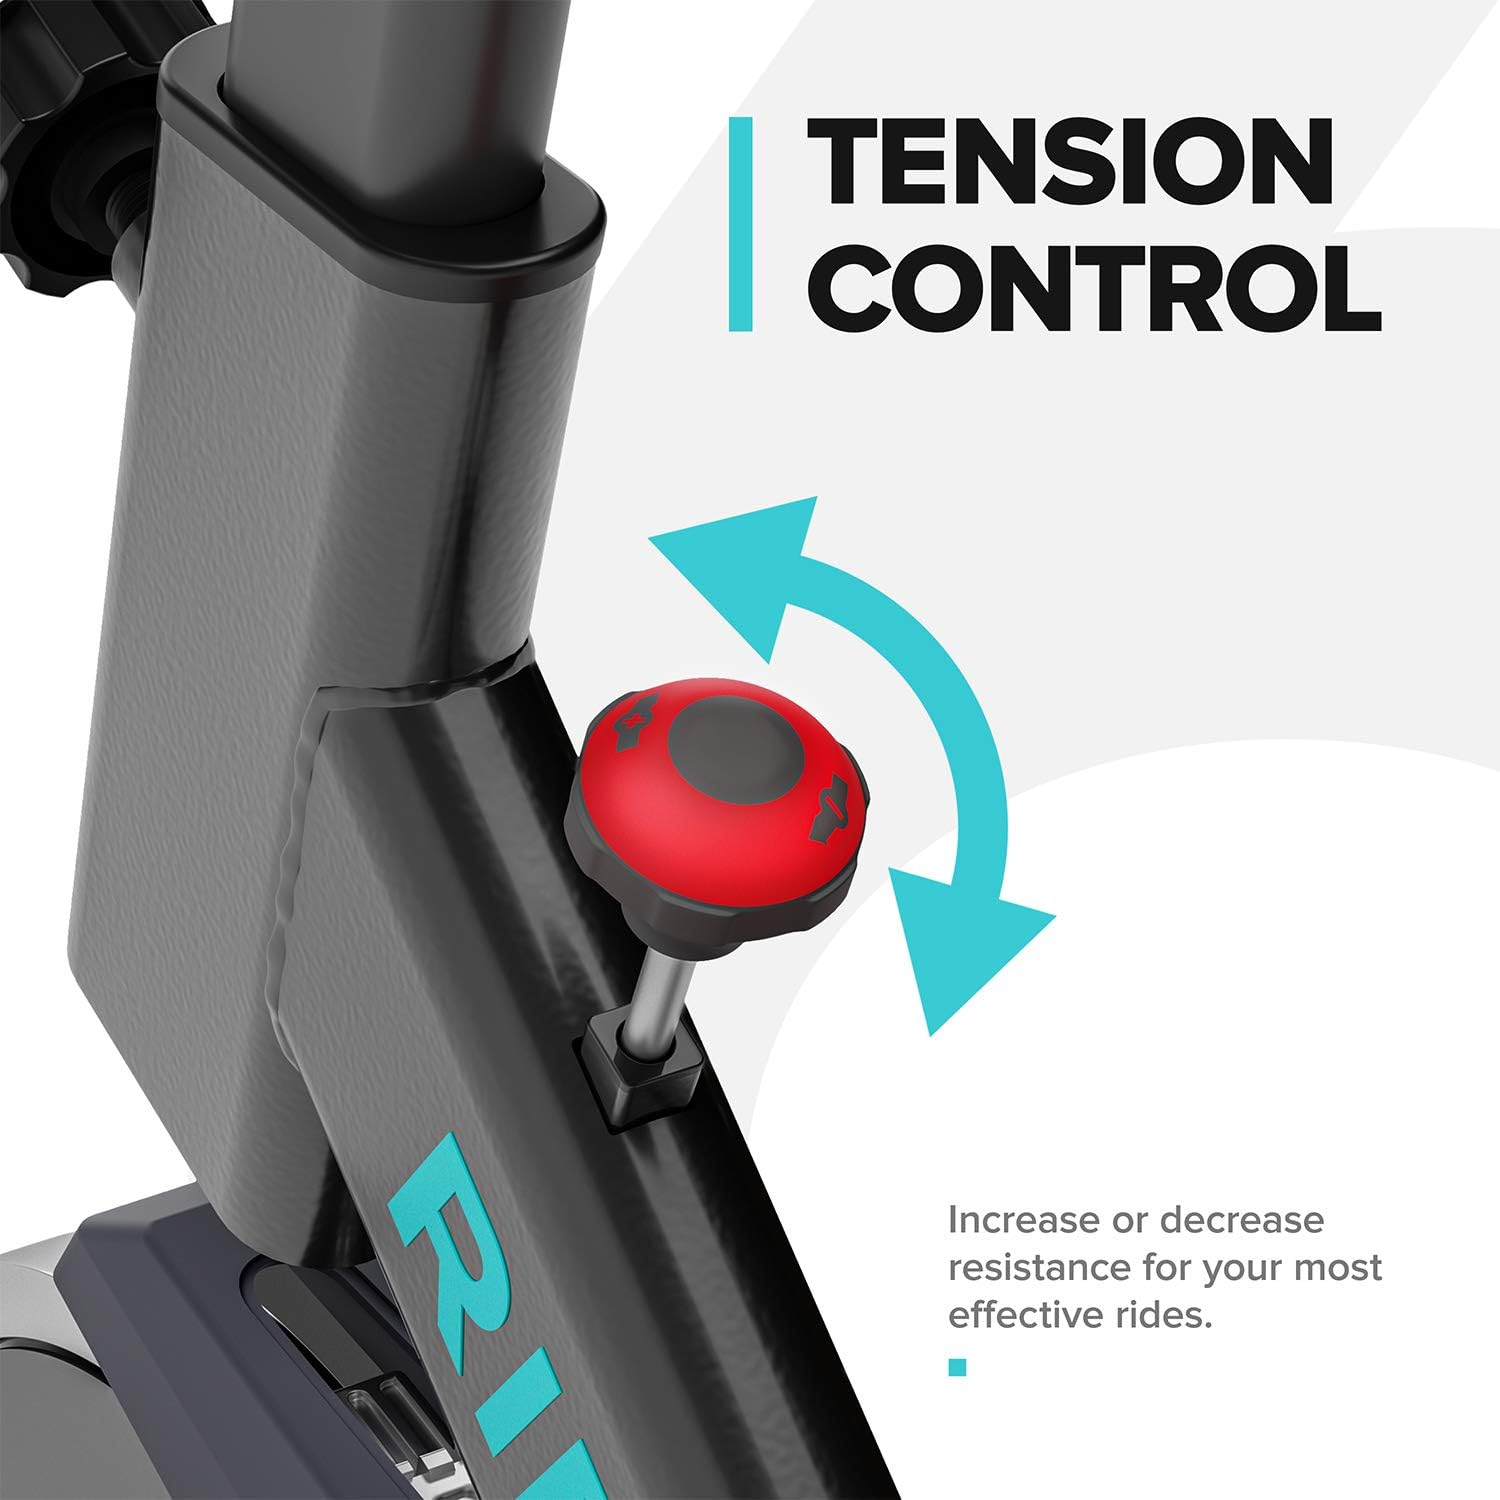
Figure 3: Tension Control. This image shows the red tension knob located on the main frame, with arrows indicating clockwise to increase resistance and counter-clockwise to decrease resistance.
The tension control knob allows you to adjust the resistance level of your workout. Turn the knob clockwise to increase resistance for a more challenging ride, and counter-clockwise to decrease resistance for an easier ride. To stop the flywheel quickly, press down firmly on the tension knob.
LCD Monitor Functions

Figure 4: LCD Monitor. This image displays the LCD monitor with its various readouts: Time, Speed, Distance (DST), Calories (CAL), and Pulse. It also shows the 'SET', 'RESET', and 'MODE' buttons.
The integrated LCD monitor tracks your workout data. Use the "MODE" button to cycle through different display functions:
- TIME: Displays the duration of your workout.
- SPD (Speed): Shows your current cycling speed.
- DST (Distance): Tracks the distance covered during your workout.
- CAL (Calories): Estimates the calories burned.
- PULSE: Displays your heart rate when holding the heart rate sensors on the handlebars.
- SCAN: Automatically cycles through all functions every few seconds.
Use the "SET" button to set target values for time, distance, or calories. Press "RESET" to clear all workout data.
Heart Rate Sensor

Figure 5: Heart Rate Sensors. This image highlights the two metallic sensors integrated into the handlebars, which are used to measure the user's heart rate and display it on the LCD monitor.
To measure your heart rate, firmly grasp the metallic sensors on both handlebars. Your pulse will be displayed on the LCD monitor after a few seconds. Ensure your hands are clean and making good contact with the sensors for an accurate reading.
Tablet Holder

Figure 6: Tablet Holder. This image shows a tablet securely placed in the holder located above the LCD monitor, alongside a water bottle in its holder, demonstrating how users can integrate entertainment or fitness apps during their workout.
The integrated tablet holder allows you to place your smartphone or tablet for entertainment or to follow guided workouts during your exercise session.
Transport Wheels

Figure 7: Transport Wheels. This close-up image shows the two small wheels located on the front stabilizer bar, designed to facilitate easy movement and relocation of the exercise bike.
To move the exercise bike, tilt it forward by lifting the rear stabilizer until the transport wheels on the front stabilizer make contact with the floor. Carefully roll the bike to its desired location.
Maintenance
Regular maintenance ensures the longevity and safe operation of your exercise bike.
- Cleaning: Wipe down the bike with a damp cloth after each use to remove sweat and dust. Avoid abrasive cleaners or solvents.
- Inspection: Periodically check all bolts and nuts for tightness. Tighten any loose fasteners.
- Lubrication: The belt drive system is generally maintenance-free. If you notice any squeaking from the flywheel or pedal mechanism, a small amount of silicone-based lubricant can be applied to pivot points, avoiding the belt itself.
- Storage: Store the bike in a cool, dry place away from direct sunlight and extreme temperatures.
Troubleshooting
| Problem | Possible Cause | Solution |
|---|---|---|
| LCD Monitor not displaying | Batteries are dead or incorrectly installed. Loose connection. | Replace batteries (if applicable). Check all cable connections to the monitor. |
| Squeaking noise during operation | Loose bolts or parts. Lack of lubrication on moving parts. | Inspect and tighten all bolts. Apply a small amount of silicone lubricant to pedal axles or other pivot points (avoiding the belt). |
| Resistance not changing | Tension knob not properly engaged or worn friction pad. | Ensure the tension knob is fully engaged. If the issue persists, contact customer support. |
| Pedals feel loose | Pedals are not tightened sufficiently. | Retighten pedals firmly. Remember the left pedal is reverse-threaded. |
Product Specifications

Figure 8: Product Dimensions. This image provides key dimensions of the RIF6 exercise bike: 42 inches in length, 19 inches in width, and 44 inches in height, along with a maximum weight support of 275 lbs.
| Feature | Detail |
|---|---|
| Brand | RIF6 |
| Model Name | 411d66a4-5fe9-4e85-9109-cdc318aae61d |
| Special Feature | Adjustable Seat |
| Color | Black |
| Power Source | Pedal-powered (non-electric) |
| Recommended Uses | Indoor |
| Material | Alloy Steel |
| Resistance Mechanism | Friction |
| Product Dimensions (L x W x H) | 42" x 19" x 44" (from image) |
| Maximum Weight Recommendation | 275 Pounds |
| Handle Material | Alloy Steel |
| Minimum Height | 44 Inches |
| Number of Resistance Levels | 8 |
| UPC | 855599006328 |
| Drive System | Belt |
| Flywheel Weight | 40 Lb |
Warranty and Support
For warranty information, technical support, or to order replacement parts, please contact RIF6 customer service. Keep your purchase receipt and model number handy when contacting support.
RIF6 Customer Support:
- Website: Visit the RIF6 Store on Amazon (for general inquiries)
- Refer to your product packaging or the RIF6 official website for specific contact details.


