1. Introduction
Thank you for purchasing the FUZE SRC-5 Digital Voice Conversion AM/FM Radio Cassette Player. This compact and portable device allows you to enjoy your favorite cassette tapes, listen to AM/FM radio, and record audio directly to a microSD card or USB memory stick. It also features a convenient voice recorder function for meetings or personal notes. This manual provides detailed instructions to help you get the most out of your new device.
2. Product Overview

This image shows the front of the FUZE SRC-5 unit. Key digital controls are visible, including buttons for 'Speed Change/Review', 'Memo Record', 'Start/Confirm', 'Review/Repeat', 'Play', 'Stop', 'Power', and a 'Function Switch' to select between SD, Radio, or Tape modes. A digital display is located at the top, and a speaker grille is at the bottom.
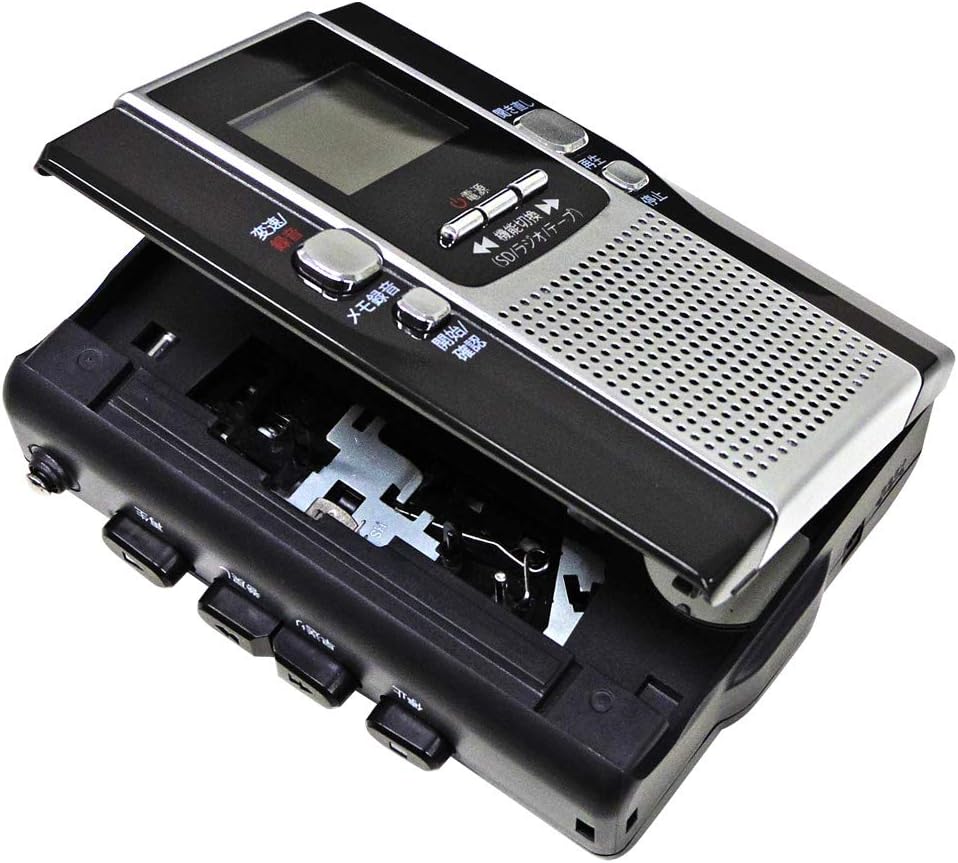
This image displays the FUZE SRC-5 with its cassette compartment open, revealing the tape mechanism. The compartment is designed for easy insertion and removal of standard cassette tapes. Note that the cassette function is for playback and digital conversion only; direct recording onto cassette tapes is not supported by this unit.
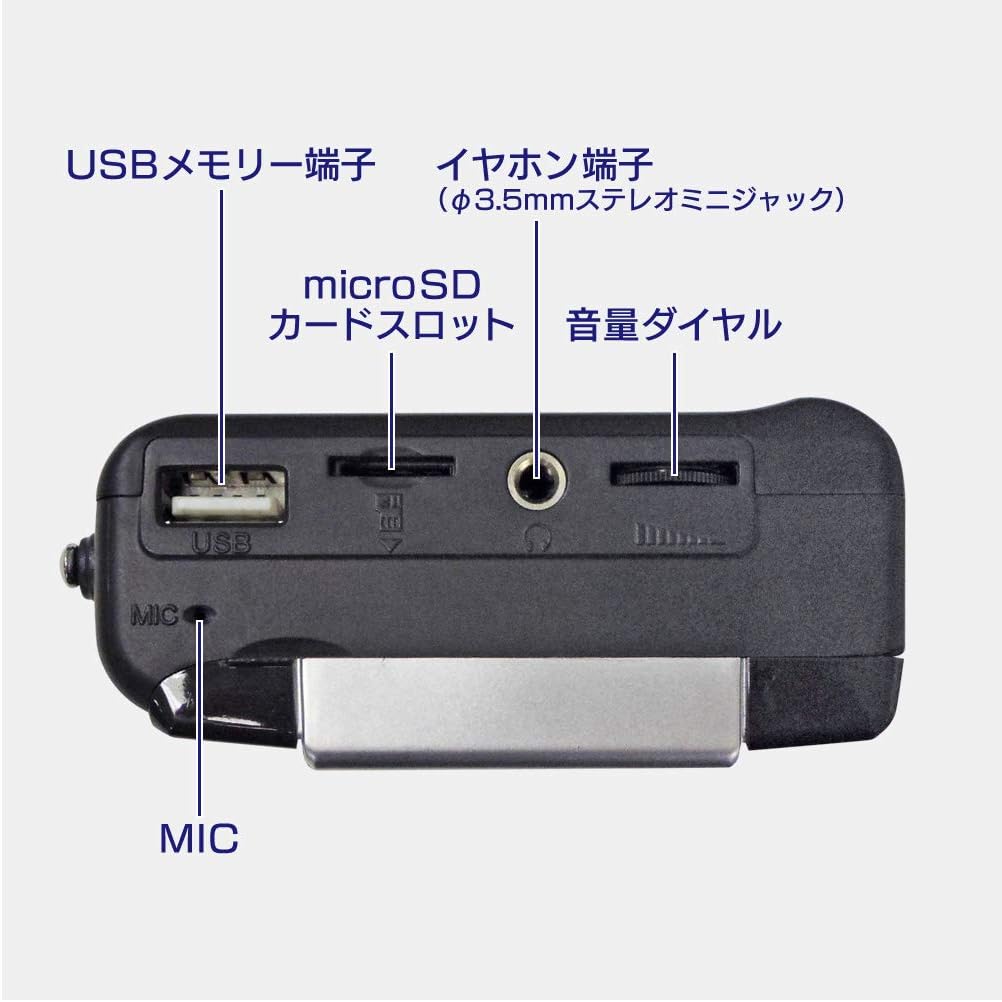
This image provides a top-down view of the FUZE SRC-5, highlighting its various ports and controls. From left to right, you can see the USB memory terminal, microSD card slot, earphone jack (3.5mm stereo mini-jack), and the volume dial. A built-in microphone (MIC) is also visible near the USB port.
2.1 Side Panel Controls (Cassette Transport)
- Play (再生): Initiates cassette playback.
- Rewind (早戻し): Rewinds the cassette tape.
- Fast Forward (早送り): Fast forwards the cassette tape.
- Stop (停止): Stops cassette playback or recording.
2.2 Front Panel Controls (Digital Functions)
- Power (電源): Turns the unit on or off.
- Function Switch (機能切換): Selects the operating mode: SD card, Radio, or Tape.
- Speed Change/Review (変速/聴音): Adjusts playback speed in review mode.
- Memo Record (メモ録音): Activates the temporary memo recording function.
- Start/Confirm (開始/確認): Starts memo recording or confirms a selection.
- Review/Repeat (聞き直し): Enables partial repeat playback for review.
- Play (再生): Initiates digital audio playback (from SD/USB).
- Stop (停止): Stops digital audio playback or recording.
2.3 Top Panel Ports
- USB Memory Terminal: For connecting a USB memory stick.
- microSD Card Slot: For inserting a microSD card (2GB-8GB supported).
- Earphone Jack: 3.5mm stereo mini-jack for connecting headphones.
- Volume Dial: Adjusts the audio output volume.
- MIC (Microphone): Built-in microphone for voice recording.
3. Setup
3.1 Power Supply
The FUZE SRC-5 can be powered by either AA batteries or the included AC adapter.
- Using AA Batteries:
- Open the battery compartment cover on the back of the unit.
- Insert two (2) AA alkaline batteries, ensuring correct polarity (+/-).
- Close the battery compartment cover securely.
- Using the AC Adapter:
- Connect the small end of the supplied AC adapter to the DC IN jack on the unit.
- Plug the AC adapter into a standard AC 100V 50/60Hz wall outlet.
3.2 Inserting a microSD Card or USB Memory Stick
To use the digital recording and playback features, insert a compatible storage device.
- microSD Card:
- Locate the microSD card slot on the top of the unit.
- Insert a microSD card (2GB to 8GB capacity) with the contacts facing down until it clicks into place.
- USB Memory Stick:
- Locate the USB memory terminal on the top of the unit.
- Insert a USB memory stick firmly into the port.
4. Operating Instructions
4.1 Basic Playback
- Cassette Tape Playback:
- Open the cassette compartment and insert a cassette tape. Close the compartment.
- Press the Power button to turn on the unit.
- Set the Function Switch to 'Tape'.
- Press the side Play button to start playback.
- Adjust the volume using the Volume Dial.
- To stop, press the side Stop button. Use Fast Forward or Rewind for tape navigation.
- microSD/USB Memory Playback (MP3):
- Ensure a microSD card or USB memory stick with MP3 files is inserted.
- Press the Power button to turn on the unit.
- Set the Function Switch to 'SD' (for microSD) or 'USB' (if available, otherwise it might auto-detect).
- Press the front Play button to start playback.
- Use the front panel buttons for Fast Forward, Rewind, Review/Repeat, and Speed Change/Review as needed.
- To stop, press the front Stop button.
4.2 Radio Operation
- Press the Power button to turn on the unit.
- Set the Function Switch to 'Radio'.
- Extend the antenna for better reception.
- Use the tuning controls (usually the Fast Forward/Rewind buttons in Radio mode) to manually tune to a station.
- Auto-Search Function: Press and hold the tuning button to automatically scan and save up to 60 stations.
- Adjust the volume using the Volume Dial.
4.3 Recording Functions
The unit supports recording from various sources directly to a microSD card or USB memory stick in MP3 format. Note: Recording directly onto a cassette tape is not supported.
- Recording from Cassette Tape to microSD/USB:
- Insert a microSD card or USB memory stick.
- Insert the cassette tape you wish to digitize.
- Set the Function Switch to 'Tape'.
- Press the side Play button to start cassette playback.
- Press the front Record button (often combined with Play or a dedicated button, refer to specific button labels if different from general 'Play'/'Stop' for digital recording) to begin recording the cassette audio to the digital storage.
- Press the front Stop button when finished.
- Recording from FM/AM Radio to microSD/USB:
- Insert a microSD card or USB memory stick.
- Tune to the desired FM/AM radio station.
- Press the front Record button to begin recording the radio broadcast.
- Press the front Stop button when finished.
- Voice Recorder Function (External Audio via MIC):
- Insert a microSD card or USB memory stick.
- Set the Function Switch to 'SD' or 'USB' mode.
- Press the front Record button (or a dedicated voice record button) to start recording audio through the built-in microphone.
- Press the front Stop button to end the recording.
- Memo Recording Mode:
- Press the Memo Record button.
- Press the Start/Confirm button to begin a temporary recording (approximately 40 seconds).
- Press the Start/Confirm button again to play back the memo recording.
5. Maintenance
5.1 Cleaning the Cassette Mechanism
Regular cleaning of the cassette heads, pinch rollers, and capstan is essential for optimal sound quality and to prevent tape damage. It is recommended to clean these components after approximately 10 hours of playback or every 10 tapes.
- Open the cassette compartment.
- Using a cotton swab lightly dampened with isopropyl alcohol, gently clean the tape heads, pinch rollers, and capstan.
- Allow the components to dry completely before inserting a tape.
5.2 Battery Replacement
If the unit's performance degrades or it fails to power on with batteries, replace them with new AA alkaline batteries. Ensure correct polarity.
6. Troubleshooting
- No Power:
- Check if the AC adapter is securely plugged into both the unit and the wall outlet.
- If using batteries, ensure they are inserted correctly with the right polarity and are not depleted. Replace with new batteries if necessary.
- Poor Radio Reception:
- Extend the telescopic antenna fully.
- Adjust the position and direction of the unit for better signal reception.
- Move away from sources of interference such as computers, TVs, or other electronic devices.
- Cassette Playback Issues (Muffled Sound, Tape Winding):
- Clean the tape heads, pinch rollers, and capstan as described in the Maintenance section.
- Ensure the cassette tape is not damaged or tangled.
- Note that cassette tapes exceeding 100 minutes or non-normal position tapes are not supported.
- Recording Not Working:
- Ensure a compatible microSD card (2GB-8GB) or USB memory stick is properly inserted and has sufficient free space.
- Verify that the correct function mode (Tape, Radio, or SD/USB for MIC) is selected.
- Confirm that the source (cassette playing, radio tuned, microphone active) is providing audio.
7. Specifications
| Feature | Description |
|---|---|
| Playback Sources | Cassette Tape, microSD Card (MP3 format), USB Memory (MP3 format) |
| Playback Format | MP3 |
| Recording Sources | Cassette Tape to microSD/USB, External Audio (MIC) to microSD/USB, FM/AM Radio to microSD/USB |
| Recording Format | MP3 |
| FM Radio Frequency | 76.0 - 90.0 MHz |
| AM Radio Frequency | 522 - 1710 kHz |
| microSD Card Support | 2GB - 8GB |
| Terminals | Earphone Jack, USB Terminal, microSD Card Slot |
| Power Supply | 2 x AA Batteries / AC Adapter (Input: AC100V 50/60Hz 0.3A / Output: 5.0V 600mA) |
| Dimensions (W x H x D) | Approx. 89 x 117 x 40 mm |
| Weight | Approx. 250 g |
| Included Accessories | AC Adapter, Earphones, Instruction Manual, Warranty Card |
Important Notes:
- Cassette tapes exceeding 100 minutes in length are not supported.
- Only normal position cassette tapes are supported.
- The cassette tape mechanism is for playback and digital conversion only; direct recording onto cassette tapes is not possible.
8. Warranty and Support
This product comes with a warranty. Please refer to the included warranty card for details regarding warranty period and terms. For technical support or inquiries not covered in this manual, please contact your retailer or the manufacturer's customer service.


