1. Introduction
This manual provides detailed instructions for the setup, operation, and maintenance of your Posunitech GS02 Wearable Barcode Scanner. The GS02 is designed for efficient barcode data capture in various environments, offering hands-free operation and robust connectivity.
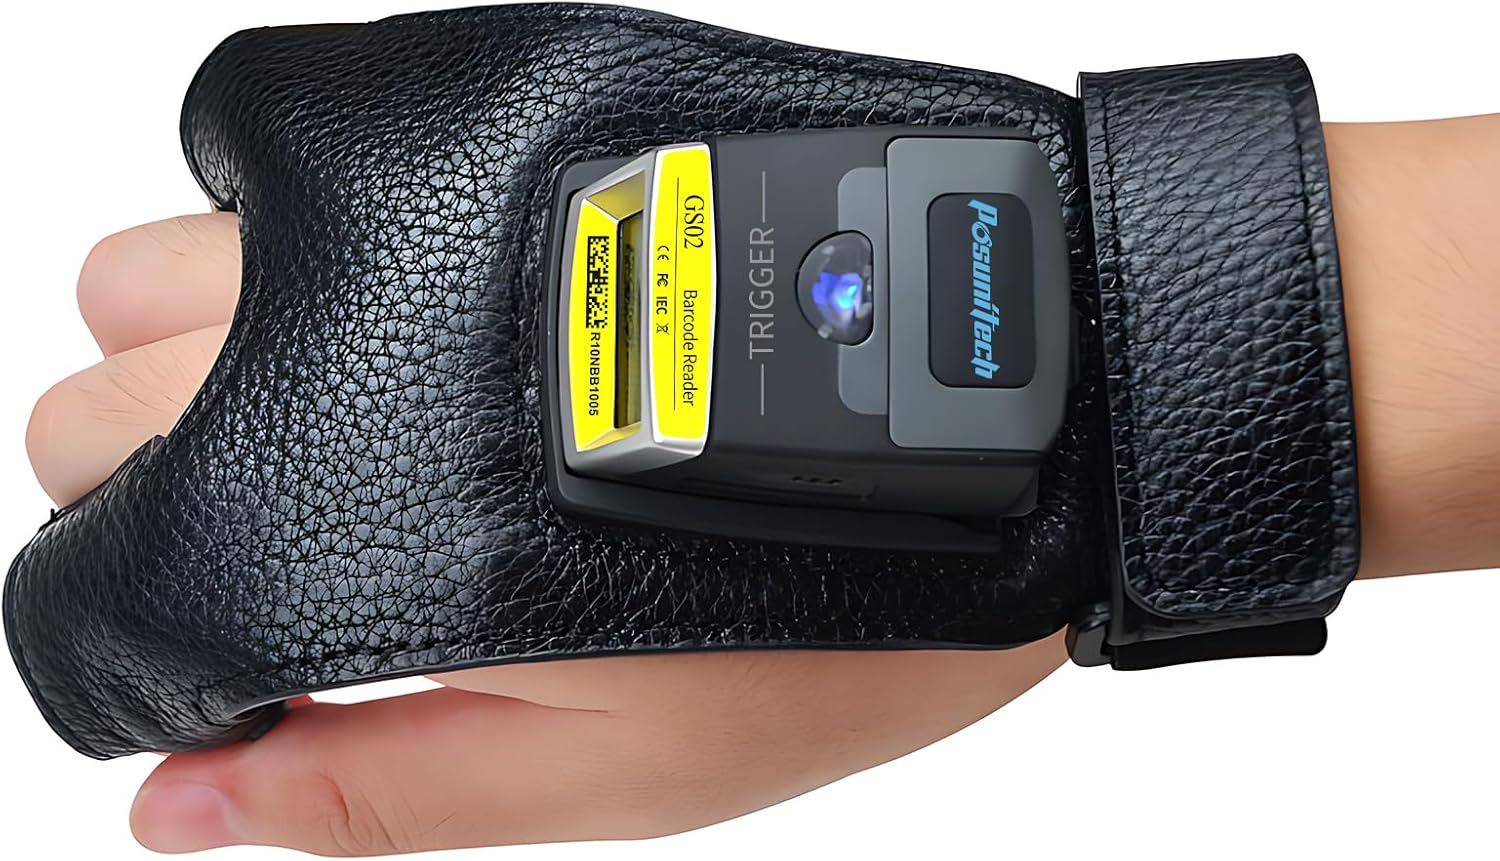
Image 1.1: The Posunitech GS02 wearable barcode scanner securely fitted on a user's hand, demonstrating its hands-free design.
2. What's in the Box
Verify that all components are present in your package:
- GS02 Barcode Scanner Unit
- Wearable Glove
- USB Charging Cable
- Lanyard
- User Manual (this document)

Image 2.1: An overview of the items included in the Posunitech GS02 scanner package.
3. Product Overview
Familiarize yourself with the main components of the GS02 scanner:
- Scan Window: Area where barcodes are read.
- Indicator LED Light: Provides status feedback (e.g., power, connection, scan success).
- Trigger Button: Activates the scanning function.
- Removable Battery: Provides power to the device.
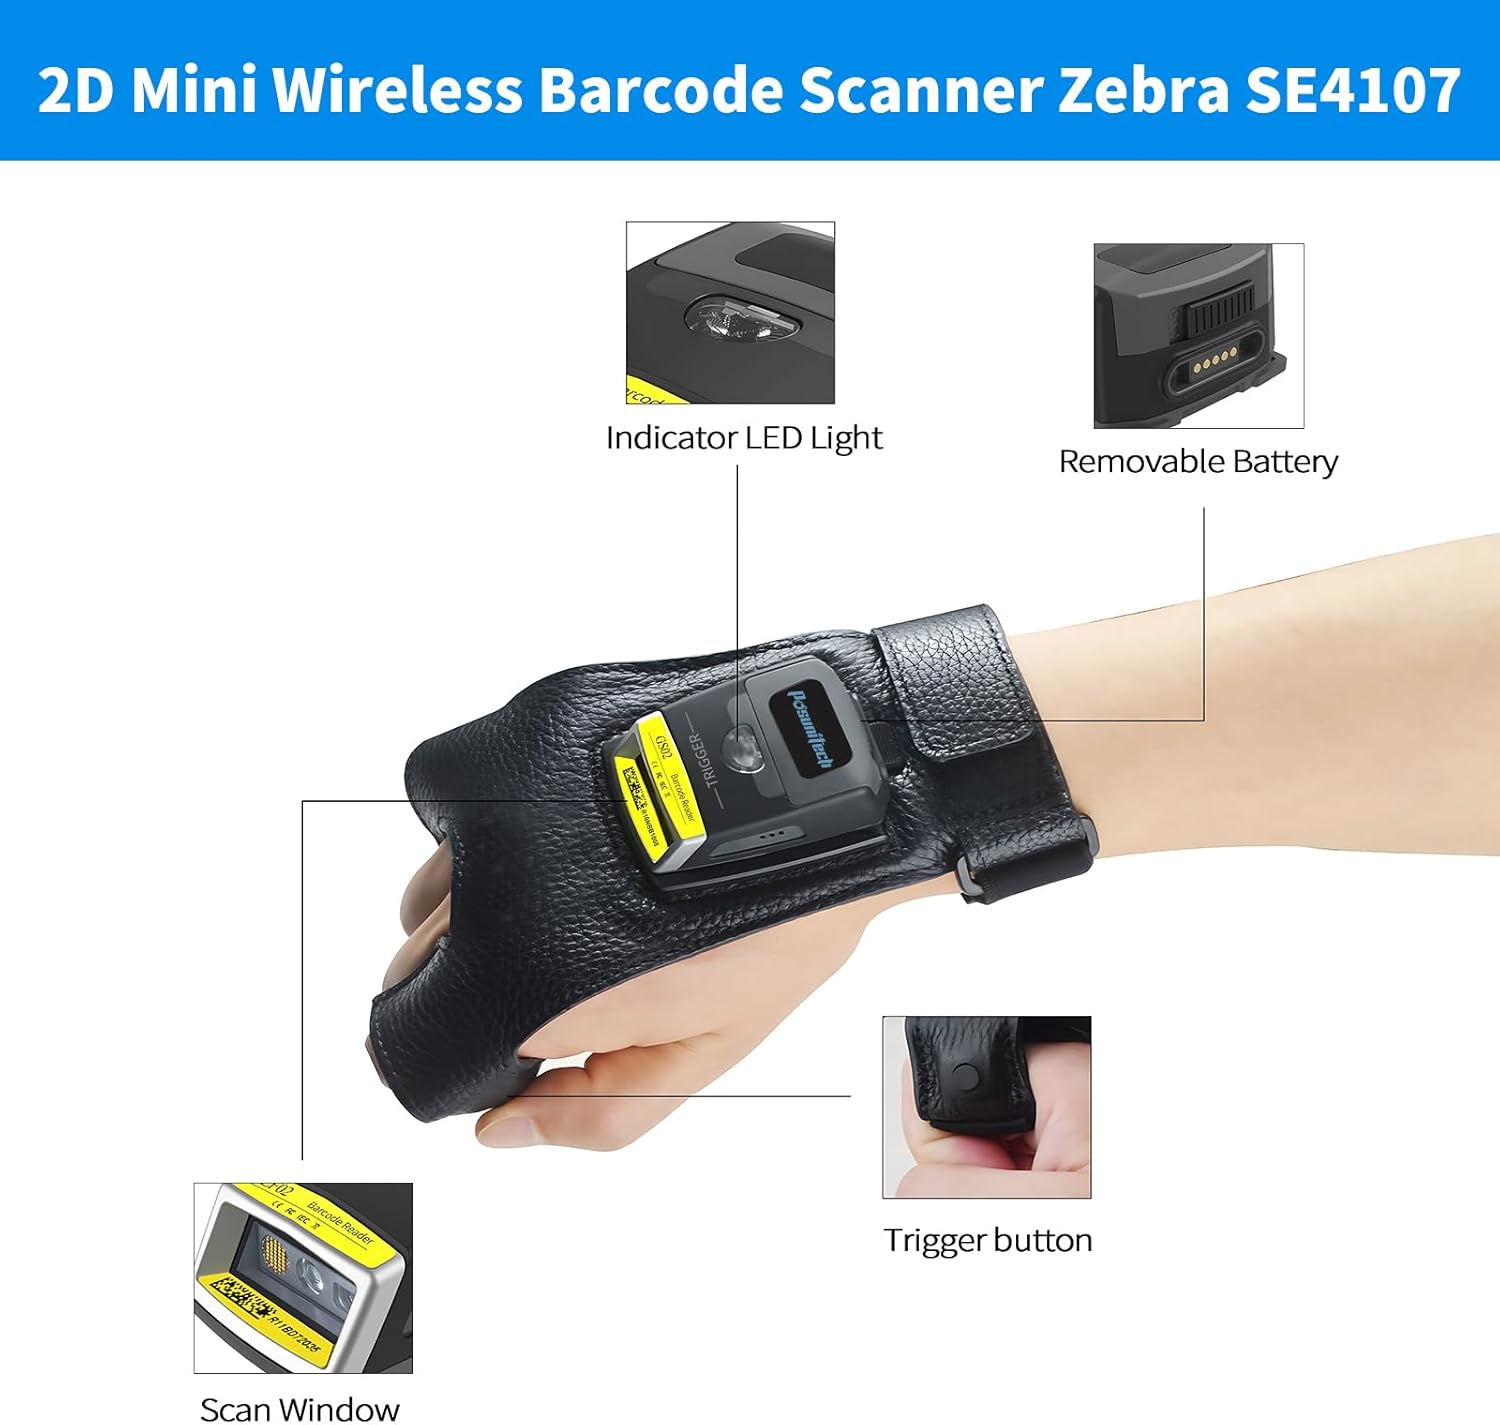
Image 3.1: Labeled diagram showing the main parts of the GS02 scanner unit.
4. Setup and Installation
4.1 Attaching the Scanner to the Glove
- Ensure the scanner unit is charged (refer to Section 7 for battery information).
- Slide the GS02 scanner unit into the designated slot on the wearable glove. The elastic button mechanism secures the scanner in place.
- Adjust the glove for a comfortable and secure fit on your hand.

Image 4.1: The finger trigger button, located on the underside of the glove, allows for easy scanning activation.
4.2 Initial Pairing (Bluetooth)
- Power on the GS02 scanner by pressing the wake button. The indicator LED will show its status.
- On your host device (computer, smartphone, tablet), enable Bluetooth and search for available devices.
- Select 'GS02 Scanner' from the list of discovered devices to initiate pairing.
- Once paired, the scanner will function as a keyboard input device.
4.3 NFC Pairing (for compatible Android devices)
For quick pairing with NFC-enabled Android devices:
- Ensure NFC is enabled on your Android device.
- Tap the GS02 scanner against the NFC detection area of your Android device.
- Follow any on-screen prompts to complete the pairing process.

Image 4.2: A user performing NFC pairing by tapping the GS02 scanner to an Android smartphone.
5. Operating Instructions
5.1 Scanning Barcodes
- Point the scan window of the GS02 scanner towards the barcode you wish to read.
- Press the trigger button on the glove to activate the scanner. A red scan line will appear.
- Ensure the scan line crosses the entire barcode. A successful scan is typically indicated by an audible beep and/or a change in the indicator LED.
- The scanned data will be transmitted to your connected host device.
5.2 Scanning Modes
The GS02 supports two primary scanning modes:
- Key Trigger Mode: The scanner activates only when the trigger button is pressed. This is suitable for individual scans.
- Continuous Mode: The scanner remains active and continuously scans, ideal for high-volume scanning tasks. Refer to the full user guide for instructions on switching between modes.

Image 5.1: Visual representation of Key Trigger Mode and Continuous Mode scanning patterns.
5.3 Decode Capabilities
The GS02 scanner is capable of decoding a wide range of 1D and 2D barcodes, including those displayed on screens and printed on paper:
- UPC-A, UPC-E, EAN-13, EAN-8, ISBN/ISSN
- Code 39, Code 32, Code 128, Code bar
- Interleaved 2 of 5, Industrial 2 of 5
- Code 93, Code 11
- EAN-13, JAN.EAN/UPC Add-on2/5
- MSI/Plessey, Telepen, Matrix 2 of 5, UCC/EAN128 code, etc.

Image 5.2: The GS02 scanner can read both printed barcodes and digital barcodes displayed on screens.
6. Battery Information
The GS02 scanner is equipped with a 550mAh replaceable battery, designed for extended operation.
- Battery Capacity: 550mAh
- Continuous Scan Time: Approximately 10-11 hours after a full charge.
- Charging Time: Approximately 1.5-2 hours using the provided USB charging cable.
- Standby Time: Up to 720 hours.

Image 6.1: Battery specifications for the GS02 scanner.
7. Compatibility
The Posunitech GS02 scanner is compatible with a variety of operating systems and software applications, functioning as a standard keyboard input device:
- Operating Systems: Windows, Mac, iOS, Android, Linux.
- Software: Works with common applications such as Word, Excel, Novell, and other management systems that accept keyboard input.
8. Maintenance
8.1 Cleaning
- Regularly clean the scan window with a soft, lint-free cloth to ensure optimal scanning performance.
- Do not use abrasive cleaners or solvents.
- The device has an IP65 rating, indicating protection against dust and low-pressure water jets. However, avoid submerging the device in water.
8.2 Battery Care
- Charge the battery fully before first use.
- Avoid extreme temperatures when storing or operating the device.
- If the device will not be used for an extended period, charge it periodically to maintain battery health.
8.3 Durability
The GS02 scanner features a shockproof design, capable of withstanding impacts from drops of up to 1.5 meters (5 feet) onto concrete floors.

Image 8.1: The GS02 scanner's ability to withstand drops from 1.5 meters.
9. Troubleshooting
9.1 Scanner Not Pairing
- Ensure the scanner is powered on and has sufficient battery charge.
- Verify Bluetooth is enabled on your host device and the scanner is in pairing mode.
- Try restarting both the scanner and your host device.
- If using NFC, ensure NFC is active on your Android device and you are tapping the correct area.
9.2 Barcodes Not Scanning
- Check that the scan window is clean and free from obstructions.
- Ensure the barcode is not damaged or poorly printed.
- Adjust the distance and angle between the scanner and the barcode.
- Verify that the barcode type is supported by the GS02 (refer to Section 5.3).
- Confirm the scanner is in the correct scanning mode (Key Trigger or Continuous).
9.3 Incorrect Data Output
- Ensure your host device's keyboard layout matches the scanner's settings (if configurable).
- Some barcodes may include start/stop characters or other formatting. Consult the full user manual for advanced configuration options regarding data output.
10. Specifications
| Feature | Specification |
|---|---|
| Model | GS02 |
| Product Dimensions | 6.3 x 5.51 x 2.76 inches (16.0 x 14.0 x 7.0 cm) |
| Item Weight | 6.7 ounces (190 grams) |
| Connectivity Technology | Bluetooth, USB Cable |
| Power Source | Battery Powered (550mAh replaceable battery) |
| Compatible Devices | Desktop, Laptop, Smartphone |
| Manufacturer | Posunitech |
| Decode Capability | 1D, 2D, QR (Zebra SE4107 engine) |
| Ingress Protection (IP) Rating | IP65 |
11. Warranty and Support
For warranty information and technical support, please refer to the official Posunitech website or contact their customer service directly. Keep your purchase receipt for warranty claims.
Manufacturer: Posunitech
Website: Visit the Posunitech Store on Amazon


