1. Introduction
This manual provides detailed instructions for the installation, setup, and operation of your Steren LOCK-500 Wi-Fi Digital Smart Lock. Please read this manual thoroughly before installation and use to ensure proper function and safety. Keep this manual for future reference.
2. Safety Information
Important Safety Instructions:
- Do not attempt to disassemble or repair the lock yourself. Contact qualified service personnel.
- Ensure all components are installed correctly according to the instructions to prevent malfunction.
- Keep physical keys in a secure location away from the lock.
- Regularly check battery levels and replace them when indicated to avoid lockouts.
- Protect your numeric codes and RFID cards from unauthorized access.
- This lock is designed for indoor use or protected outdoor environments. Avoid direct exposure to extreme weather conditions.
3. Package Contents
Verify that all items are present in your package:
- Steren LOCK-500 Digital Smart Lock (Front and Rear Panels)
- Mortise Lock Body
- Strike Plate and Strike Box
- Mounting Hardware (Screws, Spindles)
- 2 x Physical Keys
- 4 x RFID Cards
- Installation Template
- User Manual (This document)

Image: Steren LOCK-500 Smart Lock with its retail packaging, showing the lock unit, physical keys, and RFID cards.
4. Product Overview
Familiarize yourself with the components of your Steren LOCK-500 smart lock.
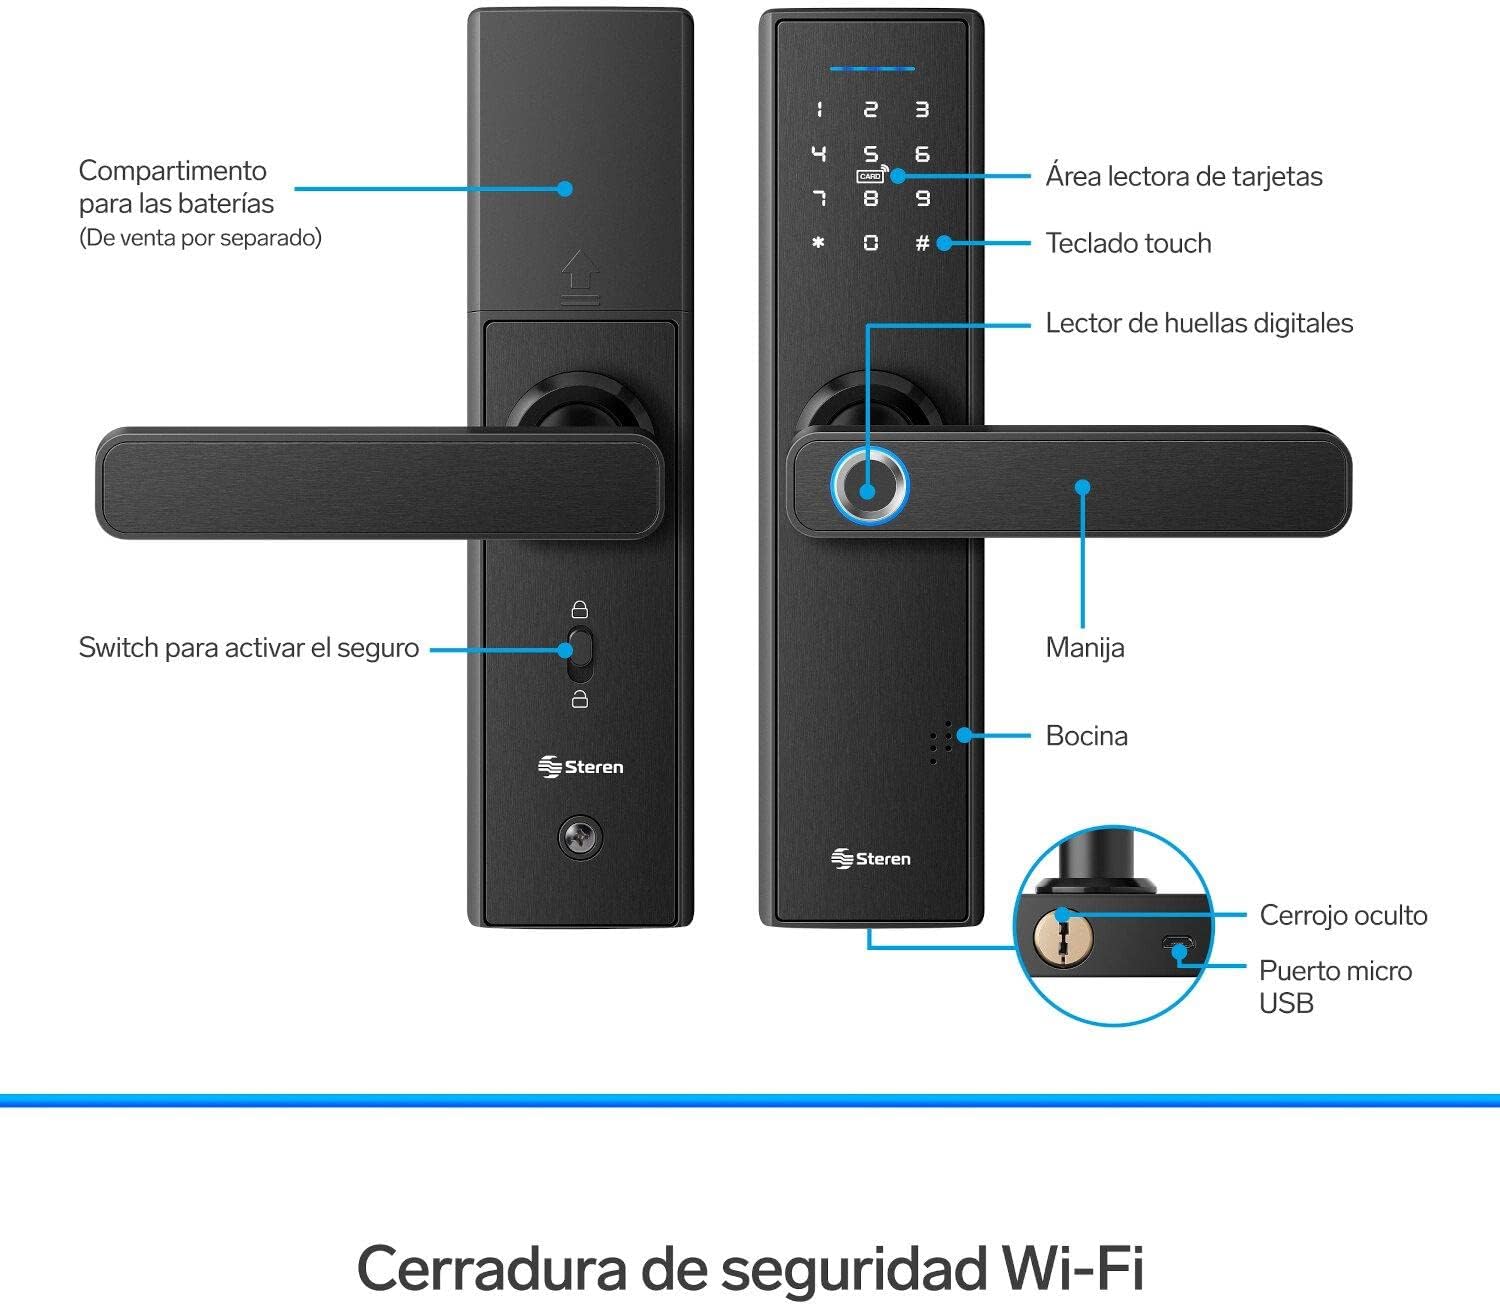
Image: Detailed diagram of the Steren LOCK-500 smart lock, highlighting key components such as the card reader area, touch keypad, fingerprint reader, handle, speaker, battery compartment, security switch, hidden deadbolt, and micro USB port.
- Card Reader Area: For RFID card access.
- Touch Keypad: For numeric code entry.
- Fingerprint Reader: For biometric access.
- Handle: To open the door after successful authentication.
- Speaker: Provides audio feedback for operations and alarms.
- Battery Compartment: Located on the interior panel (batteries sold separately).
- Security Switch: Activates the internal deadbolt for added security.
- Hidden Deadbolt: Manual key override.
- Micro USB Port: For emergency power supply.
5. Installation
The Steren LOCK-500 is designed for doors with a thickness of 35 mm to 50 mm and is compatible with both left and right-opening doors. Professional installation is recommended.
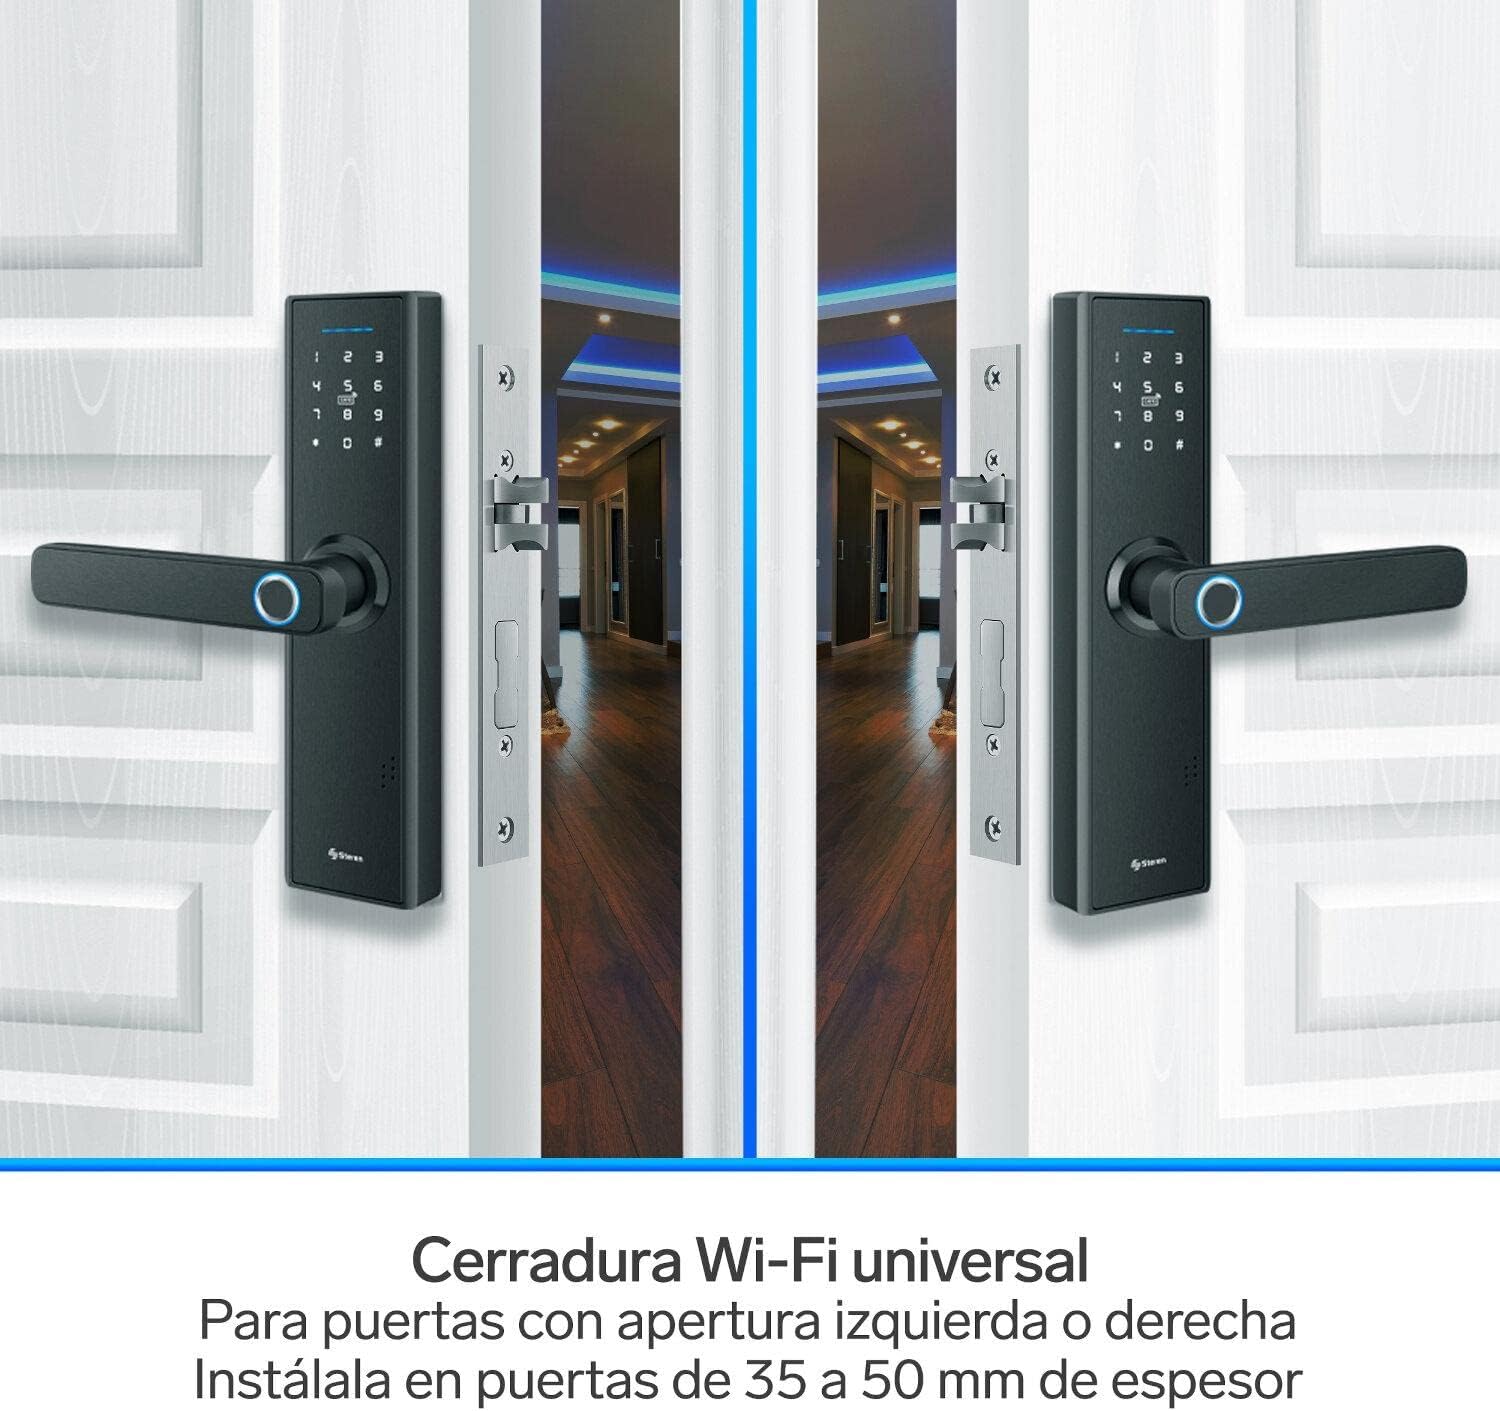
Image: Two Steren LOCK-500 smart locks installed on double doors, illustrating its universal fit for both left and right-opening doors and compatibility with door thicknesses between 35mm and 50mm.
5.1 Pre-Installation Check
- Ensure your door meets the thickness requirements (35-50 mm).
- Check door frame for proper alignment and clearance.
- Gather necessary tools: screwdriver, drill, measuring tape, pencil.
5.2 Step-by-Step Installation
- Prepare the Door: Use the provided template to mark and drill holes on your door.
- Install the Mortise Lock Body: Insert the mortise into the door edge and secure it with screws.
- Install the Exterior Panel: Route the cables through the door and align the exterior panel.
- Install the Interior Panel: Connect the cables from the exterior panel to the interior panel. Secure the interior panel with mounting screws.
- Insert Batteries: Open the battery compartment on the interior panel and insert 4 AA batteries (not included).
- Test Operation: After installation, test all functions (handle, keypad, fingerprint, key) to ensure smooth operation.

Image: Technical drawing showing the dimensions of the Steren LOCK-500 smart lock, including its length (24 cm), width (6.2 cm), handle length (13.5 cm), and thickness (2.2 cm and 4.8 cm for the handle).
6. Initial Setup and App Connection
To unlock the full potential of your Steren LOCK-500, connect it to the Steren Home App.

Image: A smartphone displaying the Steren Home App interface, showing controls for the smart lock. The lock itself is visible in the background, indicating remote control capabilities.
6.1 Download the Steren Home App
- Search for "Steren Home" on the App Store (iOS) or Google Play Store (Android).
- Install the app on your smartphone.
6.2 Connect to Wi-Fi
- Ensure your Wi-Fi network is 2.4 GHz. The lock does not support 5 GHz networks.
- Follow the in-app instructions to add your LOCK-500 device. This typically involves putting the lock into pairing mode and entering your Wi-Fi credentials.
6.3 User Management
- Administrator Setup: The first user registered via the app will be the administrator.
- Adding Users: Use the app to add new users and assign them access methods (fingerprint, code, RFID card).
- Temporary Codes: Generate temporary numeric codes for guests or service providers directly from the app. These codes can be time-limited or single-use.

Image: Two individuals on their phones, illustrating the feature of creating and sharing temporary access codes for the smart lock with friends or family.
7. Operating Instructions
The Steren LOCK-500 offers multiple ways to access your property.

Image: A Steren LOCK-500 smart lock installed on a door, with icons illustrating its five primary access methods: fingerprint, numeric codes, RFID cards, mobile app control, and physical keys.
7.1 Access Methods
- Fingerprint: Place your registered finger on the fingerprint reader. The lock will unlock upon successful verification.
- Numeric Code: Enter your registered numeric code on the touch keypad, followed by the '#' key.
- RFID Card: Present a registered RFID card to the card reader area. The lock will unlock.
- Mobile App (Remote Access): Use the Steren Home App on your smartphone to remotely unlock the door. Ensure your phone and the lock are connected to the internet.
- Physical Key: In case of emergency or battery depletion, use the physical key to manually unlock the door. The keyhole is typically located at the bottom of the exterior handle.
7.2 Locking the Door
- Automatic Locking: The lock can be configured to automatically lock after a set period (e.g., 5 seconds) after closing.
- Manual Locking: From the exterior, press the '#' key for 2 seconds. From the interior, use the security switch or turn the handle upwards.
7.3 Emergency Power
If the batteries are completely depleted, you can provide emergency power using a power bank connected to the micro USB port on the exterior panel. This will allow you to use an electronic access method to open the lock and replace the batteries.
8. Maintenance
- Battery Replacement: Replace all four AA batteries when the low battery indicator appears or when the lock provides a low battery warning sound. Do not mix old and new batteries.
- Cleaning: Wipe the lock's surface with a soft, dry cloth. Avoid using abrasive cleaners or solvents that could damage the finish or electronic components.
- Fingerprint Sensor: Keep the fingerprint sensor clean and dry for optimal performance.
- Regular Checks: Periodically check that all screws are tight and the lock operates smoothly.
9. Troubleshooting
| Problem | Possible Cause | Solution |
|---|---|---|
| Lock does not respond. | Dead batteries. | Use emergency power via Micro USB port and replace batteries. |
| Fingerprint not recognized. | Finger is dirty, wet, or sensor is obstructed. Fingerprint not properly registered. | Clean and dry finger/sensor. Re-register fingerprint if issues persist. |
| Numeric code not working. | Incorrect code entered. Code expired (temporary). | Verify code. Check app for code validity. |
| Cannot connect to Wi-Fi. | Incorrect Wi-Fi password. Router is 5 GHz only. Lock is too far from router. | Ensure 2.4 GHz network. Verify password. Move router closer or use a Wi-Fi extender. |
| Alarm sounds after multiple attempts. | Multiple incorrect access attempts. | This is a security feature. Wait for the alarm to clear or use a valid access method. |
10. Specifications
| Feature | Detail |
|---|---|
| Model | LOCK-500 |
| Brand | STEREN |
| Access Methods | Fingerprint, Numeric Code, RFID Card, Mobile App, Physical Key |
| Connectivity | Wi-Fi (2.4 GHz only) |
| Power Supply | 4 x AA Batteries (not included) |
| Emergency Power | Micro USB Port |
| Door Thickness Compatibility | 35 mm - 50 mm |
| Material | Alloy Steel |
| Dimensions (L x W x H) | 5.08 x 17.78 x 30.48 cm (2 x 7 x 12 inches) |
| Weight | 1.98 kg |
11. Warranty and Support
For warranty information and technical support, please refer to the official Steren website or contact their customer service directly.
- Manufacturer: Steren
- Website: www.steren.com.mx (Please check your regional Steren website for specific contact details)
- Warranty: Information regarding product warranty is typically provided with the purchase documentation or available on the manufacturer's website.


