Introduction
This manual provides detailed instructions for the assembly, use, and maintenance of your Spilay Dollhouse Dust Proof Cover, specifically designed for the Yaquan Courtyard P006 miniature house. This accessory helps protect your miniature creation from dust and environmental elements, preserving its intricate details.
Product Overview
The Spilay Dust Proof Cover is constructed from high-quality plexiglass, offering clear visibility and durable protection. It is designed for a precise fit with the P006 Yaquan Courtyard dollhouse model. The cover provides 360-degree protection, ensuring your dollhouse remains clean and well-preserved.
- Material: High-quality plexiglass (acrylic) for clarity and durability.
- Compatibility: Specifically designed for the Spilay P006 Yaquan Courtyard dollhouse.
- Protection: Offers comprehensive dust protection.
Package Contents
Please verify that all components are present before beginning assembly:
- 5 pieces of plexiglass (acrylic) panels for the dust cover.
- Instruction manual (this document).
Note: Glue and batteries are not included in the package due to shipping restrictions. Silicone liquid glue is recommended for assembly.
Setup and Assembly Instructions
Follow these steps to assemble your dust proof cover. Refer to the diagrams for visual guidance.
- Identify Components: The dust cover consists of 5 plexiglass panels: two A7 panels (34.9 x 29.5 x 0.15 CM), two A8 panels (29.5 x 25.8 x 0.15 CM), and one A9 panel (34.9 x 26.1 x 0.15 CM).
- Remove Protective Film: Carefully peel off the kraft paper and transparent protective film from both sides of each plexiglass panel. This step requires patience as the film can sometimes be difficult to remove. Using a piece of duct tape to lift an edge can assist in removal.
- Assemble Side Panels: Begin by attaching the two A8 side panels to the base of your dollhouse, ensuring they are positioned correctly according to the dollhouse's dimensions. Use silicone liquid glue to secure the edges.
- Attach Front and Back Panels: Next, attach the two A7 panels to form the front and back of the dust cover, aligning them with the A8 side panels and the dollhouse base. Apply glue along the joining edges.
- Secure Top Panel: Finally, place the A9 panel on top, aligning it with the assembled side, front, and back panels. Secure it with glue.
- Reinforce Joints (Optional): After the glue has dried, you may use clear scotch tape along the four corners of the top panel and the four vertical edges to provide additional stability and a tighter seal. (Tape is not included).

Figure 1: Exploded view of dust cover components, indicating assembly direction.
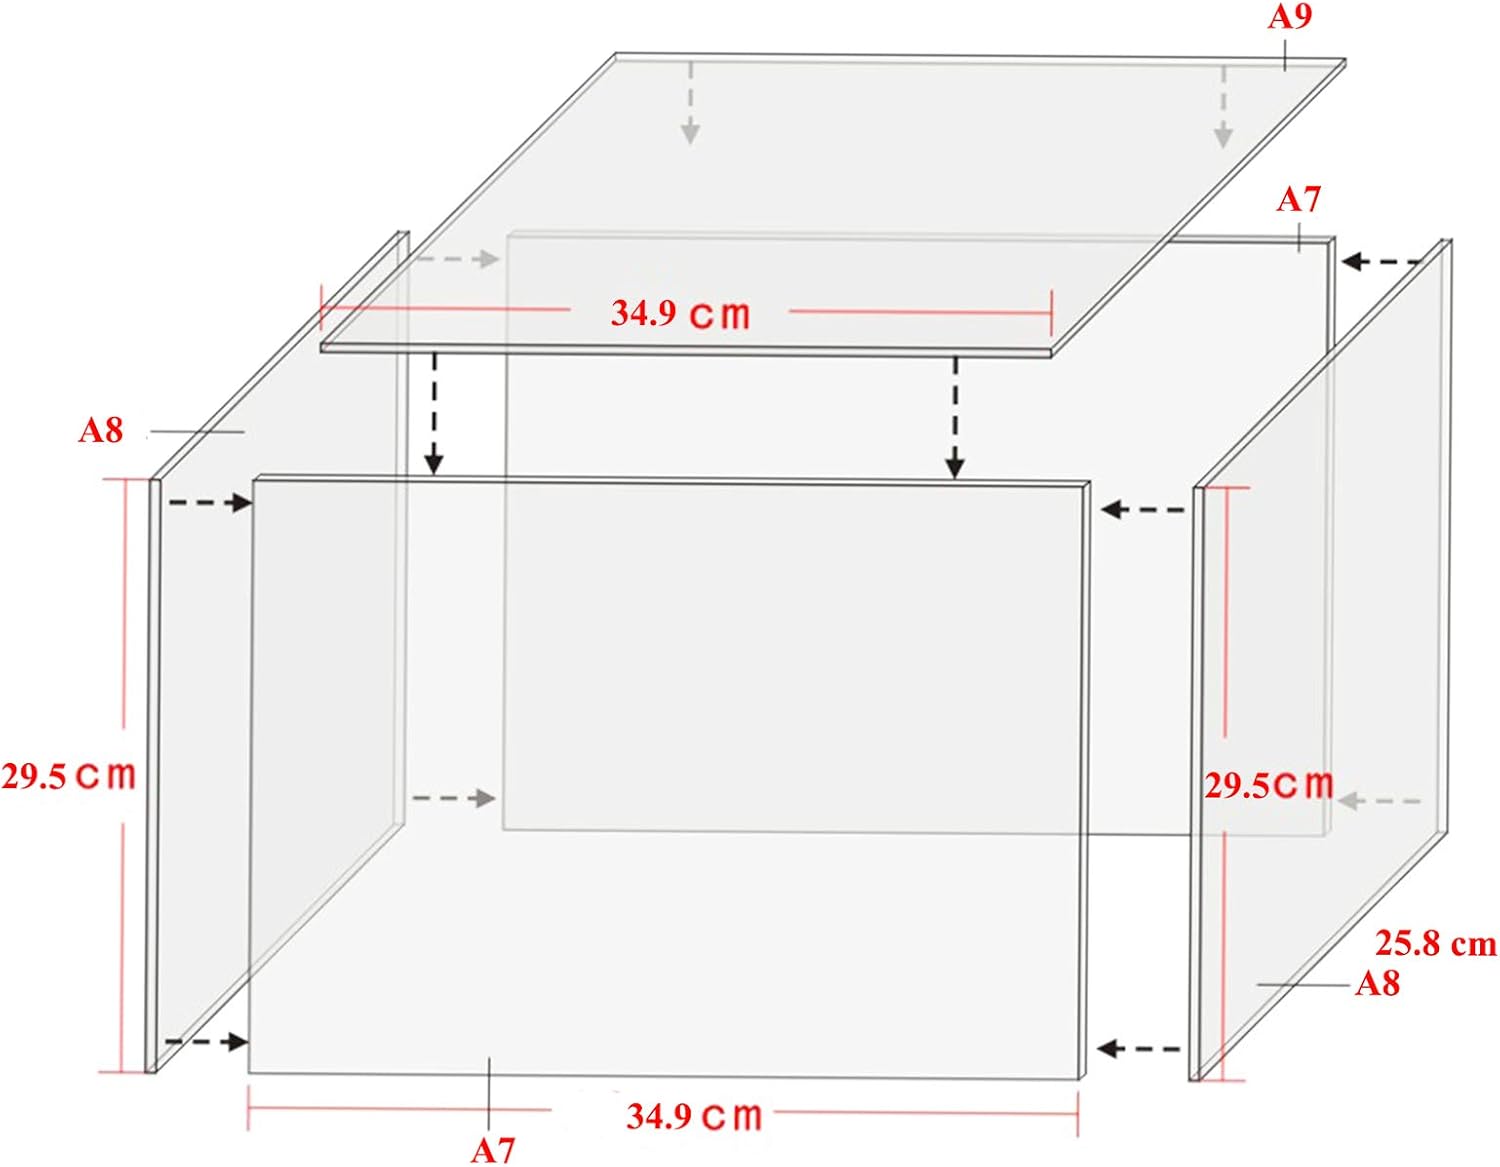
Figure 2: Dimensions of the dust cover panels and overall assembled size.

Figure 3: Product information detailing panel types and quantities.
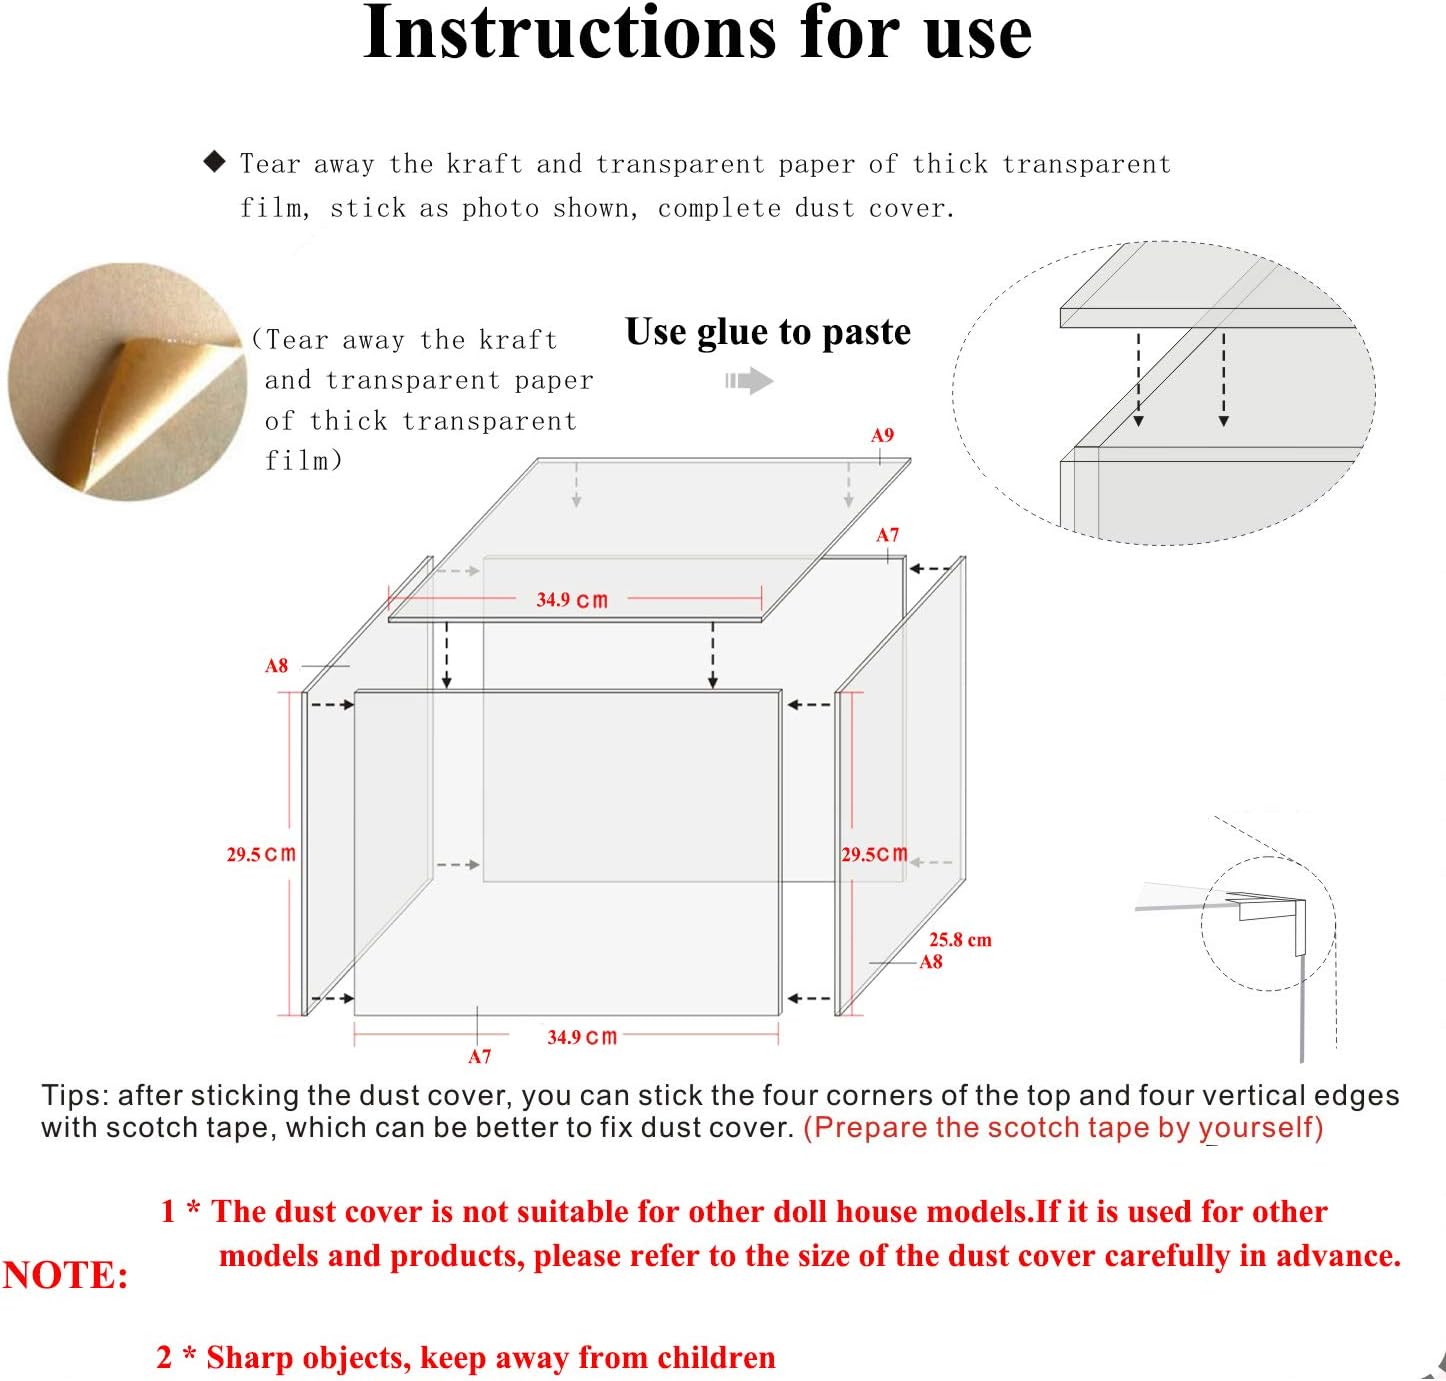
Figure 4: Visual guide for protective film removal and glue application during assembly.
Video 1: Demonstration of placing the assembled dust cover over the Spilay Yaquan Courtyard P006 dollhouse.
Operating Instructions
Once assembled, the dust cover is designed to be placed directly over your Spilay P006 Yaquan Courtyard dollhouse. Its precise dimensions ensure a snug fit, providing an enclosed environment to protect your miniature display from dust accumulation.

Figure 5: Front view of the dollhouse with the dust cover installed.

Figure 6: Side view of the dollhouse with the dust cover installed.
Maintenance
To clean the plexiglass dust cover, use a soft, damp cloth (such as a microfiber towel) with water. Avoid abrasive cleaners or harsh chemicals, as these can scratch or damage the plexiglass surface. Gently wipe the surfaces to remove dust and smudges.
Troubleshooting
- Difficulty Removing Protective Film: If the protective film is difficult to peel, try using a piece of strong tape (like duct tape) to firmly press onto a corner of the film and then slowly pull it away from the plexiglass panel. Pull parallel to the sheet to minimize tearing.
- Missing or Incorrect Pieces: In the event of missing or incorrect components, please contact Spilay customer support with your purchase details.
- Unstable Assembly: Ensure that sufficient silicone liquid glue is applied to all joining edges and allowed to dry completely. For added stability, clear scotch tape can be used on the exterior seams after the glue has cured.
Specifications
| Feature | Detail |
|---|---|
| Brand | Spilay |
| Model Number | P006 DUST COVER |
| Material | Plexiglass (Acrylic) |
| Color | Transparent |
| Assembled Dimensions (L x W x H) | 34.9 CM x 25.8 CM x 29.5 CM (13.74 x 10.16 x 11.61 inches) |
| Item Weight | 0.5 Kilograms (1.1 pounds) |
| Mounting Type | Tabletop Mount |
| Manufacturer Recommended Age | 14 years and up |
Safety Information
- Recommended for ages 14 and up.
- Keep sharp objects away from children during assembly.
- Handle plexiglass panels with care to avoid scratches or breakage.
Warranty and Support
Spilay products are inspected for completeness before delivery. If you encounter any issues during assembly or have questions regarding your dust cover, please contact Spilay customer service for assistance. While specific warranty details are not provided, Spilay is committed to resolving any problems promptly.


