1. Introduction
This manual provides essential information for the safe and effective use of your HXJNLDC 802540 3.7V 900mAh Lithium Battery. Please read these instructions carefully before installation and operation to ensure proper function and longevity of the battery.
2. Important Safety Information
Failure to follow these safety instructions may result in fire, electric shock, injury, or damage to the product or property.
- The red wire is positive ("+"), and the black wire is negative ("-"). Do not reverse-charge or reverse-connect.
- Do not use the battery if it shows conspicuous damage or deformation.
- Do not use leaky batteries.
- Do not put the battery into fire, water, or allow it to get wet.
- Do not drive a nail into the battery, strike it with a hammer, or tread on it.
- Avoid charging near a fire or in direct sunlight.

Image: A lithium polymer battery with a caution label, emphasizing warnings against reverse charging, damage, and extreme conditions.
3. Product Compatibility
This HXJNLDC 802540 battery is compatible with the following Sena Bluetooth Headset series:
- Sena 10S series (including Sena 10S-01)
- Sena 20S series (including Sena 20S-01, Sena 20S Evo)
- Sena 30K series (including Sena 30K-01D)
It can also be used in other 3.7-5V electronic products with power less than 3.33Wh (900mAh). This battery is not applicable to high-power electric tools or model aircraft.
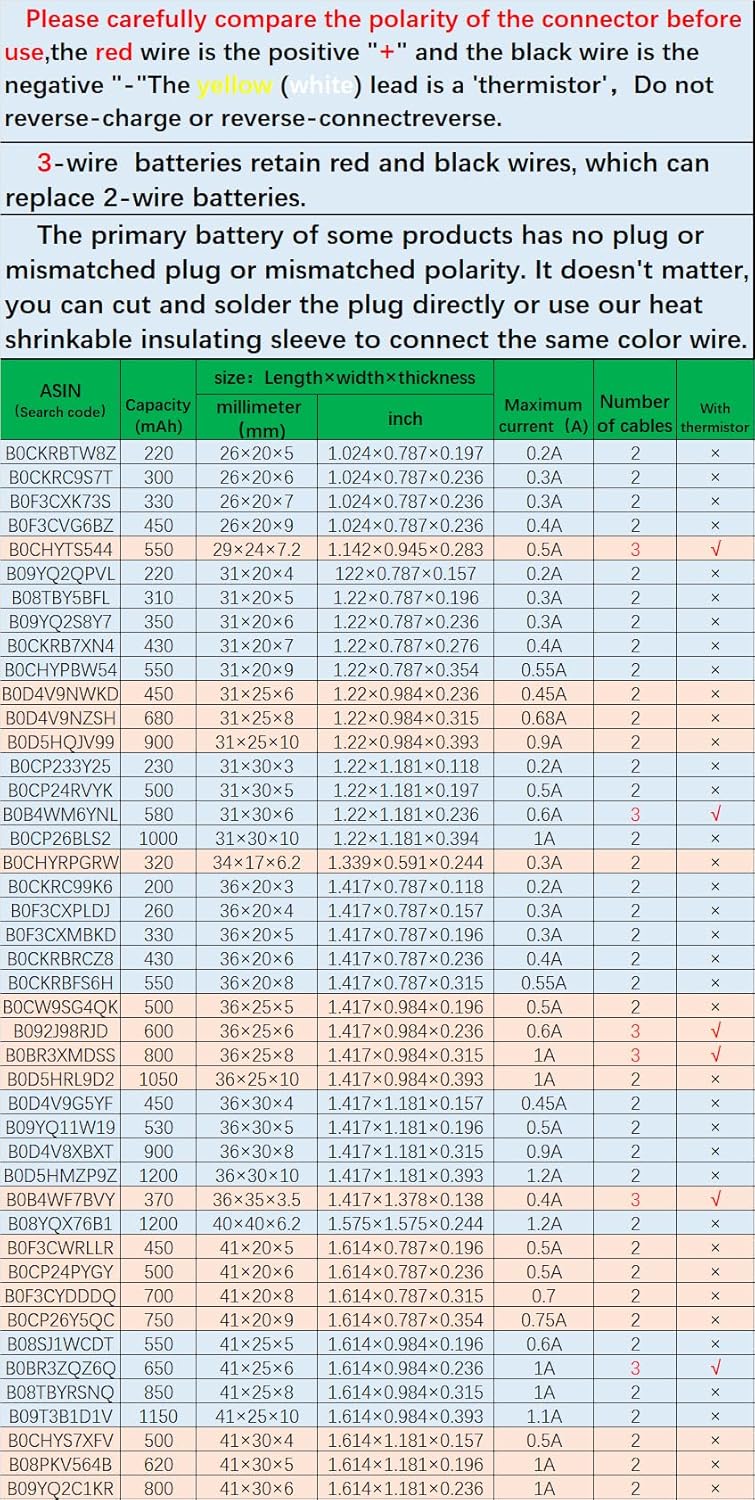
Image: A visual representation of the battery's dimensions and a list of compatible Sena headset models.
4. Product Specifications
| Feature | Specification |
|---|---|
| Battery Type | Rechargeable Lithium Ion Polymer (LiPo) |
| Model Number | 802540 |
| Nominal Voltage | 3.7V |
| Full Charge Voltage | 4.2V |
| Capacity | 900mAh |
| Power | 3.33Wh |
| Dimensions (T*W*L) | 8 × 25 × 41 mm (0.315 × 0.984 × 1.614 inches) |
| Weight | 18g (0.635oz) |
| Maximum Current | 1A |
| Protection Features | Overcharge, Overdischarge, Overcurrent, Short Circuit |
| Cable Type | 3302-28 High Temperature Resistant Silicone Cable |
| Connector Type | Genuine JST Pitch 1.0mm 2-pin connector module |
The battery is constructed with a large-capacity A+ lithium cell and a Japanese Seiko IC protection board.

Image: The HXJNLDC 802540 3.7V 900mAh lithium battery with its specifications printed on the label.
Additional Battery Specifications
Below are tables detailing various battery models, their capacities, dimensions, and other relevant information. Please refer to these tables for cross-referencing or identifying other compatible battery types.

Image: A table listing various battery models, their capacity, dimensions (in millimeters and inches), maximum current, number of cables, and thermistor presence.

Image: A continuation of the table detailing various battery models, their capacity, dimensions, maximum current, number of cables, and thermistor presence.
5. Setup and Installation
Before installing the new battery, carefully review the following instructions:
- Verify Connector Specifications and Polarity: Compare the connector of your new battery with the original battery. Ensure the red wire connects to the positive ("+") terminal and the black wire connects to the negative ("-") terminal. Incorrect polarity can damage the device and battery.
- Addressing Mismatched Connectors: If the primary battery of your device has no plug, a mismatched plug, or mismatched polarity, you have two options:
- Cut and Solder: Carefully cut the plug from the original battery and solder it directly to the new battery's wires, matching the color (red to red, black to black).
- Use Heat Shrinkable Insulating Sleeve: If soldering is not feasible or preferred, you can cut the wires and use the provided heat shrinkable insulating sleeve to connect the same color wires securely. Ensure connections are insulated properly to prevent short circuits.
- Secure Installation: Once connected, ensure the battery is placed securely within the device, avoiding any pressure on the wires or battery itself that could cause damage.

Image: Detailed views of the battery's connector from front, back, and side, highlighting the red positive and black negative wires.

Image: Visual instructions emphasizing the importance of checking connector polarity (red for positive, black for negative) and guidance on modifying connections if necessary, including the use of heat shrinkable sleeves.
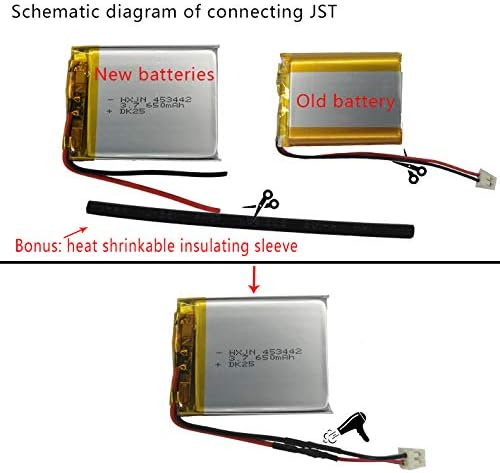
Image: A schematic diagram illustrating how to connect a new battery using a heat shrinkable insulating sleeve when the original battery's connector needs to be reused.
6. Operating Guidelines
Once installed, the HXJNLDC 802540 battery operates like the original battery in your Sena headset. Ensure your device is fully charged before initial use.
- Charging: Use the original charger and charging cable provided with your Sena headset. The battery is designed with protection against overcharge, overdischarge, overcurrent, and short circuits.
- Usage: The battery provides a capacity of 900mAh, offering reliable power for your compatible Sena headset. Actual operating time may vary based on device usage patterns (e.g., continuous music playback, intercom use).
Image: A graph showing the discharge curve of a sample battery, indicating a measured capacity of 912.1mAh, confirming the advertised capacity.
7. Maintenance and Care
To maximize the lifespan and performance of your HXJNLDC 802540 battery, follow these maintenance guidelines:
- Storage: Store the battery in a cool, dry place away from direct sunlight and extreme temperatures.
- Cleaning: Keep the battery and its connectors clean and free from dust or debris. Use a dry, soft cloth for cleaning.
- Avoid Physical Damage: Do not drop, puncture, or expose the battery to strong impacts. Physical damage can compromise safety and performance.
- Regular Use: For optimal performance, avoid leaving the battery fully discharged or fully charged for extended periods. Regular use and charging cycles are beneficial.
8. Troubleshooting
If you encounter issues with your HXJNLDC 802540 battery, consider the following:
- Battery Not Charging:
- Ensure the charging cable and adapter are functioning correctly.
- Verify that the battery connector is securely and correctly plugged into the device, observing polarity (red to positive, black to negative).
- Check for any visible damage to the battery or its wires. Do not attempt to charge a damaged battery.
- Short Operating Time:
- Ensure the battery has been fully charged.
- Operating time can be affected by environmental factors (e.g., cold temperatures) and device usage (e.g., high volume, continuous intercom).
- Device Not Powering On:
- Recheck all connections for proper seating and polarity.
- Confirm the battery is charged.
- If the issue persists, the device itself may have a fault unrelated to the battery.
If troubleshooting steps do not resolve the issue, please refer to the Warranty and Support section.
9. Warranty and Support
HXJNLDC offers a one-year warranty for quality issues. If you experience any quality-related problems with your battery within one year of purchase, please contact us via email for a replacement.
For support or warranty claims, please reach out to HXJNLDC customer service through the platform where you purchased the product.