1. Introduction
This manual provides detailed instructions for the installation, operation, and maintenance of your LAMSAM Prewired Alnico Pickups Set. This set is designed for Fender Telecaster guitars, offering a complete solution including Alnico pickups, a roller saddle bridge, a carved plate, a 3-way switch, and control knobs. Please read this manual thoroughly before installation to ensure proper setup and optimal performance.
2. Package Contents
Your LAMSAM Prewired Alnico Pickups Set includes the following components:
- Prewired Control Plate with 3-way switch, volume, and tone knobs (knurled pearl-top)
- Bridge Pickup (Alnico V)
- Neck Pickup (Alnico III)
- Roller Saddle Bridge Plate (carved design)
- Mounting Screws and Springs
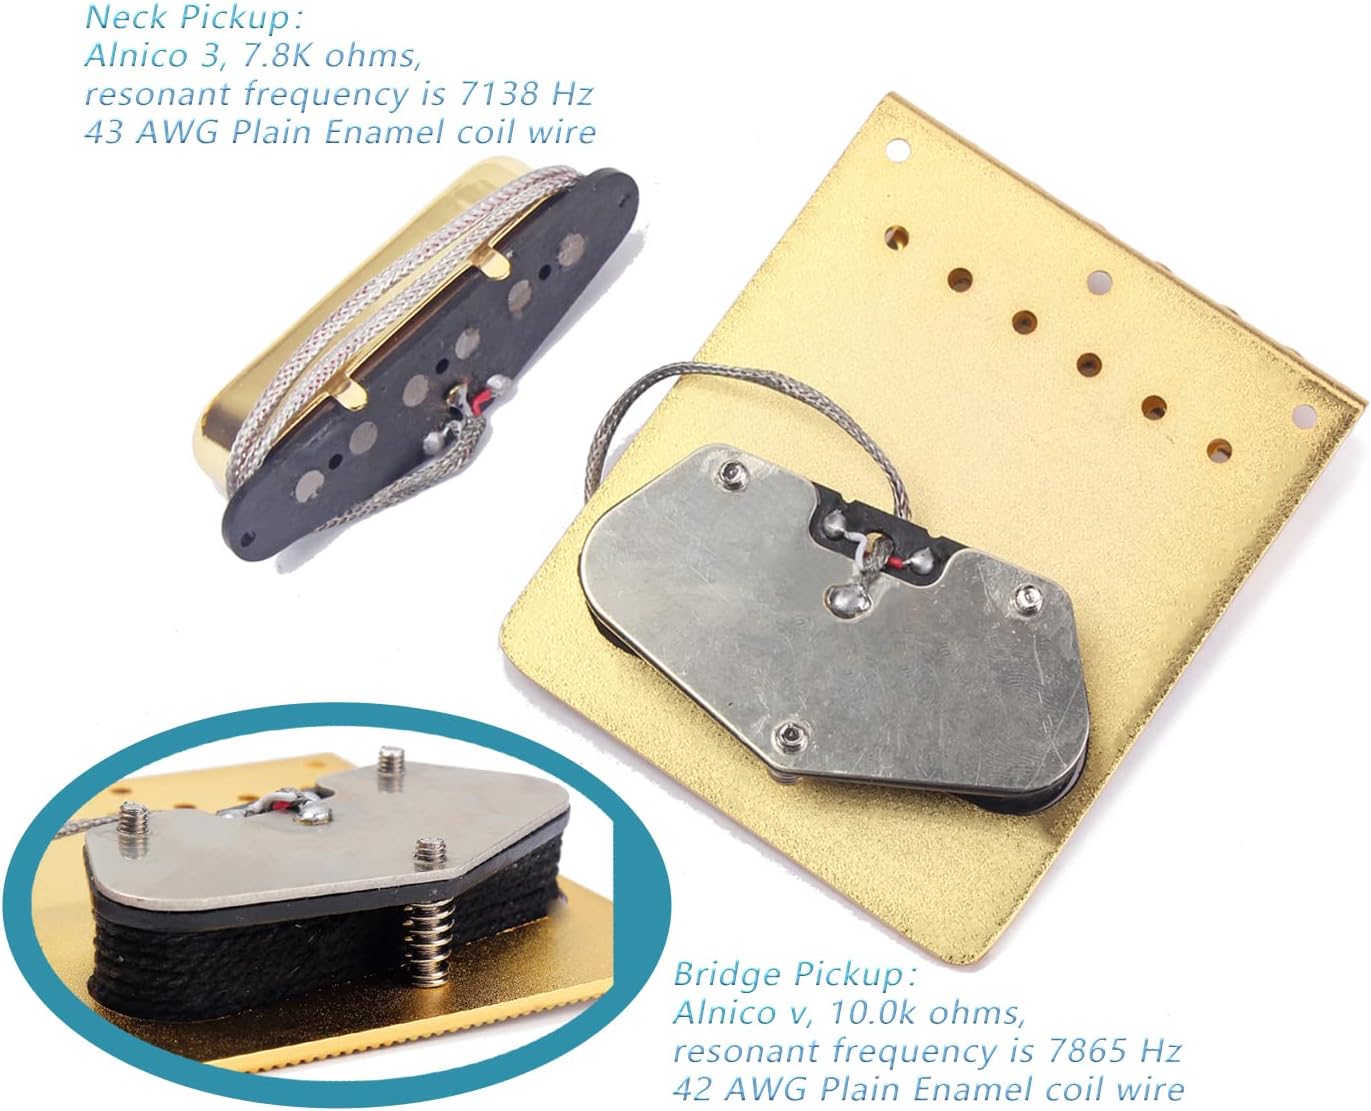
Image 2.1: Overview of the LAMSAM Prewired Alnico Pickups Set components, including the control plate, bridge, and pickups.

Image 2.2: The product packaging and all included items, such as the prewired assembly, pickups, bridge, and mounting hardware.
3. Specifications
| Component | Specification |
|---|---|
| Neck Pickup | Alnico III magnet, 7.8K ohms resistance, 7138 Hz resonant frequency, 43 AWG Plain Enamel coil wire |
| Bridge Pickup | Alnico V magnet, 10.0K ohms resistance, 7865 Hz resonant frequency, 42 AWG Plain Enamel coil wire |
| Control Plate | Prewired with 3-way switch, 250k pots (volume and tone), 2A473J capacitor |
| Bridge Plate | Roller saddle design, carved cupronickel material |
| Knobs | Knurled Pearl-top |
| Material (Plate) | Cupronickel |
| Item Weight | 1.31 pounds (0.59 kg) |
| Product Dimensions | 6.3 x 4.72 x 2.36 inches (16 x 12 x 6 cm) |

Image 3.1: Close-up view of the neck and bridge pickups with their respective Alnico magnet types, resistance, resonant frequencies, and wire gauges.
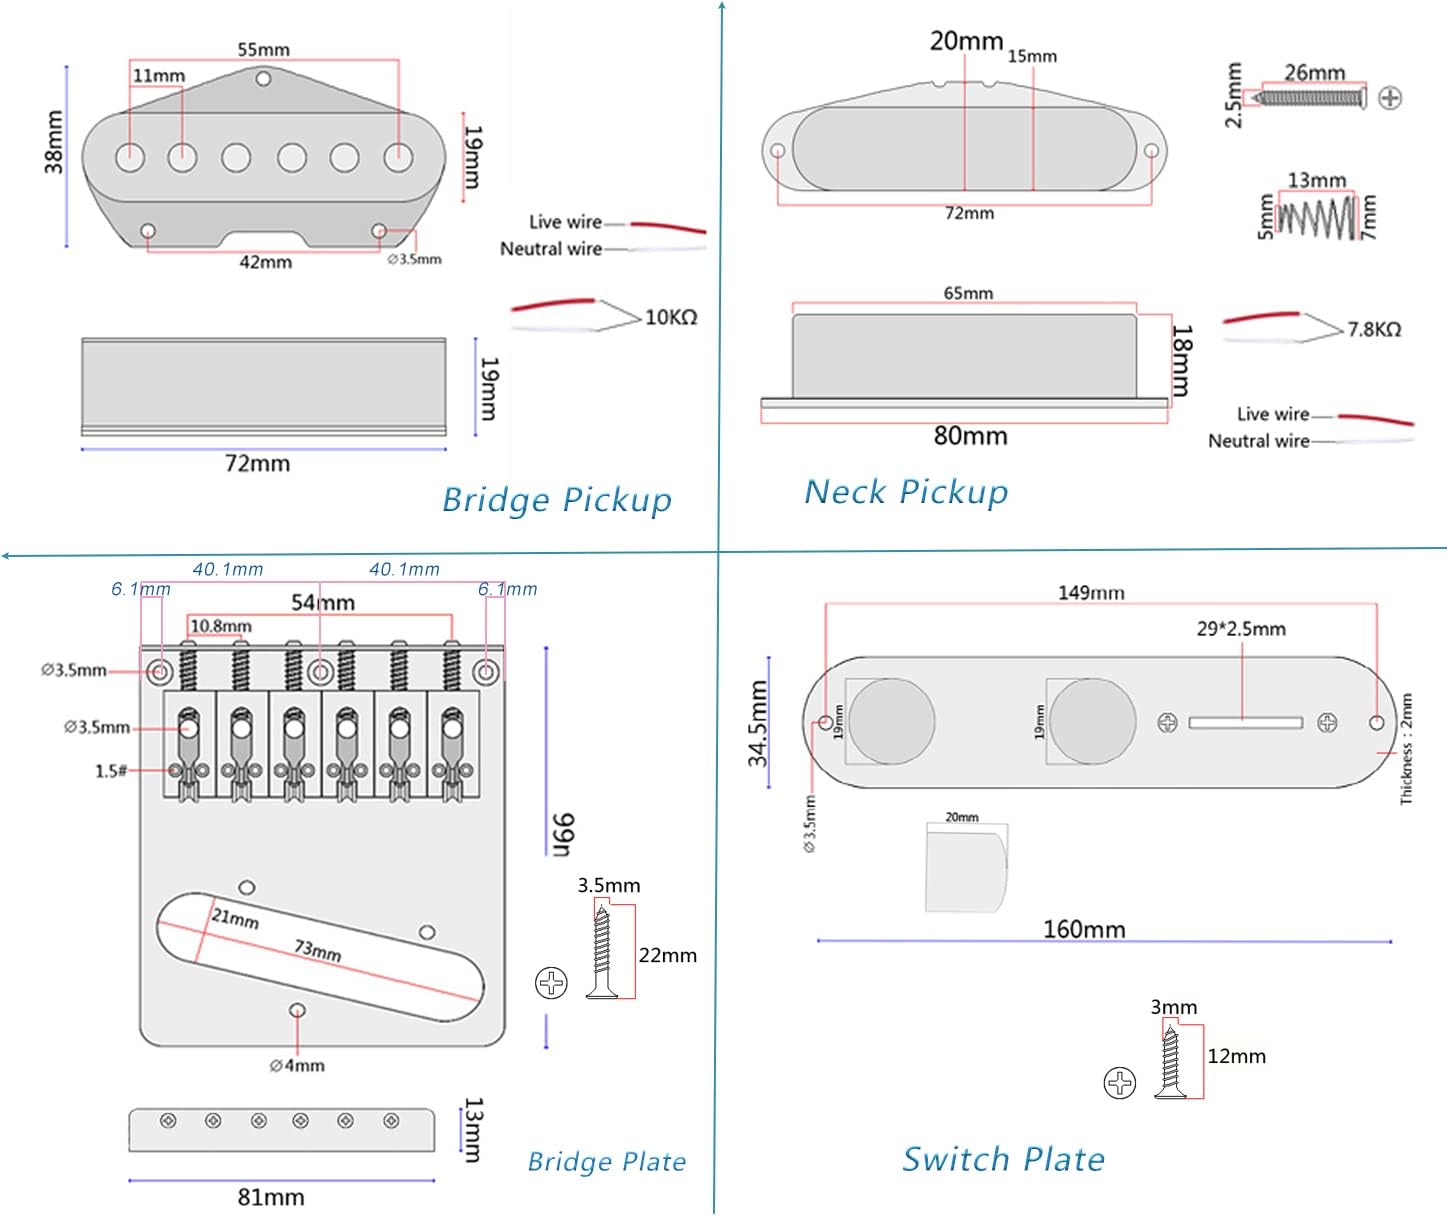
Image 3.2: Technical drawings showing the dimensions of the bridge pickup, neck pickup, bridge plate, and switch plate for compatibility reference.
4. Installation Guide
This prewired set simplifies installation. Basic soldering skills are required to connect the output jack and ground wire.
4.1 Tools Required
- Soldering Iron and Solder
- Wire Strippers
- Screwdrivers (Phillips and Flathead)
- Multimeter (optional, for checking connections)
4.2 Installation Steps
- Prepare the Guitar: Carefully remove the old bridge, control plate, and pickups from your Telecaster. Disconnect all existing wiring.
- Install Bridge Pickup and Plate: Place the bridge pickup into the bridge plate. Secure the bridge plate to the guitar body using the provided screws. Ensure the roller saddles are correctly oriented.
- Install Neck Pickup: Mount the neck pickup into its designated cavity on the guitar body.
- Install Control Plate: Position the prewired control plate onto the guitar body. Secure it with screws.
- Wiring Connections:
- Connect the output wires from the neck and bridge pickups to the corresponding terminals on the 3-way switch as shown in the wiring diagram.
- Connect the main output wire from the control plate to your guitar's output jack.
- Connect the ground wire from the control plate to the guitar's bridge and output jack ground. Ensure all ground connections are solid to prevent hum.
- Test Connections: Before reassembling, temporarily plug your guitar into an amplifier and gently tap on each pickup with a metal object (like a screwdriver) to confirm they are working and the switch functions correctly.
- Final Assembly: Once all connections are verified, carefully reassemble any remaining guitar parts.

Image 4.1: Detailed wiring diagram illustrating connections for the 3-way switch, volume, tone controls, neck pickup, bridge pickup, and output jack.

Image 4.2: View of the prewired control plate, showing the 3-position pickup switch, 250k pots, and capacitor, ready for installation.

Image 4.3: The bridge plate with the bridge pickup installed, alongside the neck pickup, demonstrating the components before final assembly.
5. Operation
Once installed, your LAMSAM Prewired Alnico Pickups Set operates like a standard Telecaster control system.
- 3-Way Pickup Selector Switch:
- Position 1 (Bridge): Activates the bridge pickup for a bright, articulate tone.
- Position 2 (Middle): Activates both bridge and neck pickups for a fuller, blended tone.
- Position 3 (Neck): Activates the neck pickup for a warm, smooth tone.
- Volume Knob: Controls the overall output volume of the guitar. Turn clockwise to increase volume, counter-clockwise to decrease.
- Tone Knob: Adjusts the treble frequencies. Turn clockwise for brighter tones, counter-clockwise for warmer, darker tones.
6. Maintenance
Proper maintenance ensures the longevity and performance of your pickup set.
- Cleaning: Use a soft, dry cloth to wipe down the control plate, bridge, and pickups regularly. Avoid abrasive cleaners or solvents.
- Connections: Periodically check all soldered connections for integrity. Loose connections can lead to intermittent signal or hum.
- Hardware: Ensure all mounting screws for the bridge and control plate are snug. Do not overtighten.
- Storage: When not in use, store your guitar in a stable environment to protect the electronics from extreme temperature changes and humidity.
7. Troubleshooting
If you encounter issues, refer to the following common problems and solutions:
| Problem | Possible Cause | Solution |
|---|---|---|
| No sound or intermittent sound | Loose or faulty wiring connection, faulty output jack, pickup malfunction. | Check all soldered connections, especially to the output jack and pickups. Ensure the guitar cable is fully inserted. Test with a different cable/amp. |
| Excessive hum or noise | Poor grounding, unshielded cavities, external interference. | Verify all ground wires are securely connected (bridge, control plate, output jack). Ensure proper shielding in guitar cavities. Avoid proximity to strong electrical fields. |
| Volume or tone knobs not working | Faulty potentiometer (pot), incorrect wiring to pot, faulty capacitor. | Inspect wiring to the affected pot and capacitor according to the diagram. If wiring is correct, the pot or capacitor may need replacement. |
| Pickup selector switch not changing tones | Faulty switch, incorrect wiring to switch. | Check wiring to the 3-way switch. Ensure all pickup leads are correctly soldered to the switch terminals. If wiring is correct, the switch may be faulty. |
8. Customer Support
For further assistance or inquiries regarding your LAMSAM Prewired Alnico Pickups Set, please contact LAMSAM customer support through the retailer where the product was purchased. Please have your product model number (B08T67X7GD) and purchase date available when contacting support.
You can also visit the LAMSAM Store on Amazon for more product information.