1. Introduction and Overview
The ASUS Prime Z590-A is an ATX motherboard designed to support 10th and 11th Generation Intel Core processors, utilizing the LGA 1200 socket. This motherboard is engineered to provide a stable and high-performance foundation for personal computer builds, featuring robust power delivery, comprehensive cooling solutions, and advanced connectivity options. It integrates AI-driven technologies for optimized performance and user experience.

Figure 1: The ASUS Prime Z590-A Motherboard and its retail packaging.
2. Key Features
- Intel LGA 1200 Socket: Optimized for maximum performance with 11th Gen Intel Core processors, also compatible with 10th Gen Intel Core processors.
- AI Motherboard Technologies: Features AI overclocking for intelligent performance tuning, AI cooling for efficient thermal management, and AI noise cancellation for clear audio communication.
- Enhanced Power Solution: Equipped with 14+2 DrMOS power stages, ProCool sockets, durable alloy chokes, and long-lasting capacitors to ensure stable power delivery under demanding workloads.
- Comprehensive Cooling: Includes a VRM heatsink, PCH heatsink, multiple hybrid fan headers, and Fan Xpert 4 utility for flexible and effective cooling control.
- Boosted Memory Performance: Incorporates careful trace routing, optimized vias, and ground layer enhancements (ASUS OptiMem II) to preserve signal integrity and improve memory overclocking capabilities.
- Advanced Connectivity: Supports Intel 2.5 Gb LAN, USB 3.2 Front Panel Type-C, and Thunderbolt™ 4 for high-speed data transfer and versatile peripheral connections.
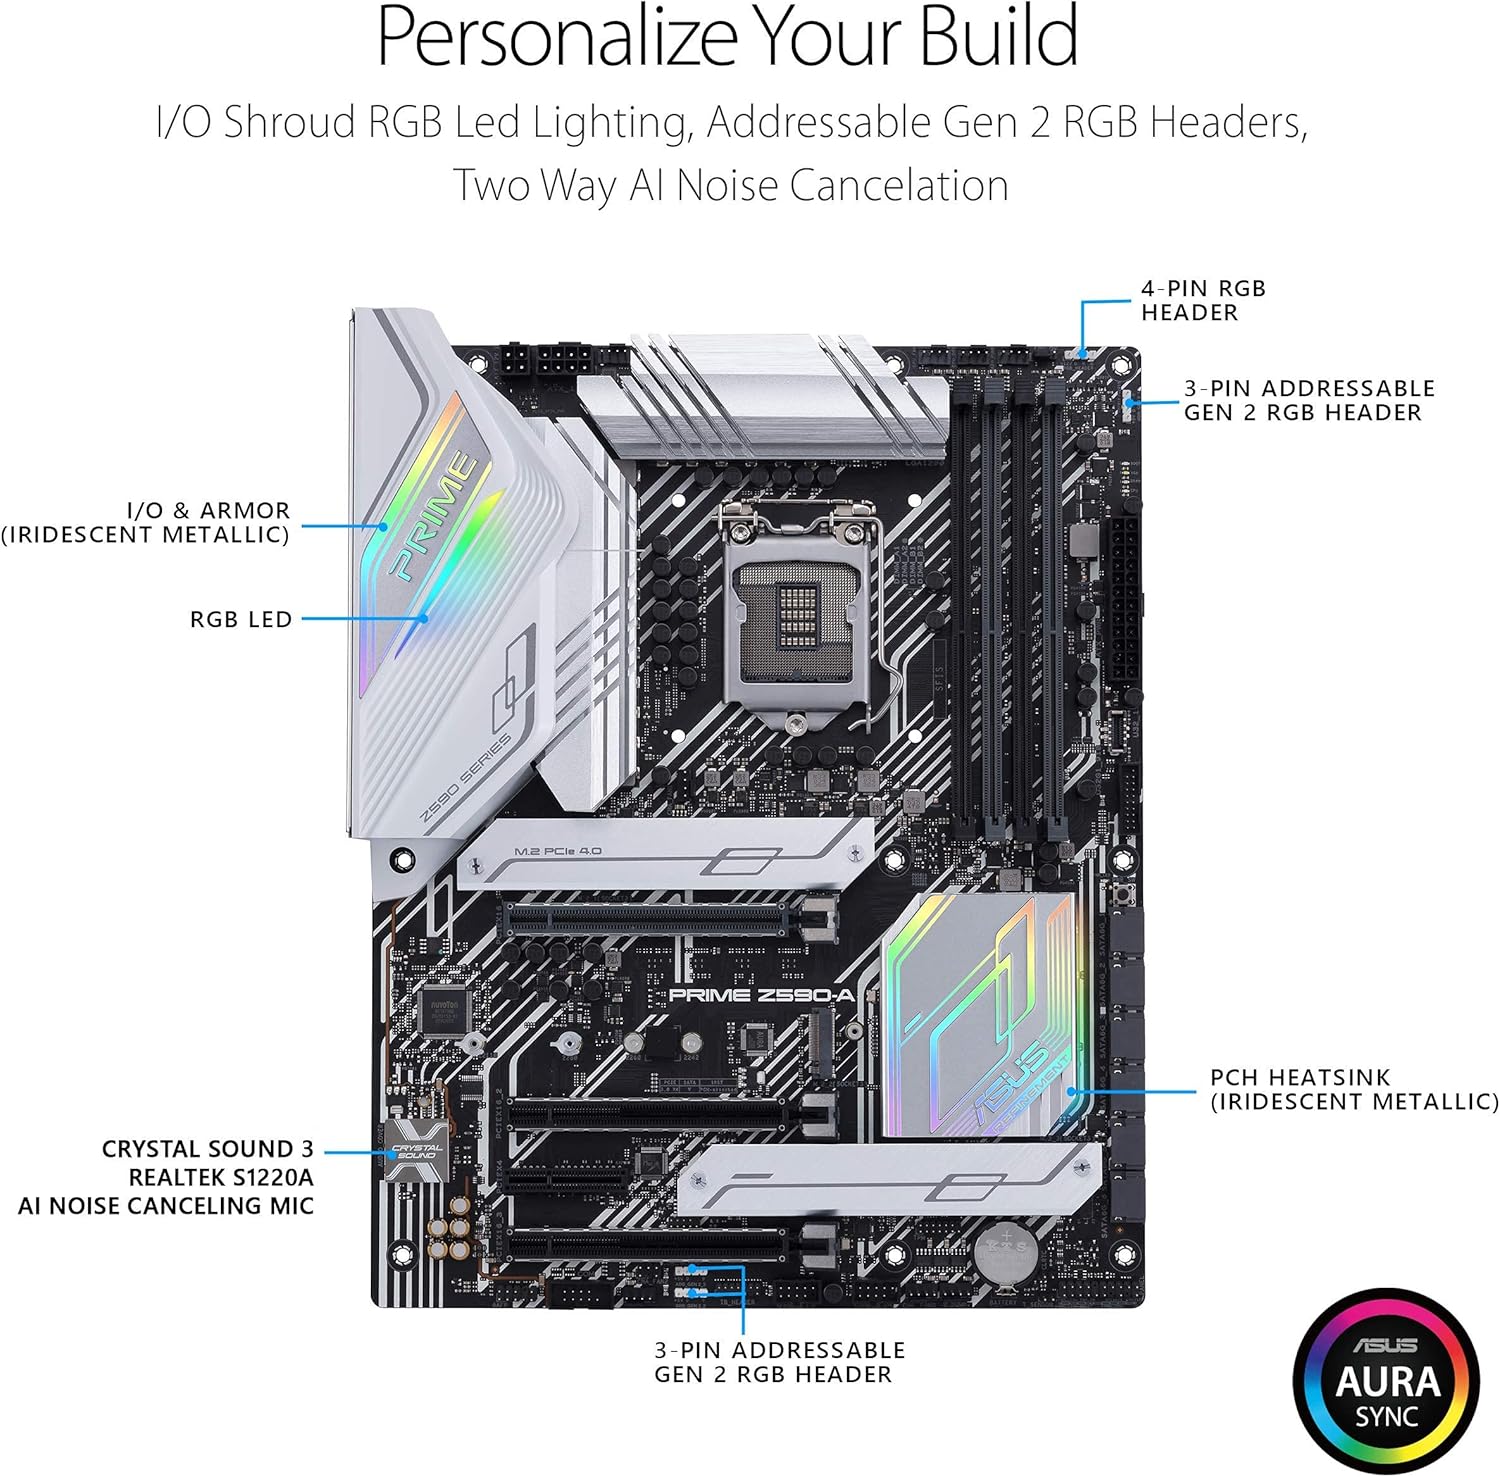
Figure 2: Overview of customizable features including I/O Shroud RGB LED Lighting, Addressable Gen 2 RGB Headers, and Two-Way AI Noise Cancelation.

Figure 3: Detailed view of the Enhanced Power and Cooling features, including VRM heatsink, M.2 heatsinks, PCH heatsink, and fan headers.
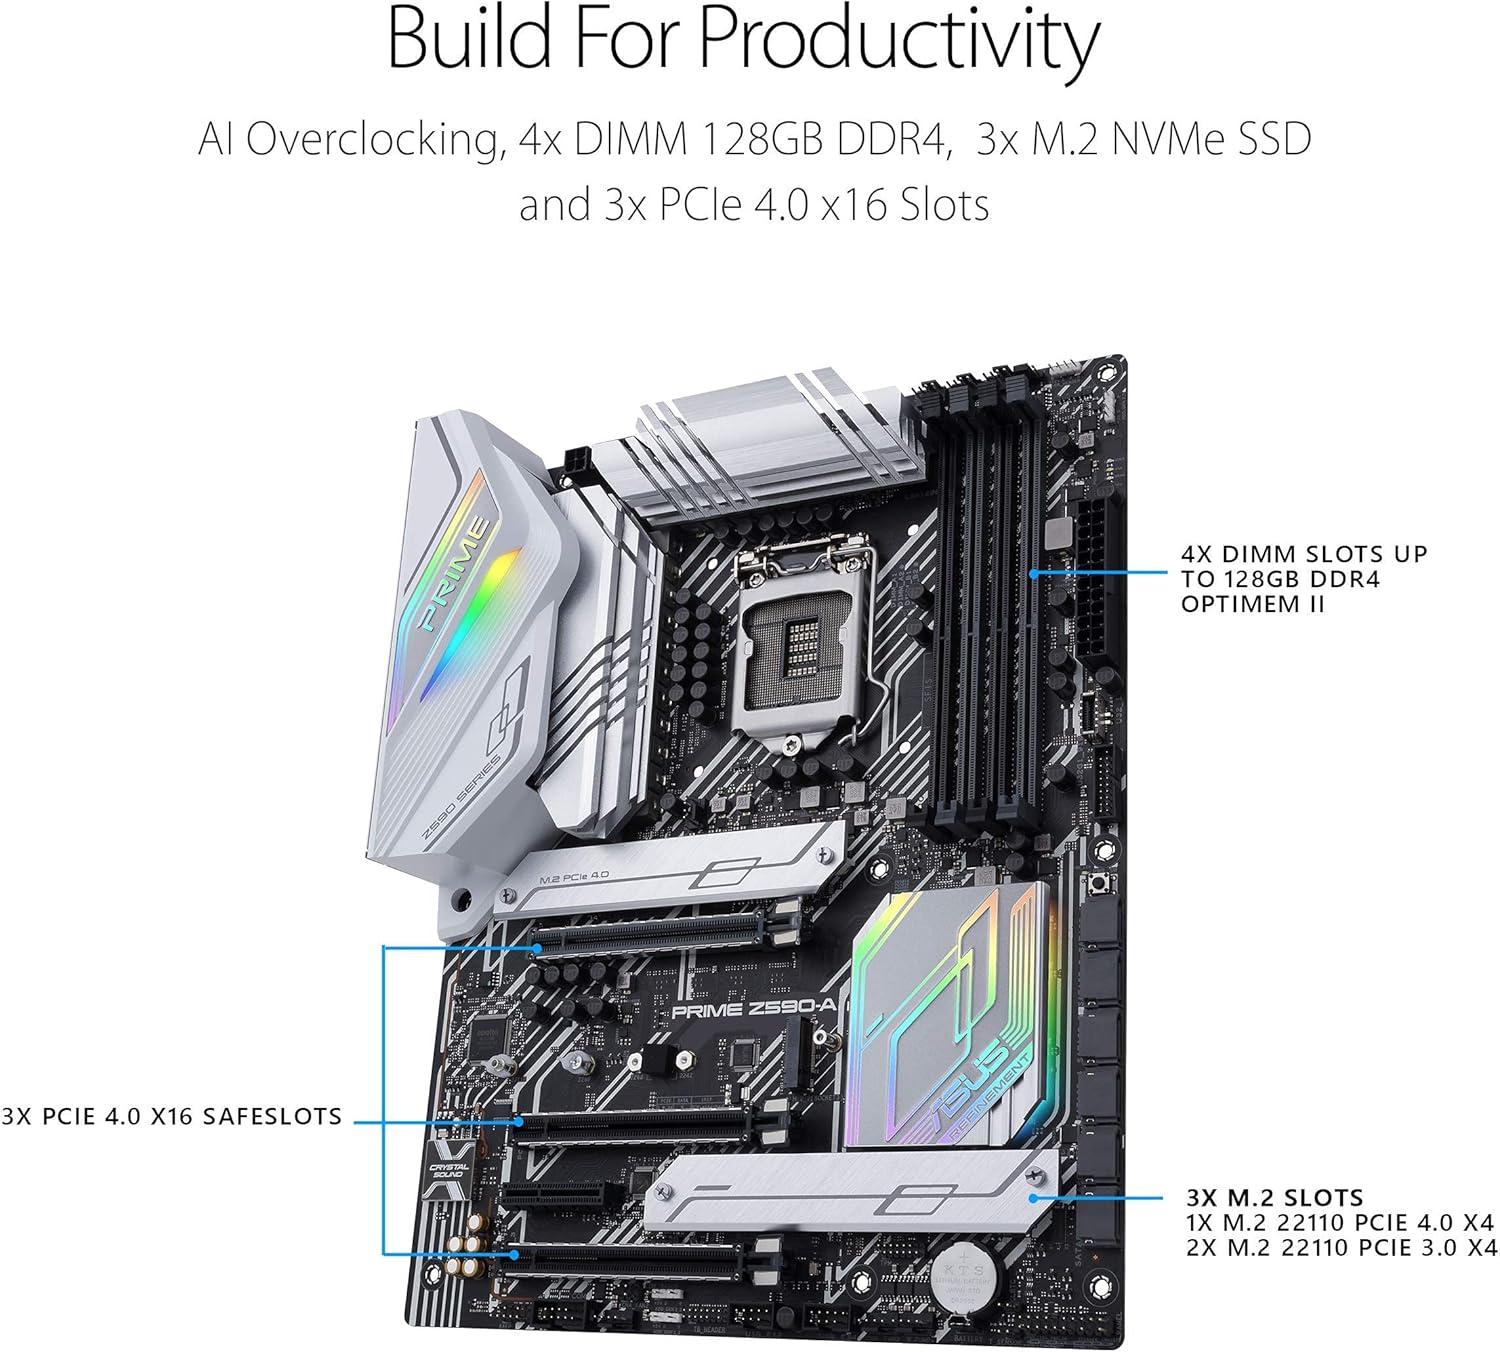
Figure 4: Illustration of productivity-focused features such as 4x DIMM slots supporting up to 128GB DDR4, 3x M.2 NVMe SSD slots, and 3x PCIe 4.0 x16 SafeSlots.

Figure 5: Overview of the rear I/O panel and internal headers, showcasing Intel 2.5G Ethernet, USB 3.2 Gen 2x2 Type-C, and Thunderbolt 4 header.
3. Package Contents
Upon opening the retail box, verify that all standard components are present. The ASUS Prime Z590-A package typically includes the following items:
- ASUS Prime Z590-A Motherboard
- User Guide / Instruction Manual
- Support DVD (containing drivers and utilities)
- SATA Cables (typically 2-3)
- Q-Connector (for front panel headers)
- M.2 Rubber Package (for M.2 SSD installation)

Figure 6: Contents of the ASUS Prime Z590-A retail package, including the motherboard, user guide, SATA cables, Q connector, and M.2 rubber.
4. Setup and Installation
Proper installation is crucial for the optimal performance and longevity of your motherboard. Always ensure you are working in an anti-static environment to prevent damage to sensitive components. Refer to the detailed instructions in the included User Guide for specific steps and diagrams.
4.1. Pre-Installation Checklist
- Ensure your power supply unit (PSU) is compatible and provides sufficient wattage.
- Gather all necessary components: CPU, CPU cooler, RAM modules, storage devices (M.2 SSDs, SATA drives), graphics card, and PC case.
- Prepare a clean, flat, and static-free workspace. Consider using an anti-static wrist strap.
4.2. Installation Steps (Summary)
- Install the CPU: Carefully align the CPU with the LGA 1200 socket, ensuring the triangular markers match. Lower the load plate and secure the retention lever.
- Install the CPU Cooler: Apply thermal paste (if not pre-applied) and mount the CPU cooler according to its manufacturer's instructions.
- Install RAM Modules: Open the DIMM slot clips, align the RAM modules with the key notch, and press firmly until the clips snap into place. Refer to the manual for preferred dual-channel configurations.
- Install M.2 SSDs: Insert M.2 SSDs into the designated slots and secure them with the provided M.2 rubber package or screws.
- Mount Motherboard in Case: Install the I/O shield (if not pre-attached) into your PC case. Align the motherboard with the standoffs in the case and secure it with screws.
- Connect Power Cables: Connect the 24-pin ATX power cable and the 8-pin (or 4+4-pin) CPU power cable from your PSU to the motherboard.
- Install Graphics Card: Insert your graphics card into the primary PCIe x16 slot and secure it. Connect any necessary PCIe power cables from the PSU.
- Connect Storage and Peripherals: Connect SATA data cables to your SATA drives and the motherboard. Connect front panel headers (USB, audio, power/reset buttons) using the Q-Connector for ease of installation.
5. Operating Instructions
5.1. First Boot and BIOS Setup
After assembling your system, connect a monitor, keyboard, and mouse. Power on the system. During the initial boot, press the designated key (usually DEL or F2) to enter the BIOS/UEFI setup utility. Here, you can:
- Set the correct date and time.
- Configure boot order for your operating system installation media.
- Enable XMP/DOCP for optimal RAM speed.
- Adjust fan curves and monitor system temperatures.
- Configure AI Overclocking settings (if desired).
5.2. Operating System and Driver Installation
Install your preferred operating system (e.g., Windows 10/11). After OS installation, install the necessary drivers from the included Support DVD or by downloading the latest versions from the official ASUS support website.
6. Maintenance
Regular maintenance helps ensure the longevity and stable performance of your motherboard and overall system.
- Dust Removal: Periodically clean dust from inside your PC case, especially from heatsinks and fan blades, using compressed air. Ensure the system is powered off and unplugged before cleaning.
- BIOS/UEFI Updates: Check the ASUS support website for the latest BIOS/UEFI updates. Updates can improve compatibility, stability, and performance. Follow the update instructions carefully to avoid system damage.
- Driver Updates: Keep your system drivers updated. Regularly check the ASUS support website for the latest chipset, LAN, audio, and other relevant drivers.
- Cable Management: Ensure internal cables are neatly managed to promote better airflow and prevent interference.
7. Troubleshooting
If you encounter issues with your system, consider the following common troubleshooting steps:
- No Power/No Boot:
- Verify all power cables (24-pin ATX, 8-pin CPU, PCIe for GPU) are securely connected.
- Check if the PSU is switched on and the wall outlet is functional.
- Ensure the front panel power button cable is correctly connected to the motherboard.
- No Display:
- Confirm the monitor is connected to the graphics card (or motherboard if using integrated graphics) and is powered on.
- Reseat the graphics card and RAM modules.
- Try booting with only one RAM stick.
- System Instability/Crashes:
- Check CPU and GPU temperatures. Ensure adequate cooling.
- Verify RAM modules are properly seated and compatible. Run a memory diagnostic tool.
- Update BIOS/UEFI and all system drivers to the latest versions.
- Network Connectivity Issues:
- Ensure the Ethernet cable is securely connected and the router/modem is functioning.
- Install or update the LAN drivers from the ASUS support website.
- Check network adapter settings in your operating system.
For more complex issues, consult the comprehensive troubleshooting section in your User Guide or visit the ASUS support website for detailed solutions and FAQs.
8. Specifications
| Category | Specification |
|---|---|
| Brand | ASUS |
| Model Number | PRIME Z590-A |
| CPU Socket | LGA 1200 |
| Compatible Processors | 10th and 11th Generation Intel Core |
| Chipset Type | Intel Z590 |
| RAM Memory Technology | DDR4 |
| Max Memory Storage Capacity | 128 GB |
| Memory Speed | Up to 5133 MHz (OC) |
| Wireless Type | WiFi 6E (via add-in card, not integrated) |
| LAN | Intel 2.5 Gb Ethernet |
| USB Ports | USB 3.2 Gen 2x2 Type-C, USB 3.2 Gen 2 Type-C, USB 3.2 Gen 1, USB 2.0 |
| Product Dimensions (LxWxH) | 14.44 x 14.44 x 11.81 inches |
| Item Weight | 3.52 pounds |
| Platform | Windows 10 (compatible with Windows 11) |
9. Warranty and Support
ASUS provides a limited warranty for its motherboards. The specific terms and duration of the warranty may vary by region and purchase date. Please retain your proof of purchase for warranty claims.
9.1. Obtaining Technical Support
For technical assistance, driver downloads, BIOS updates, and further product information, please visit the official ASUS support website:
You may also contact ASUS customer service directly through the contact information provided on their website for your specific region.


