
1. Important Safety Instructions
Please read all instructions carefully before using the appliance to ensure safe and efficient operation. Keep this manual for future reference.
- Always ensure the appliance is properly grounded.
- Do not allow children to play on or in the appliance. The appliance features a Child Lock function to prevent accidental operation.
- Keep flammable materials away from the appliance.
- Do not attempt to repair or replace any part of the appliance unless specifically recommended in this manual. All other servicing should be referred to a qualified technician.
- Ensure the water inlet and drain hoses are securely connected to prevent leaks.
- Unplug the appliance from the power outlet before cleaning or performing any maintenance.
2. Product Overview
The LG F964V72WRHT is a high-capacity washer-dryer designed for efficient laundry care. It incorporates advanced features for optimal performance and user convenience.
Key Features:
- 9 Kilograms Capacity: Accommodates large laundry loads.
- Hygiene Steam: Utilizes steam for enhanced cleaning and sanitization.
- Child Lock: Prevents unintended operation by children.
- Rat Protection Mesh: Integrated feature for added durability and protection.
- Energy Star Certified: Designed for energy efficiency.
Components Identification:
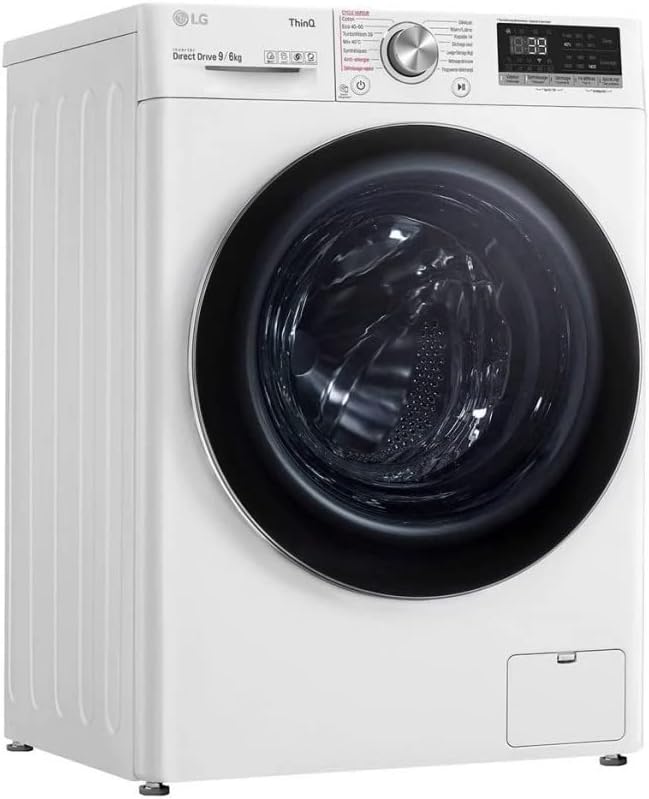
Figure 2.1: Front-left view of the LG F964V72WRHT washer-dryer. This image shows the overall design, including the main drum door, control panel, and detergent dispenser drawer.

Figure 2.2: Close-up of the control panel and drum door. The control panel features a central program selection dial, push buttons for various functions, and a digital display showing time and settings.

Figure 2.3: Detergent dispenser drawer partially open. This drawer is located on the top-left of the appliance and is used for adding detergent and fabric softener.

Figure 2.4: Front view with the drum door open. This shows the interior of the washing drum, designed for efficient washing and drying cycles.
3. Setup and Installation
Proper installation is crucial for the safe and efficient operation of your washer-dryer. It is recommended to have the appliance installed by a qualified technician.
3.1 Unpacking
- Remove all packaging materials, including the polystyrene base and any protective film.
- Carefully remove the transit bolts from the rear of the appliance. Keep them for future transport if needed.
- Ensure the Rat Protection Mesh is securely in place at the bottom of the appliance.
3.2 Location and Leveling
- Place the appliance on a firm, level floor.
- Adjust the leveling feet at the bottom of the appliance until it is perfectly stable and level. Use a spirit level to verify.
3.3 Water and Drain Connections
- Connect the water inlet hose to a cold water tap with a 3/4-inch thread. Ensure the connection is tight to prevent leaks.
- Position the drain hose into a standpipe or over the edge of a sink, ensuring it is securely fixed to prevent displacement during operation.
3.4 Electrical Connection
- Plug the power cord into a grounded electrical outlet.
- Ensure the voltage supply matches the appliance's requirements (964 Volts as per specifications).
4. Operating Instructions
This section guides you through the process of operating your LG F964V72WRHT washer-dryer.
4.1 Loading Laundry
- Open the drum door (refer to Figure 2.4).
- Load laundry items loosely into the drum, ensuring not to overload. The maximum capacity is 9 kg.
- Close the drum door firmly until it clicks shut.
4.2 Adding Detergent and Softener

Figure 4.1: Top-down view of the open detergent dispenser drawer. This image clearly shows the separate compartments for main wash detergent, pre-wash detergent, and fabric softener.
- Pull out the detergent dispenser drawer (refer to Figure 2.3 and 4.1).
- Add the appropriate amount of detergent to the main wash compartment.
- If using pre-wash, add detergent to the pre-wash compartment.
- Add fabric softener to the designated compartment, ensuring not to exceed the maximum fill line.
- Gently push the dispenser drawer back into place.
4.3 Selecting a Wash Cycle
- Turn the program selection dial (refer to Figure 2.2) to choose the desired wash cycle. Available cycles include:
- Coton (Cotton): For cotton items.
- Eco 40-60: Energy-efficient wash for cottons and mixed fabrics at 40-60°C.
- TurboWash 39: Quick wash cycle.
- Mix 40°C: For mixed fabric loads at 40°C.
- Synthétiques (Synthetics): For synthetic fabrics.
- Anti-allergie (Anti-Allergy): Special cycle for allergy sufferers, often using steam.
- Délavage vapeur (Steam Wash): Utilizes steam for deep cleaning and sanitization (Hygiene Steam).
- Délicat (Delicate): For delicate items.
- Main/Laine (Hand/Wool): For hand washable or wool items.
- Rapide 14 (Quick 14): Very short wash cycle.
- Séchage seul (Drying Only): For drying clothes without washing.
- Lavage + Séchage (Wash + Dry): Combined wash and dry cycle.
- Programme téléchargé (Downloaded Program): For custom cycles downloaded via the ThinQ app.
- The digital display will show the estimated cycle time and default settings.
4.4 Adjusting Options and Starting the Cycle
- Use the push buttons on the control panel to adjust options such as temperature, spin speed, or add extra rinses, if available for the selected cycle.
- To activate the Child Lock, press and hold the designated button (usually indicated by a lock icon) for a few seconds until the lock indicator appears on the display. Repeat to deactivate.
- Press the Start/Pause button to begin the wash cycle.
5. Maintenance and Cleaning
Regular maintenance ensures the longevity and optimal performance of your appliance.
5.1 Cleaning the Detergent Dispenser
- Pull out the detergent dispenser drawer completely.
- Remove any removable inserts and rinse them under running water.
- Clean the drawer and its housing with a soft brush and warm water to remove detergent residue.
- Reinsert the components and push the drawer back into place.
5.2 Cleaning the Drum and Door Seal
- Wipe the inside of the drum with a damp cloth after each use, especially if using the drying function.
- Regularly clean the rubber door seal to remove lint, dirt, and mold buildup.
- Leave the door slightly ajar after use to allow the drum to air dry and prevent odors.
5.3 Cleaning the Drain Pump Filter
- Locate the drain pump filter cover at the bottom-front of the appliance (refer to Figure 2.1, the small rectangular panel).
- Open the cover and place a shallow tray underneath to catch any residual water.
- Carefully unscrew and remove the filter.
- Clean the filter under running water, removing any lint, coins, or foreign objects.
- Screw the filter back in securely and close the cover.
6. Troubleshooting
Before contacting service, please refer to the following table for common issues and their solutions.
| Problem | Possible Cause | Solution |
|---|---|---|
| Appliance does not start. | Power cord not plugged in; door not closed properly; Child Lock active. | Check power connection; ensure door is latched; deactivate Child Lock. |
| No water filling. | Water tap closed; inlet hose kinked; water supply issue. | Open water tap; straighten hose; check household water supply. |
| Water not draining. | Drain hose kinked or blocked; drain pump filter clogged. | Straighten drain hose; clean drain pump filter (Section 5.3). |
| Excessive vibration/noise. | Appliance not level; transit bolts not removed; uneven load. | Adjust leveling feet; ensure transit bolts are removed; redistribute laundry. |
| Error code displayed. | Specific malfunction. | Refer to the full user manual for a list of error codes or contact customer support. |
7. Specifications
| Brand | LG |
| Model Number | F964V72WRHT |
| Capacity | 9 Kilograms |
| Configuration | Push button |
| Voltage | 964 Volts |
| Certification | Energy Star |
| Special Features | Child Lock, Hygiene Steam, Rat Protection Mesh |
| ASIN | B08SWGQWPQ |
| Date First Available | December 10, 2020 |
8. Warranty and Support
For detailed warranty information, please refer to the warranty card included with your product or visit the official LG website. Keep your proof of purchase for warranty claims.
Spare Parts Availability: Information regarding the availability of spare parts is currently unavailable. Please contact LG customer support for further assistance.
If you encounter any issues not covered in this manual or require technical assistance, please contact LG customer support through their official channels.
You can find more information and support on the LG Electronics Store on Amazon.


