Introduction
This manual provides instructions for the installation, operation, and maintenance of the Black Box KVXLCDP-200 KVM Extender. This device allows for the extension of dual-head 4K DisplayPort video, USB 2.0, and RS-232 signals over a single CATx cable up to 100 meters (330 feet). It is designed for applications requiring remote access to a computer system with high-resolution video and peripheral support.
Package Contents
Verify that all items are present in your package. If any items are missing or damaged, contact your supplier.
- KVM Extender Transmitter Unit
- KVM Extender Receiver Unit
- Power Adapters (x2) with regional plugs
- USB Type-A to Type-B Cable
- DisplayPort Cables (x2)
- 3.5mm Audio Cable
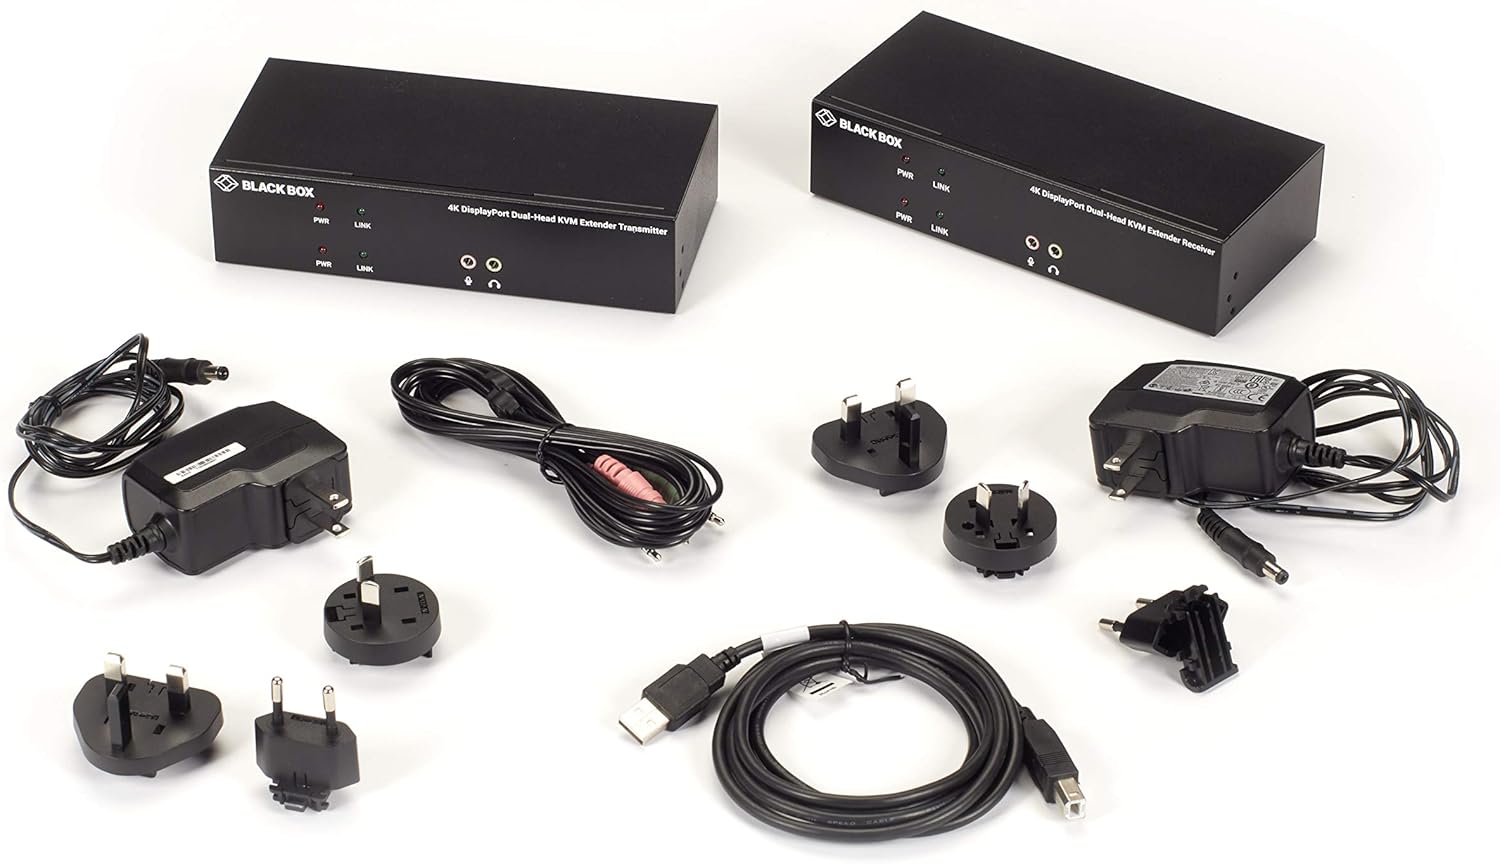
This image displays the complete contents of the Black Box KVM Extender package, including the transmitter and receiver units, two power adapters with various regional plug types, a USB Type-A to Type-B cable, two DisplayPort cables, and a 3.5mm audio cable.
Product Overview
Transmitter and Receiver Front Panels

This image shows the front panels of both the KVM Extender Transmitter (left) and Receiver (right). Both units feature PWR (Power) and LINK (Connection Status) LED indicators. They also include 3.5mm audio jacks for microphone input and headphone output.
- PWR LED: Indicates power status. Green for power on, Red for power off or fault.
- LINK LED: Indicates connection status between transmitter and receiver. Green for active link, Red for no link.
- Microphone Jack: 3.5mm input for microphone.
- Headphone Jack: 3.5mm output for headphones.
Transmitter and Receiver Rear Panels

This image displays the rear panels of the KVM Extender Transmitter (left) and Receiver (right). Both units include CATx ports for connection, DisplayPort inputs/outputs, USB ports, an RS-232 serial port, and a DC 5V power input.
- CATx Ports: RJ-45 ports for connecting the transmitter and receiver units using two CAT5e/6/7 cables.
- DP-IN (Transmitter): DisplayPort input from the source computer.
- DP-OUT (Transmitter): DisplayPort output for a local monitor.
- DP-OUT (Receiver): DisplayPort outputs for connecting to remote monitors.
- USB Ports (Transmitter): USB Type-B port for connecting to the source computer.
- USB Ports (Receiver): USB Type-A ports for connecting USB 2.0 peripheral devices (e.g., keyboard, mouse, mass storage).
- RS-232 Port: DB9 serial port for connecting RS-232 peripheral devices.
- DC-5V: Power input jack for the included power adapter.
- Grounding Screw: For optional grounding connection.
Setup and Installation
- Power Off: Ensure all devices, including the computer, monitors, and the KVM extender units, are powered off before beginning installation.
- Connect Transmitter to Source Computer:
- Connect the DisplayPort outputs of your source computer to the DP-IN ports on the KVM Extender Transmitter using the provided DisplayPort cables.
- Connect a USB Type-A port on your source computer to the USB Type-B port on the KVM Extender Transmitter using the provided USB cable.
- (Optional) Connect a local monitor to the DP-OUT ports on the Transmitter.
- (Optional) Connect local USB 2.0 devices or RS-232 devices to the respective ports on the Transmitter.
- Connect Transmitter to Receiver:
- Connect the two CATx ports on the Transmitter unit to the two CATx ports on the Receiver unit using two high-quality CAT5e/6/7 cables. Ensure the cables are securely seated. The maximum recommended distance is 100 meters (330 feet).
- Connect Receiver to Remote Peripherals:
- Connect your remote monitors to the DP-OUT ports on the KVM Extender Receiver using DisplayPort cables.
- Connect your remote keyboard, mouse, and other USB 2.0 peripheral devices to the USB Type-A ports on the KVM Extender Receiver.
- (Optional) Connect RS-232 devices to the RS-232 port on the Receiver.
- Apply Power:
- Connect the included power adapters to the DC-5V power input jacks on both the Transmitter and Receiver units.
- Plug the power adapters into a power outlet. The PWR LED on both units should illuminate.
- Power On Devices: Power on your source computer and remote monitors. The LINK LED on both KVM units should illuminate, indicating an active connection.
Operating Instructions
Once all connections are made and power is applied, the KVM Extender operates transparently.
- Video Display: The video from the source computer will be displayed on the remote monitors. The system supports resolutions up to 3840x2160 at 30Hz.
- USB Peripherals: Connected USB 2.0 devices (keyboard, mouse, mass storage, etc.) at the receiver end will function as if directly connected to the source computer.
- Audio: Audio signals from the source computer will be transmitted to the headphone jack on the receiver, and microphone input from the receiver will be sent to the source computer.
- RS-232: Serial communication through the RS-232 ports will be extended between the source and remote locations.
Maintenance
- Cleaning: Use a soft, dry cloth to clean the exterior of the units. Do not use liquid or aerosol cleaners.
- Ventilation: Ensure proper ventilation around the units to prevent overheating. Do not block any ventilation openings.
- Cable Management: Keep cables organized and free from kinks or excessive bends to ensure optimal performance and longevity.
- Firmware Updates: Check the Black Box website periodically for any available firmware updates for your model. Follow the provided instructions for any update procedures.
Troubleshooting
| Problem | Possible Cause | Solution |
|---|---|---|
| No Power | Power adapter not connected or faulty. | Ensure power adapters are securely connected to both units and a working power outlet. Check the PWR LED. |
| No Video on Remote Monitor | Incorrect DisplayPort connections; CATx link issue; Resolution incompatibility. | Verify all DisplayPort cables are securely connected. Check the LINK LED on both units. Ensure the source computer's resolution is supported (up to 3840x2160 @ 30Hz). |
| USB Devices Not Working | Incorrect USB connections; USB device driver issue; USB 2.0 compatibility. | Ensure USB cables are properly connected. Try connecting the USB device directly to the computer to verify functionality. The extender supports USB 2.0. |
| No Link (LINK LED is Red) | CATx cables not connected or faulty; Exceeded cable length; Incorrect cable type. | Verify both CATx cables are securely connected between the transmitter and receiver. Ensure cable length does not exceed 100 meters. Use CAT5e/6/7 cables. |
| Audio Not Working | Incorrect audio cable connection; Audio settings on computer. | Check 3.5mm audio cable connections. Verify audio output/input settings on the source computer. |
If problems persist after attempting these solutions, contact Black Box technical support.
Specifications
- Model Number: KVXLCDP-200
- Video Resolution: Up to 3840x2160 @ 30Hz (4K UHD)
- Video Interface: DisplayPort (Dual-Head)
- Extension Distance: Up to 100m (330 ft) over two CAT5e/6/7 cables
- USB: USB 2.0 (Transparent extension, supports HID and mass storage)
- Serial: RS-232
- Audio: 3.5mm Microphone In, 3.5mm Headphone Out
- Dimensions (LxWxH): 12.5 x 3.75 x 9.75 inches
- Weight: 2.86 pounds
- Power: DC 5V (via included power adapters)
- Manufacturer: BLACKBOX NETWORK SERVICE
- ASIN: B08SVQ4HNT
Warranty and Support
For warranty information and technical support, please refer to the official Black Box website or contact their customer service directly. Keep your purchase receipt for warranty claims.
Black Box Website: www.blackbox.com


