1. Introduction and Safety Information
Thank you for choosing the GOPLUS FQ34865EFFR 4KG/75L Condensation Dryer. This manual provides essential information for the safe and efficient operation, installation, and maintenance of your appliance. Please read it thoroughly before use and keep it for future reference.
1.1 Important Safety Instructions
- Read all instructions before using the appliance.
- This appliance is for household use only.
- Do not install or store this appliance where it will be exposed to the weather or to temperatures below freezing.
- Do not dry articles that have been previously cleaned in, washed in, soaked in, or spotted with gasoline, dry-cleaning solvents, or other flammable or explosive substances, as they emit vapors that could ignite or explode.
- Do not allow children to play on or in the appliance. Close supervision of children is necessary when the appliance is used near children.
- Before the appliance is removed from service or discarded, remove the door to the drying compartment.
- Do not reach into the appliance if the drum is moving.
- Do not install or operate a damaged appliance. Contact customer service for assistance.
- Always unplug the appliance from the power supply before attempting any service.
- Ensure the lint filter is cleaned before or after each load.
2. Product Overview
The GOPLUS FQ34865EFFR is a compact 4KG/75L capacity condensation dryer designed for efficient and quiet operation (less than 50dB). It features multiple drying modes including Heat Dry, Air Dry, and Cool Down, controlled by a simple timer dial.
2.1 Components and Features
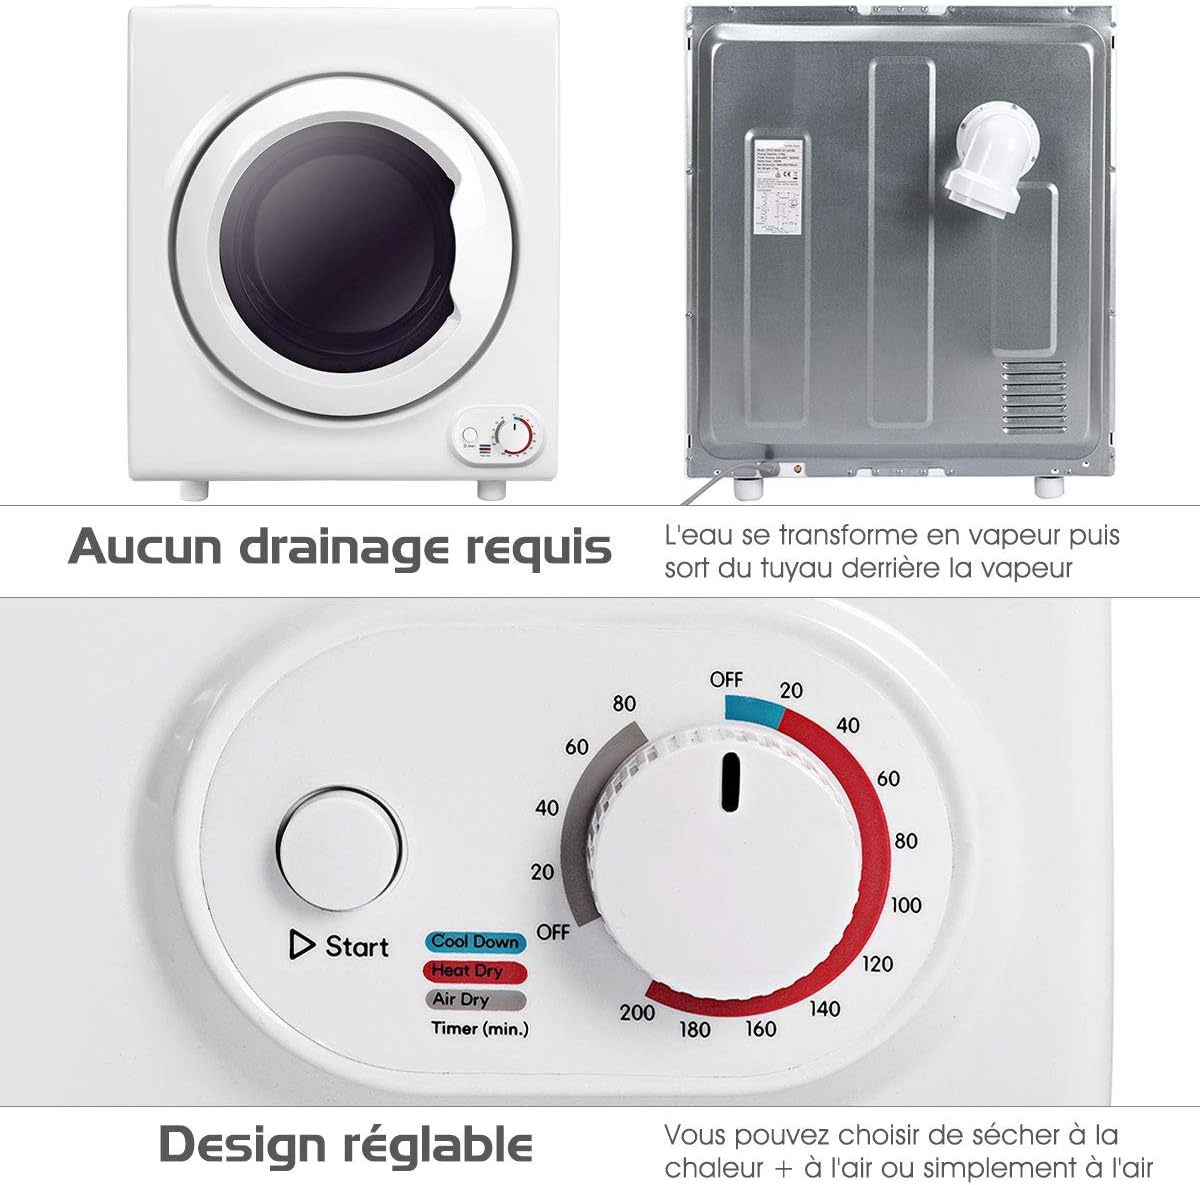
Image 2.1.1: Front and rear view of the dryer. The front shows the loading door and control panel. The rear indicates a connection point for steam/water drainage, suggesting it can be vented or directly drained.

Image 2.1.2: The control panel features a rotary dial for selecting drying time and mode (OFF, Cool Down, Heat Dry, Air Dry) and a 'Start' button.

Image 2.1.3: The dryer drum, highlighting its 4 kg capacity, suitable for various items like sheets, towels, jeans, and duvets.
3. Setup and Installation
3.1 Unpacking
Carefully remove the dryer from its packaging. Inspect for any shipping damage. Retain packaging materials for future transport if needed.
3.2 Placement
- Place the dryer on a firm, level surface. Ensure adequate clearance around the appliance for ventilation.
- Avoid placing the dryer in direct sunlight or near heat sources.
- The dryer dimensions are approximately 60 cm (width) x 40 cm (depth) x 70 cm (height). Ensure sufficient space for installation and door opening.

Image 3.2.1: Dryer dimensions for proper placement and installation planning.
3.3 Electrical Connection
Connect the dryer to a grounded electrical outlet. Ensure the power supply matches the specifications of the appliance (1400W). Do not use extension cords or adapters.
3.4 Drainage (Condensation Model)
As a condensation dryer, this appliance collects water from the drying process. The condensed water is typically collected in a removable water tank. Empty this tank after each drying cycle. Alternatively, the dryer may offer an option for direct drainage via a hose connected to a suitable drain. Refer to the specific instructions provided with your unit for direct drainage setup.
4. Operating Instructions
4.1 Preparing Laundry
- Sort laundry by fabric type and drying requirements.
- Ensure all items are thoroughly spun in a washing machine to remove excess water.
- Check pockets for any objects that could damage the dryer or laundry.
- Do not overload the dryer. The maximum capacity is 4 kg.
4.2 Loading the Dryer
Open the dryer door and load items loosely into the drum. Close the door firmly.
4.3 Selecting a Drying Program
Use the rotary dial on the control panel to select the desired drying mode and time:
- OFF: Turns the dryer off.
- Cool Down: Provides a period of no-heat tumbling to help prevent wrinkles and cool down items.
- Heat Dry: Uses heat to dry clothes. Adjust the timer (in minutes) according to the load size and desired dryness.
- Air Dry: Tumbles clothes without heat, suitable for delicate items or refreshing clothes.
Rotate the dial to the desired time setting within the chosen mode (e.g., 60 minutes for Heat Dry).
4.4 Starting the Dryer
Press the 'Start' button to begin the drying cycle. The dryer will operate for the selected duration.
4.5 After the Cycle
Once the cycle is complete, remove the laundry promptly to minimize wrinkles. Clean the lint filter and empty the water tank (if applicable) after each use.
5. Maintenance and Care
5.1 Cleaning the Lint Filter
The lint filter is located inside the dryer drum, near the door opening. It must be cleaned before or after every load to ensure efficient drying and prevent fire hazards. Pull out the filter, remove accumulated lint, and reinsert it securely.
5.2 Emptying the Water Tank
If your dryer uses a condensation tank, empty it after each drying cycle. The tank is typically located at the top or bottom of the appliance. Remove it, pour out the water, and replace it securely.
5.3 Cleaning the Exterior
Wipe the exterior of the dryer with a soft, damp cloth. Do not use abrasive cleaners or solvents.
5.4 Cleaning the Condenser (if applicable)
For optimal performance, the condenser unit (if accessible) may require periodic cleaning. Refer to specific instructions in your product manual for details on how to access and clean the condenser, usually every few months.
6. Troubleshooting
Before contacting customer service, please check the following common issues:
| Problem | Possible Cause | Solution |
|---|---|---|
| Dryer does not start | Not plugged in; Door not closed properly; Power outage; Timer not set. | Check power cord; Ensure door is latched; Check circuit breaker; Set timer and press start. |
| Clothes not drying properly | Lint filter clogged; Overloaded dryer; Incorrect program selected; Water tank full. | Clean lint filter; Reduce load size; Select appropriate drying mode/time; Empty water tank. |
| Unusual noise | Foreign objects in drum; Dryer not level. | Check drum for loose items; Ensure dryer is on a level surface. |
| Dryer stops mid-cycle | Overheating; Power interruption. | Clean lint filter; Ensure adequate ventilation; Check power supply. |
7. Specifications
- Brand: GOPLUS
- Model Number: FQ34865EFFR
- Type: Condensation Dryer
- Power: 1400W
- Drum Volume: 75L
- Capacity: 4 KG
- Dimensions (L x W x H): 60 x 40 x 70 cm
- Noise Level: Less than 50dB
- Color: Grey
8. Warranty and Support
For warranty information and customer support, please refer to the documentation provided at the time of purchase or contact your retailer/seller directly. Keep your proof of purchase for any warranty claims.