Introduction
Thank you for choosing the Toolman Portable Digital Tire Inflator Pump QTH080. This device is designed for convenient and efficient inflation of automobile tires, bicycle tires, motorcycle tires, sports equipment, and various inflatables. It features a digital pressure gauge, auto shut-off function, and an integrated LED light for ease of use in various conditions. Please read this manual thoroughly before operation to ensure safe and proper use.
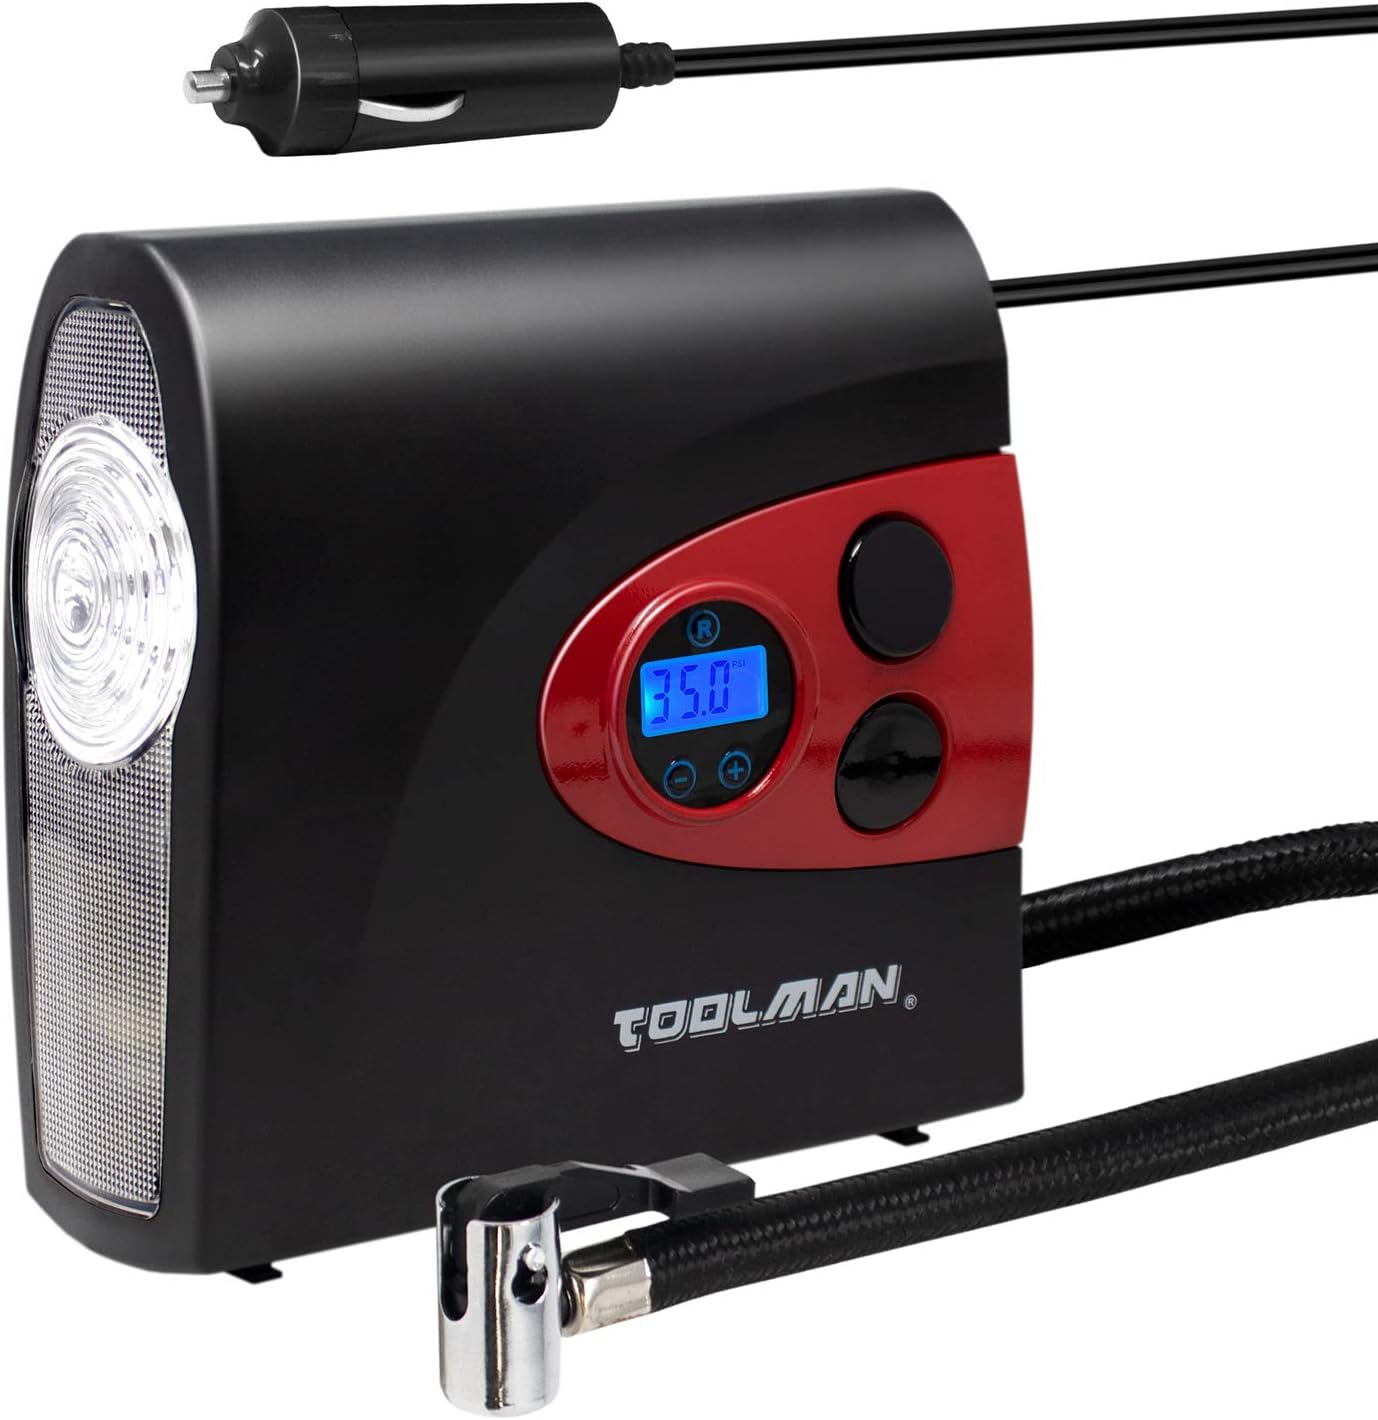
Image 1: The Toolman Portable Digital Tire Inflator Pump QTH080, showcasing its compact design and integrated power cable.
Safety Instructions
- Always operate the inflator in a well-ventilated area.
- Do not leave the inflator unattended during operation.
- Keep out of reach of children.
- Ensure the power source (12V DC cigarette lighter socket) is clean and free of debris.
- Do not operate the inflator if the power cord or air hose is damaged.
- Avoid over-inflating. Always refer to the recommended pressure for the item being inflated.
- The inflator is not designed for continuous heavy-duty use. Allow it to cool down after 10-15 minutes of continuous operation.
- This device is not suitable for truck tires.
Package Contents
- Toolman Portable Digital Tire Inflator Pump QTH080
- 12V DC Power Cable with Cigarette Lighter Plug
- Air Hose with Tire Valve Connector
- 3 Bonus Nozzle Adapters:
- Sports ball needle
- Plastic tapered nozzle (for inflatables)
- Spare fuse
- Carry Case
Product Overview
Familiarize yourself with the components of your Toolman Digital Tire Inflator.

Image 2: Overview of the Toolman Digital Tire Inflator Pump QTH080, highlighting key components such as the digital display, control buttons, LED light, cigarette inlet, and various adapters.
- Cigarette Inlet: 12V DC power connection.
- Digital PSI / BAR / KPA LCD Display: Shows current and preset pressure.
- Light Switch: Activates the integrated LED light.
- Start / Stop Button: Initiates or halts the inflation process.
- Decrease Pressure Button (-): Used to lower the preset target pressure.
- Increase Pressure Button (+): Used to raise the preset target pressure.
- PSI / BAR / KPA Switch: Toggles between pressure units.
- Bright LED Light: Provides illumination in low-light conditions.
- Adapter: Quick-connect for the air hose.
- Air Inflator Needle: For sports balls.
- Plastic Tapered Nozzle: For various inflatables.
Setup
Before using the inflator, ensure your vehicle's engine is running to provide stable power.
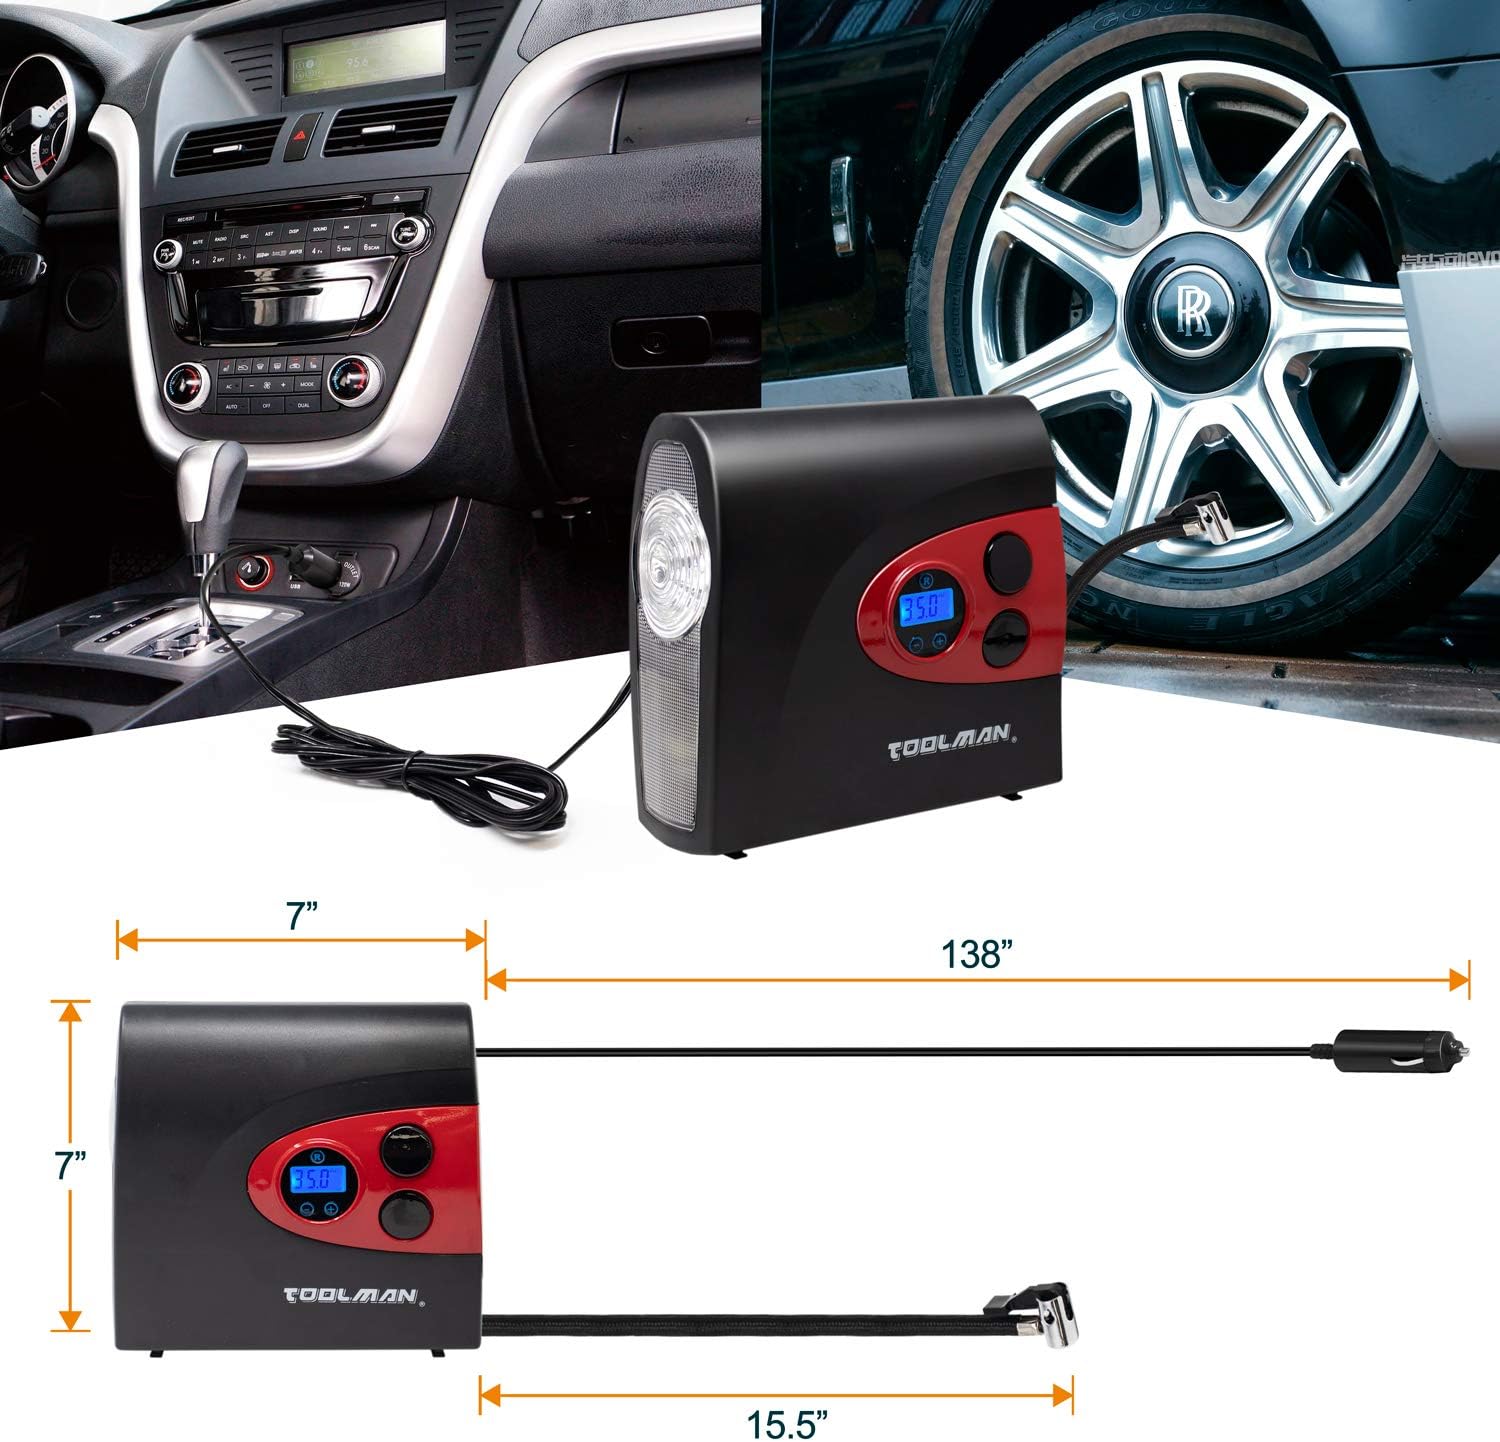
Image 3: The Toolman inflator positioned in a car's interior, demonstrating its portability and readiness for connection to a tire.
Start the Car: Turn on your vehicle's engine. This ensures sufficient power supply to the inflator and prevents draining your car battery.
Connect to Power: Insert the 12V DC power plug into your car's cigarette lighter socket. Ensure a firm connection.
Attach Air Hose: Connect the inflation port of the air hose to the tire valve core. Ensure a secure connection to prevent air leakage. For items other than standard car tires, attach the appropriate adapter first.
Operating Instructions
Follow these steps to inflate your tires or other items:
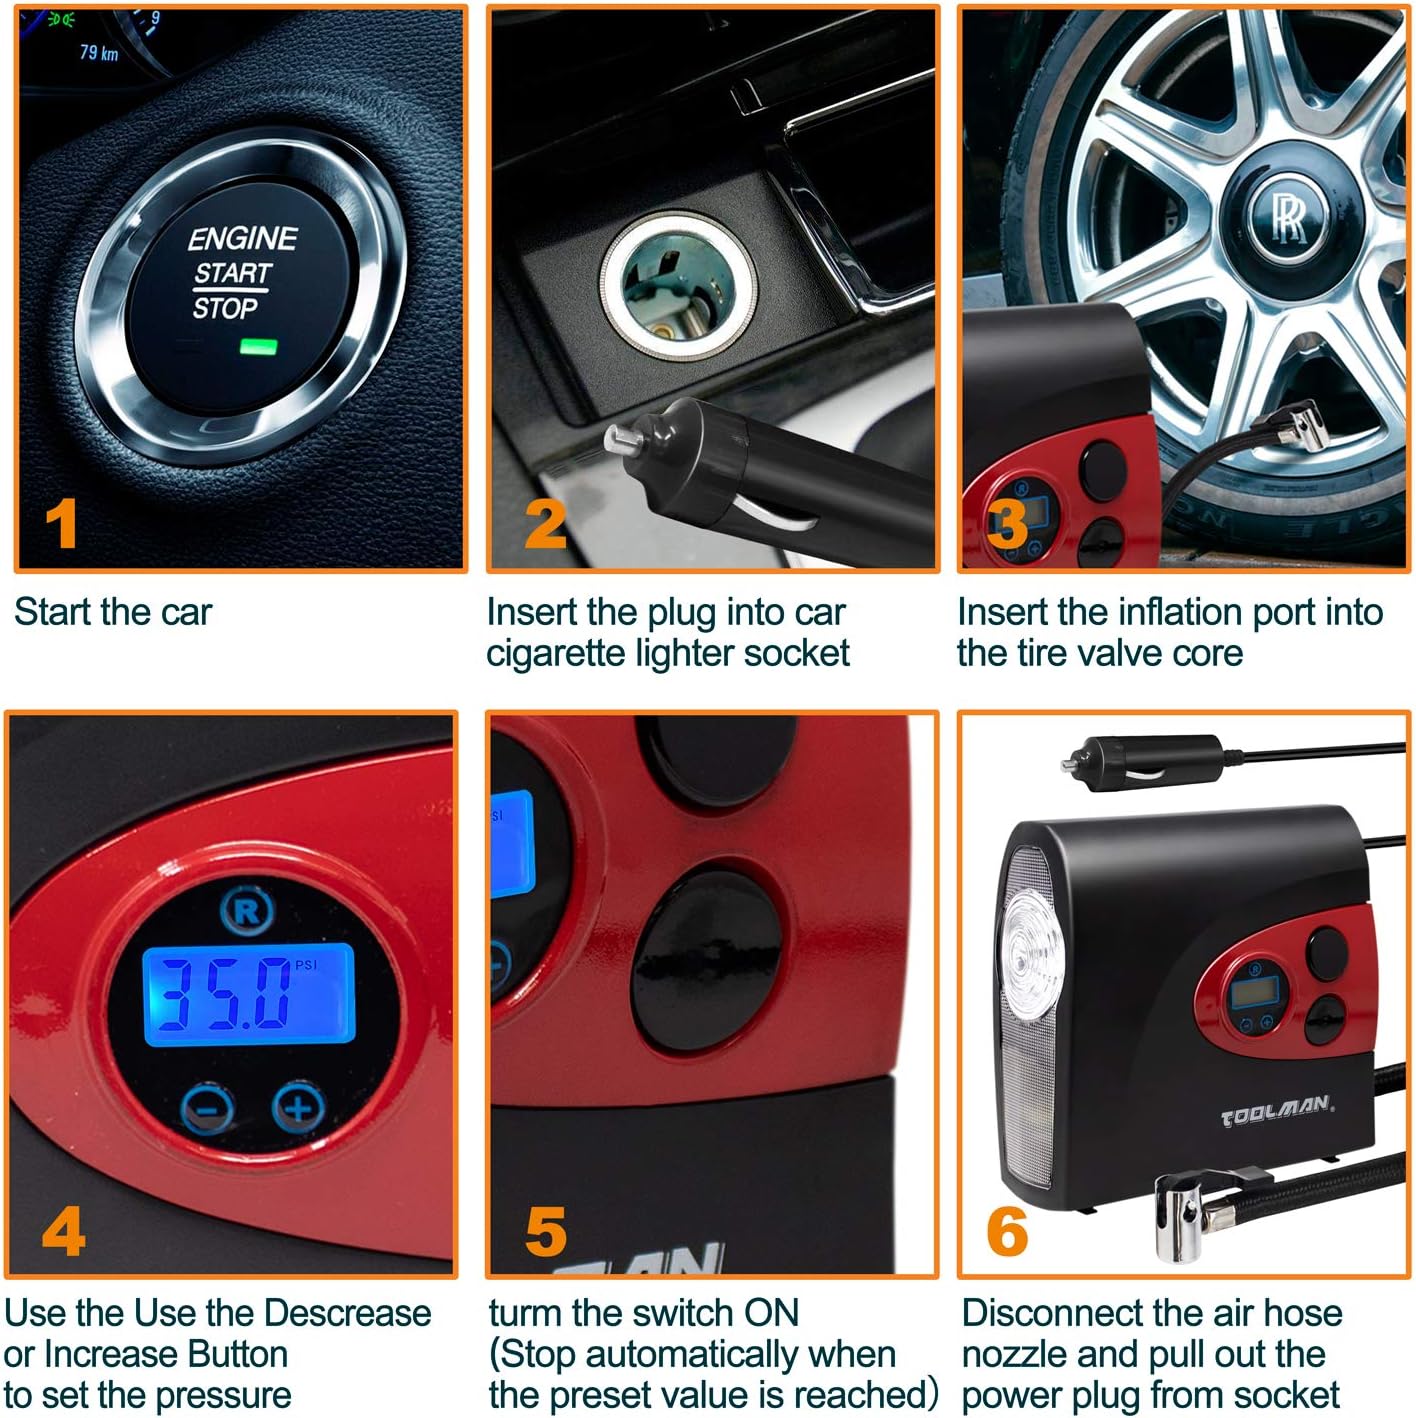
Image 4: A visual sequence demonstrating the inflation process: 1. Start the car, 2. Insert plug into cigarette lighter, 3. Insert inflation port into tire valve, 4. Use buttons to set pressure, 5. Turn ON to inflate (auto-stop), 6. Disconnect air hose and power plug.
Set Desired Pressure: With the inflator powered on and connected, the digital display will show the current pressure. Use the Decrease (-) or Increase (+) buttons to set your desired target pressure. Press the PSI / BAR / KPA Switch to cycle through pressure units if needed.
Start Inflation: Press the Start / Stop button to begin inflation. The inflator will automatically stop once the preset pressure value is reached.
Disconnect: Once inflation is complete and the device has stopped, disconnect the air hose nozzle from the tire valve and then pull out the power plug from the cigarette lighter socket.
Using the LED Light: Press the Light Switch to turn on the integrated LED light. This is useful for operating the inflator in dark environments or during nighttime emergencies.
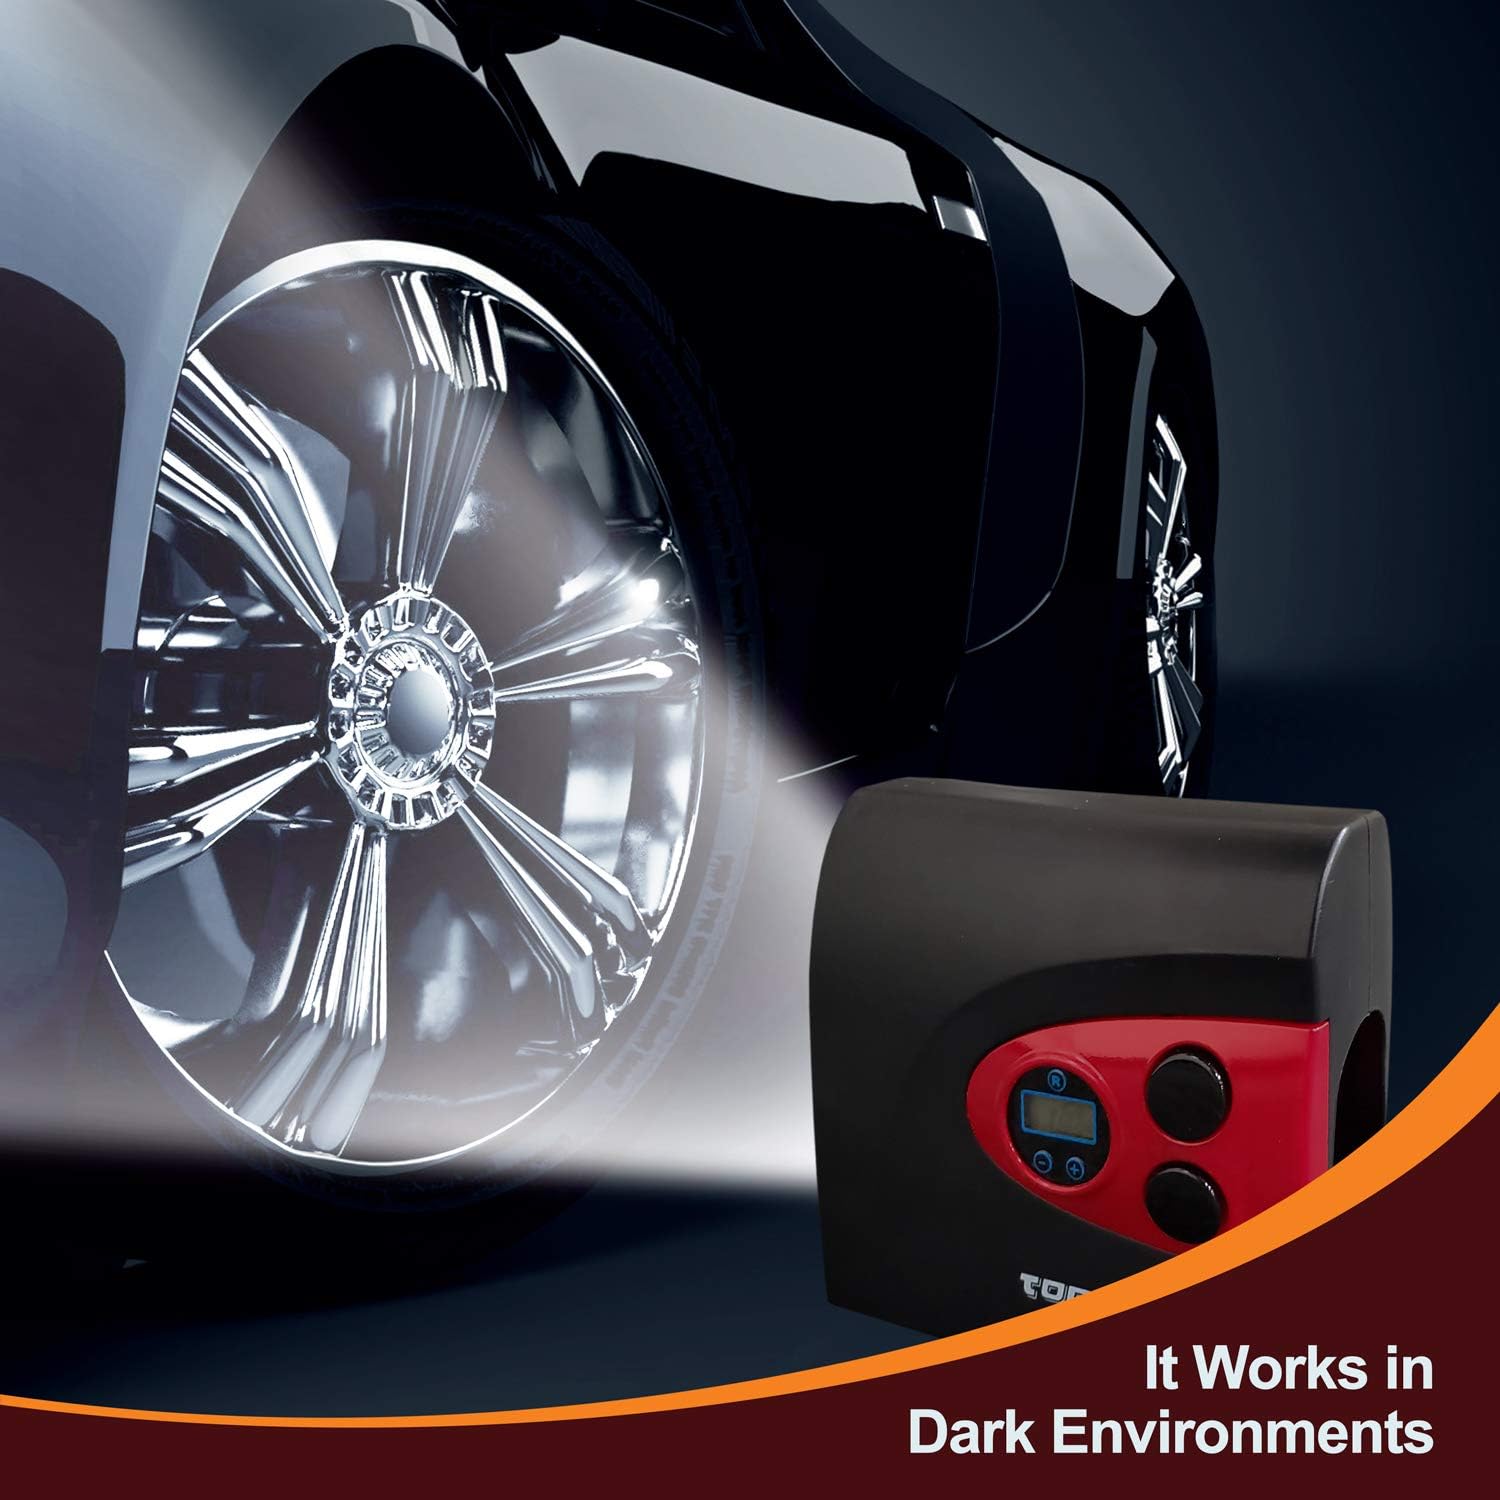
Image 5: The Toolman inflator illuminating a car tire in a dark setting, demonstrating the utility of its LED light.
Using Adapters for Multiple Functions
The Toolman Digital Tire Inflator comes with various adapters to inflate different items.
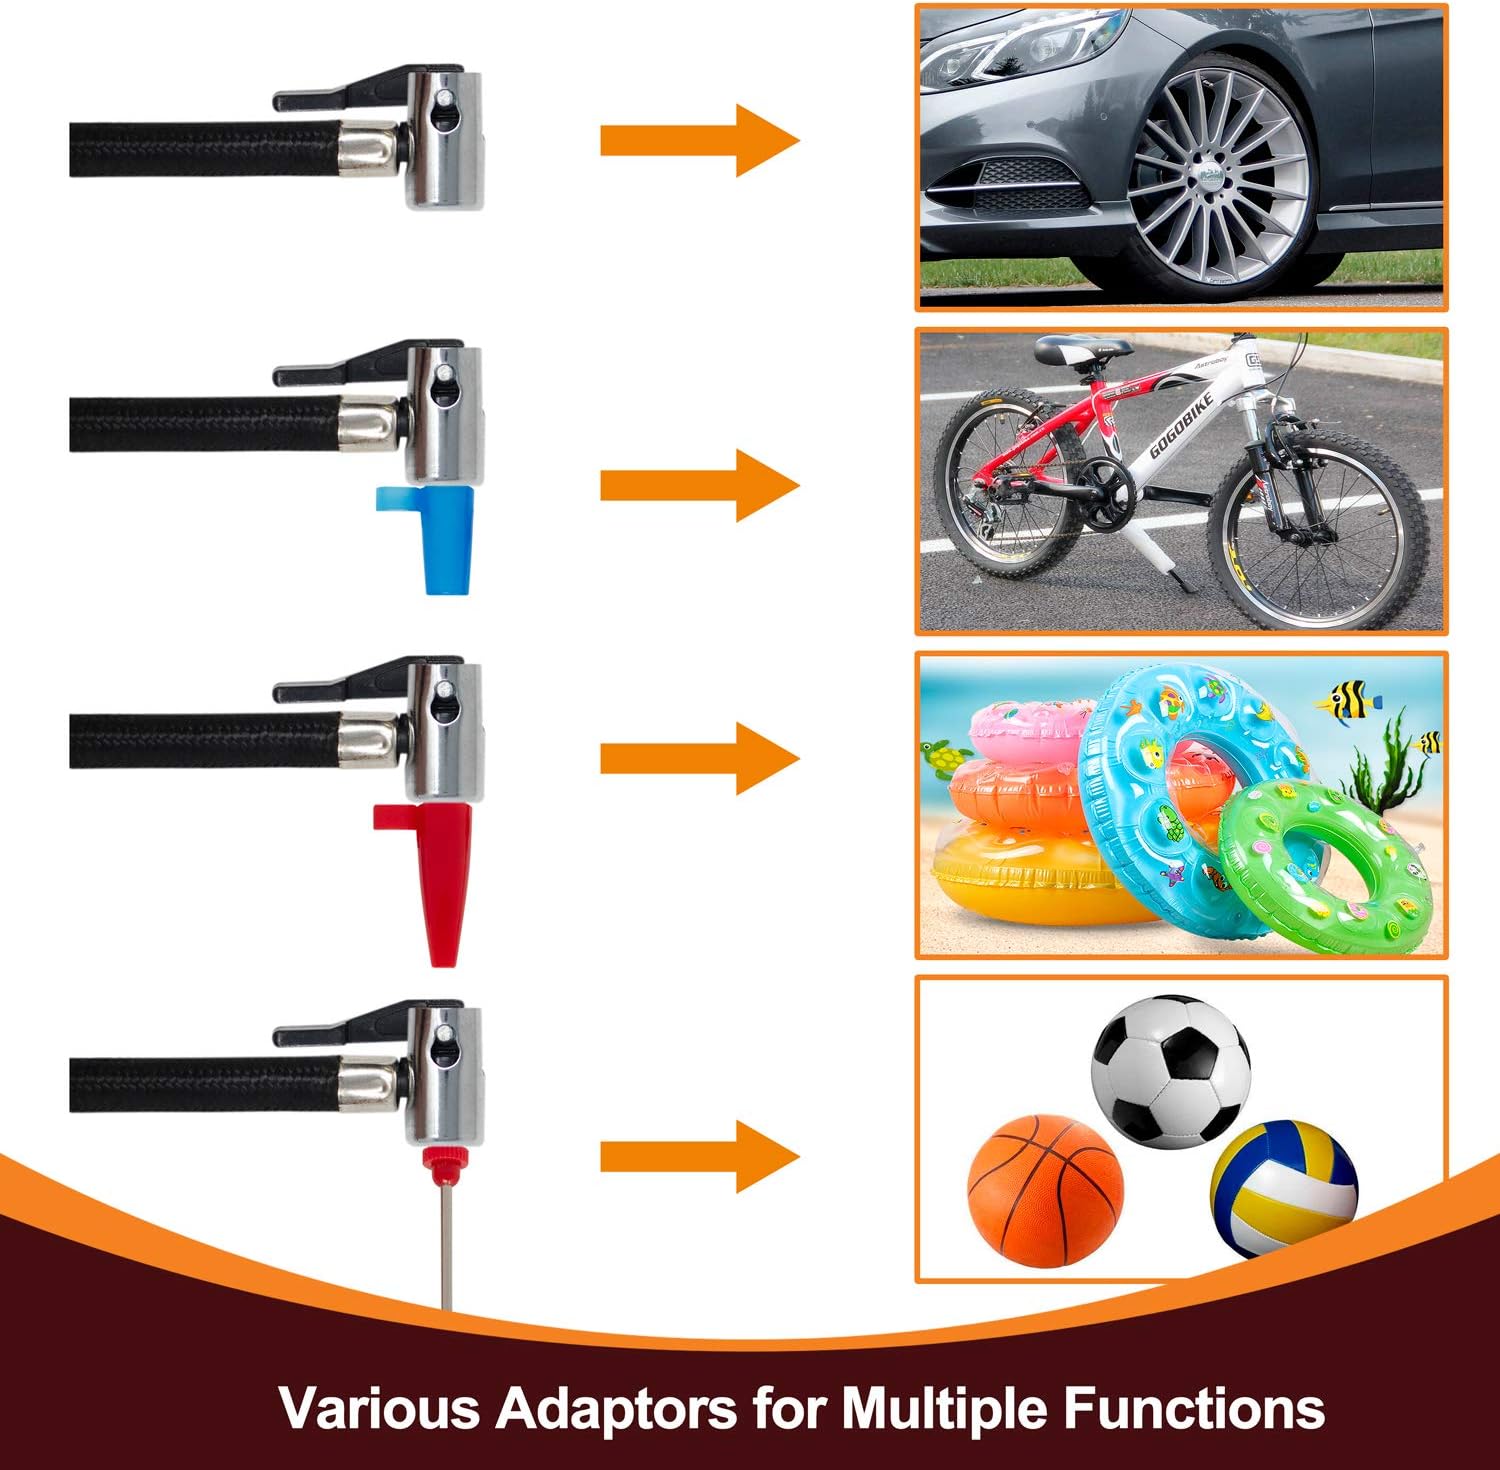
Image 6: Visual guide showing the standard tire valve connector and the additional adapters (plastic tapered nozzle, sports ball needle) for inflating different items like car tires, bicycle tires, pool toys, and sports balls.
- Car Tires: Use the standard tire valve connector directly.
- Bicycle Tires: Depending on the valve type (Presta or Schrader), you may use the standard connector or an appropriate adapter (not all bicycle valves are compatible with the standard connector; additional adapters may be required for Presta valves, which are not included).
- Inflatables (e.g., pool toys, air mattresses): Attach the plastic tapered nozzle to the air hose and insert it into the inflatable's valve.
- Sports Balls (e.g., basketballs, footballs): Attach the sports ball needle to the air hose and insert it into the ball's inflation port.
Note: Always ensure the correct adapter is securely attached before inflation.
Maintenance
- Cleaning: Wipe the exterior of the inflator with a soft, damp cloth. Do not use harsh chemicals or abrasive cleaners.
- Storage: Store the inflator in its carry case in a cool, dry place, away from direct sunlight and extreme temperatures.
- Air Hose: Inspect the air hose regularly for cracks, kinks, or damage. Replace if necessary.
- Fuse Replacement: The inflator includes a spare fuse. If the device stops working, check the fuse in the cigarette lighter plug and replace it if blown. Refer to a qualified technician if unsure.
Troubleshooting
| Problem | Possible Cause | Solution |
|---|---|---|
| Inflator does not turn on. | No power from car socket; Blown fuse in plug; Car engine not running. | Ensure car engine is running. Check car's cigarette lighter socket for power. Replace fuse in the inflator's plug if blown. |
| Slow inflation or no inflation. | Air hose not securely connected; Leak in hose/valve; Item already at desired pressure. | Ensure all connections are tight. Check air hose and valve for leaks. Verify the target pressure setting. |
| Inflator stops before reaching target pressure. | Overheating; Internal fault. | Allow the inflator to cool down for 15-20 minutes. If problem persists, contact customer support. |
| Inaccurate pressure reading. | Sensor issue; Incorrect unit setting. | Ensure the correct pressure unit (PSI, BAR, KPA) is selected. Compare reading with a known accurate gauge if possible. |
Specifications
| Brand | Toolman |
| Model Number | QTH080 |
| Power Source | 12V DC (Corded Electric) |
| Max Pressure | 150 PSI |
| Special Features | Automatic Shut-Off, Digital Display, Portable, Front LED Light |
| Item Weight | 871 g |
| UPC | 826656006513 |
Note: Specifications are subject to change without notice.
Warranty and Support
Toolman offers a LIFETIME Money-Back Guarantee for this product, indicating confidence in its quality and performance. For any questions, technical support, or warranty claims, please refer to the contact information provided with your purchase or visit the official Toolman website.
Please retain your proof of purchase for warranty purposes.


