1. Introduction
This manual provides essential instructions for the safe and efficient use of your Airmaster Electric Heater Attachment Model 78966. Please read this manual thoroughly before installation and operation, and retain it for future reference. This attachment is designed to convert a compatible blower into a lightweight, portable indoor electric heater.

Figure 1: Front-side view of the Airmaster Electric Heater Attachment. This image shows the compact design of the heater attachment, featuring its metal grille, power cord, and the red warning label on top.
2. Important Safety Instructions
Failure to follow these safety instructions may result in fire, electric shock, injury, or property damage. Always exercise caution when operating electrical heating devices.
- WARNING: This product can expose you to chemicals including lead, which is known to the State of California to cause cancer and birth defects or other reproductive harm. For more information go to www.P65Warnings.ca.gov.
- DANGER: High temperatures. Do not cover or obstruct the front of this heater. Maintain clear space around the heater to prevent fire hazards.
- CAUTION: Risk of electric shock. Do not open. Refer servicing to qualified personnel.
- Ensure the heater is securely attached to the blower before operation.
- Do not operate the heater with a damaged cord or plug.
- Do not use in wet or damp locations.
- Keep flammable materials at least 3 feet (0.9 meters) away from the front, sides, and rear of the heater.
- Unplug the heater when not in use.
3. Product Features
- Power Specifications: 120V, 60 Hz, 10 Amps, 1320 Watts, 4500 BTU Heating Capacity.
- Converts compatible blowers into a lightweight, portable indoor electric heater.
- Clips securely onto the front of the blower for stable attachment.
- Plugs into an outlet located on the side of the blower.
- Equipped with thermal protection for enhanced safety.
- Features an 8-inch cord with a grounded plug.
- Includes an illuminated On/Off rocker switch for easy operation.
- Ideal for heating basements, garages, job sites, home gyms, and similar indoor spaces.
4. Package Contents
Verify that all items are present and undamaged upon opening the package.
- 1 x Airmaster Electric Heater Attachment (Model 78966)
5. Setup Instructions
Follow these steps to properly attach the heater to your compatible blower.
- Ensure Blower is Off: Before beginning, ensure your blower unit is turned off and unplugged from its power source.
- Position Heater Attachment: Align the Airmaster Electric Heater Attachment with the front opening of your compatible blower.
- Secure Clips: Gently push the heater attachment onto the blower until the integrated clips securely engage with the blower's housing. Ensure it is firmly seated and does not wobble.
- Connect Power Cord: Take the 8-inch power cord from the heater attachment and plug it into the designated outlet located on the side of your blower unit.
- Final Check: Verify that the attachment is stable and the cord is properly connected before proceeding to operation.
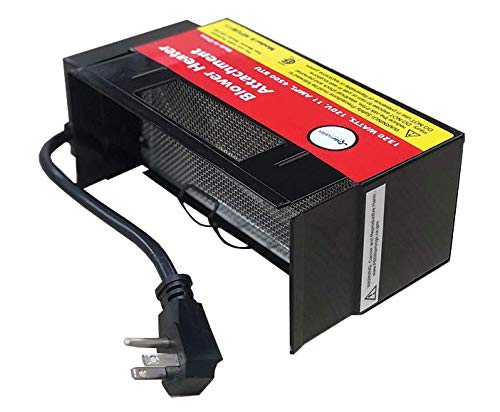
Figure 2: Angled view of the Airmaster Electric Heater Attachment, highlighting the power cord and the side profile designed for blower attachment. This image illustrates the connection point for the blower.
6. Operating Instructions
Once the heater attachment is securely installed, follow these steps to operate it.
- Plug in Blower: Plug your blower unit (with the heater attachment installed) into a standard 120V, 60 Hz electrical outlet.
- Turn On Blower: Activate your blower unit according to its own operating instructions. The blower must be running for the heater attachment to function correctly.
- Activate Heater: Locate the illuminated On/Off rocker switch on the Airmaster Electric Heater Attachment. Press the switch to the "On" position. The switch will illuminate, indicating the heater is active and generating heat.
- Adjust Settings (if applicable): If your blower has adjustable fan speeds, you may adjust them to control the distribution of heated air.
- To Turn Off: To cease heating, press the rocker switch on the heater attachment to the "Off" position. The illumination will turn off. For complete power disconnection, unplug the blower unit from the wall outlet.
7. Maintenance
Regular maintenance ensures optimal performance and longevity of your heater attachment.
- Cleaning: Ensure the heater is unplugged and completely cool before cleaning. Use a soft, dry cloth to wipe down the exterior surfaces. Do not use abrasive cleaners or immerse the unit in water.
- Grille Inspection: Periodically check the metal grille for any dust or debris accumulation. Use a vacuum cleaner with a brush attachment to gently remove any blockages. Ensure the grille remains unobstructed for proper airflow.
- Cord Inspection: Regularly inspect the power cord for any signs of damage, fraying, or cuts. If damage is found, discontinue use immediately and contact customer support.
- Storage: When not in use, store the heater attachment in a cool, dry place, away from direct sunlight and moisture.
8. Troubleshooting
Refer to this section for solutions to common issues.
| Problem | Possible Cause | Solution |
|---|---|---|
| Heater does not turn on. |
|
|
| No heat output. |
|
|
| Unusual odor or smoke. |
|
|
9. Specifications
| Attribute | Value |
|---|---|
| Model Number | 78966 |
| Brand | Airmaster |
| Voltage | 120V |
| Frequency | 60 Hz |
| Amperage | 10 Amps |
| Wattage | 1320 Watts |
| Heating Capacity | 4500 BTU |
| Product Dimensions | 8.75 x 5 x 3.25 inches |
| Item Weight | 2 Pounds |
| Cord Length | 8 inches (with grounded plug) |
| Manufacturer | Airmaster |
10. Warranty and Customer Support
For warranty information, technical assistance, or to report issues with your Airmaster Electric Heater Attachment, please contact Airmaster customer support directly. Specific warranty terms and conditions may vary and are typically provided with your purchase documentation or available on the manufacturer's official website.
You can visit the Airmaster Store for more information: Airmaster Store on Amazon


