
1. Introduction
This manual provides essential information for the proper setup, operation, and maintenance of your Weewooday PAM8406 Mini Audio Amplifier Board. This Class D digital power module is designed for DIY sound systems, offering dual-channel stereo amplification with a 5V power supply.
Please read this manual thoroughly before use to ensure optimal performance and safety.
2. Product Overview
2.1 Key Features
- High Efficiency: Over 90% efficiency, suitable for portable applications.
- Protection Features: Includes short-circuit protection and thermal protection.
- Quality Components: Features a black immersion gold circuit board, KEMET audio capacitors, and large-capacity filter capacitors per channel.
- Input/Output: Single-ended 3.5 mm audio input, dual-channel stereo output.
- Power Output: Up to 5W (2Ω 5V), 3W (4Ω 5V), or 1.8W (8Ω 5V).
2.2 Component Identification
Familiarize yourself with the various components of the amplifier board:

Image: Detailed view of the PAM8406 amplifier board with key components labeled. This includes the PAM8406 amplifier chip, 3.5mm gold-plated audio input terminal blocks, imported KEMET speaker capacitors, large-capacity filter capacitors, DC power input (+5V), right and left channel speaker outputs, and the volume adjustment knob.
- PAM8406 Amplifier Chip: The main processing unit for audio amplification.
- 3.5mm Audio Input: Gold-plated terminal blocks for connecting your audio source.
- Speaker Output Terminals: Screw terminals for connecting left and right channel speakers (L+, L-, R+, R-).
- DC Power Input: Terminals for connecting a 5V DC power supply.
- Volume Knob: Rotary control for adjusting the audio output level.
- Mode Selection Jumpers (SD, MUTE): Configurable pins for shutdown and mute functions.
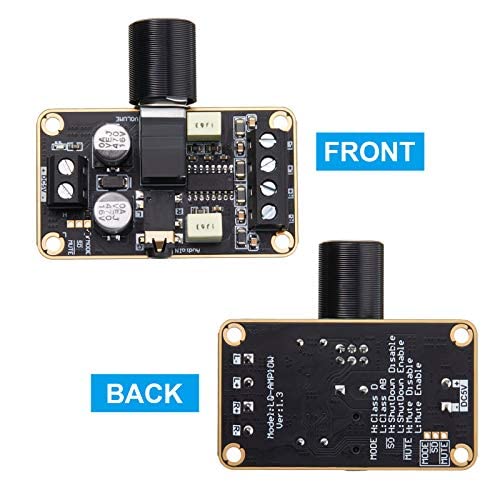
Image: Front and back views of the PAM8406 amplifier board. The front view shows the main components and connections, while the back view displays the model number (L-D-AMP10W Ver:1.3) and labels for the MODE, SD, and MUTE jumpers, indicating their default high/low level settings for Class D/AB, shutdown, and mute functions.
3. Setup Instructions
Follow these steps to correctly set up your PAM8406 amplifier board:
3.1 Power Supply Connection
- Connect a DC 5V power supply to the designated DC 5V input terminals on the board.
- Ensure correct polarity: connect the positive (+) terminal of the power supply to DC power+ and the negative (-) terminal to DC power-.
- Caution: Do not exceed 5V DC. Overvoltage will damage the IC.
3.2 Speaker Connection
- Connect your speakers to the L+, L-, R+, R- terminals.
- L+ and L- are for the left channel speaker.
- R+ and R- are for the right channel speaker.
- Ensure correct polarity for each speaker to avoid phase issues.
- Recommended speaker impedance: 2Ω, 4Ω, or 8Ω.
3.3 Audio Input Connection
- Connect your audio source (e.g., smartphone, MP3 player, PC) to the 3.5mm audio input terminal blocks.
- The input method is single-ended.
3.4 Mode Selection (Optional)
The board features jumpers for advanced configuration:
- Amplifier Type (MODE): Default is high power (Class D). Can be configured for low power (Class AB) if desired. Refer to the board's silkscreen for specific jumper settings.
- External Shutdown (SD): Default is high power level. At a low power level, the chip will shut down.
- Mute (MUTE): Default is high level (unmuted). A low level will mute the output.
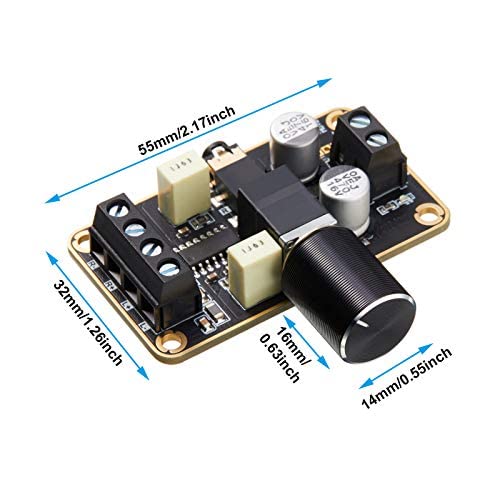
Image: A wiring example demonstrating how to connect a smartphone as an audio source (3.5mm input), two 3W small speakers (left and right channels), and a 5V DC battery as the power supply to the PAM8406 amplifier board.
4. Operating Instructions
4.1 Power On/Off
The amplifier powers on automatically when a 5V DC supply is connected. Disconnect the power supply to turn off the amplifier.
4.2 Volume Adjustment
- Rotate the volume knob clockwise to increase the volume.
- Rotate the volume knob counter-clockwise to decrease the volume.
For optimal sound quality, ensure your audio source's volume is set to a sufficient level before adjusting the amplifier's volume.
5. Maintenance
- Keep the board clean and free from dust and moisture.
- Avoid exposing the board to extreme temperatures or direct sunlight.
- Do not attempt to modify the circuit board unless you are a qualified electronics technician.
6. Troubleshooting
6.1 No Sound Output
- Check Power: Ensure the 5V DC power supply is correctly connected and providing power.
- Check Connections: Verify all audio input and speaker output connections are secure and correctly wired.
- Audio Source Volume: Confirm the volume on your audio source (e.g., PC, phone) is turned up. Some sources may require maximum output for adequate signal to the amplifier.
- Amplifier Volume: Ensure the amplifier's volume knob is not set to minimum.
- Mute Jumper: Check if the MUTE jumper is set to a low level, which would mute the output.
6.2 Distorted Sound
- Volume Levels: Reduce the volume on both the audio source and the amplifier. Overdriving either can cause distortion.
- Power Supply: Ensure the 5V DC power supply is stable and can provide sufficient current for the desired output.
- Speaker Impedance: Verify that your speakers' impedance is compatible (2Ω, 4Ω, or 8Ω).
6.3 Board Overheating
- Power Supply: Confirm the power supply voltage is exactly 5V DC. Overvoltage can cause excessive heat.
- Load: Ensure speakers are correctly connected and not short-circuited.
- Ventilation: Provide adequate ventilation around the board, especially during prolonged high-power operation.
7. Specifications
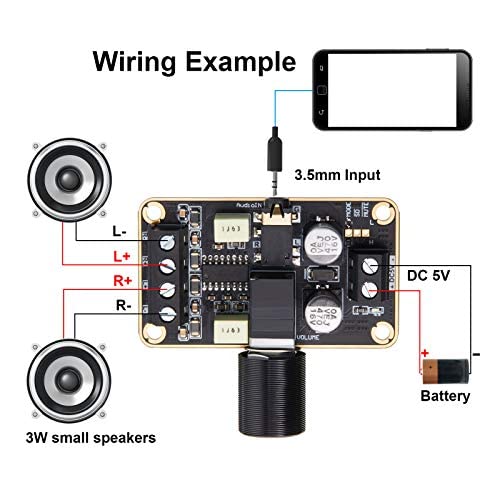
Image: Diagram showing the dimensions of the PAM8406 amplifier board. The board measures 32mm (1.26 inches) in width and 55mm (2.17 inches) in length. The volume knob extends 16mm (0.63 inches) from the board and has a diameter of 14mm (0.55 inches).
| Specification | Value |
|---|---|
| Model | PAM8406 |
| Working Voltage | DC 5V (Do not exceed) |
| Output Power | 5W (2Ω 5V) / 3W (4Ω 5V) / 1.8W (8Ω 5V) |
| Efficiency | >90% |
| Input Method | Single-ended (3.5 mm audio monaural input) |
| General Harmonic Distortion and Noise | <10% |
| Number of Channels | 2 (Stereo) |
| Dimensions (L x W) | 55 mm x 32 mm (2.17 in x 1.26 in) |
| Weight | Approximately 25 g (0.055 lbs) |
| Mounting Type | Surface Mount |
| Material Type | Gold (for contacts/plating) |
8. Safety Information
- Always ensure the power supply is disconnected before making or changing any connections.
- Do not operate the board in wet or damp conditions.
- Keep out of reach of children.
- Handle with care to avoid damaging sensitive electronic components.
- Only use a stable 5V DC power supply. Incorrect voltage can cause permanent damage or fire.
9. Warranty and Support
For warranty information and technical support, please refer to the documentation provided with your purchase or contact Weewooday customer service directly. Keep your purchase receipt for warranty claims.
For further assistance, visit the official Weewooday website or contact their support channels.