
1. Introduction
Thank you for choosing the PARKVISION PAL-120 Rear View Camera. This manual provides detailed instructions for the installation, operation, and maintenance of your new camera. Please read this manual thoroughly before installation and use to ensure proper function and safety.
The PAL-120 is designed to enhance your vehicle's safety by providing a clear view of the area behind your vehicle, assisting with parking and reversing maneuvers. It features a flexible mounting position, switchable image orientation, and optional parking guidelines.
2. Product Overview
2.1 Key Features
- Dual Video System Compatibility: Supports both PAL and NTSC video systems, making it suitable for most vehicle types.
- High Definition Imaging: Equipped with a 1/3" CMOS image sensor, providing clear vision day and night with effective pixels of 960x576 (NTSC) or 960x480 (PAL).
- Control Wires for Customization: Features dedicated wires for switching video systems, vertically inverting the image, and toggling parking guidelines.
- Adjustable Viewing Angle: Includes two gaskets for fine-tuning the camera's angle by approximately 5° or 10° to achieve optimal rear visibility.
- Compact and Discreet Design: Mini size with a durable zinc alloy metal housing, allowing for easy and discreet installation.
- Wide Voltage Range: Compatible with DC 9V-16V vehicle electrical systems.
- IP68 Waterproof Rating: Ensures reliable performance in various weather conditions.
2.2 Product Components
The PARKVISION PAL-120 camera package typically includes:
- PARKVISION PAL-120 Rear View Camera
- Video Cable (RCA)
- Power Cable
- Adjustable Gaskets (2 pcs)
- User Manual (this document)

Image 2.1: PARKVISION PAL-120 Rear View Camera.
3. Setup and Installation
Important: Always test the camera before routing the video cable from the rear to the front of the vehicle. Use only the wiring provided with the camera for installation. Do not use wires from other brands or existing vehicle wiring to avoid functionality issues.
3.1 Wiring Connections
- Power Connection: Connect the camera's power cable to the vehicle's reverse light power supply (typically 12V DC). This ensures the camera activates when the vehicle is put into reverse.
- Video Connection: Connect the camera's RCA video output cable to the video input of your head unit or monitor. If your head unit has a reverse trigger wire (often pink), connect it to the trigger wire on the RCA video cable. If not, this connection is not necessary.
- Ground Connection: Ensure a secure ground connection for the camera. Try different grounding points (e.g., a metal part of the vehicle chassis) if you experience image issues.
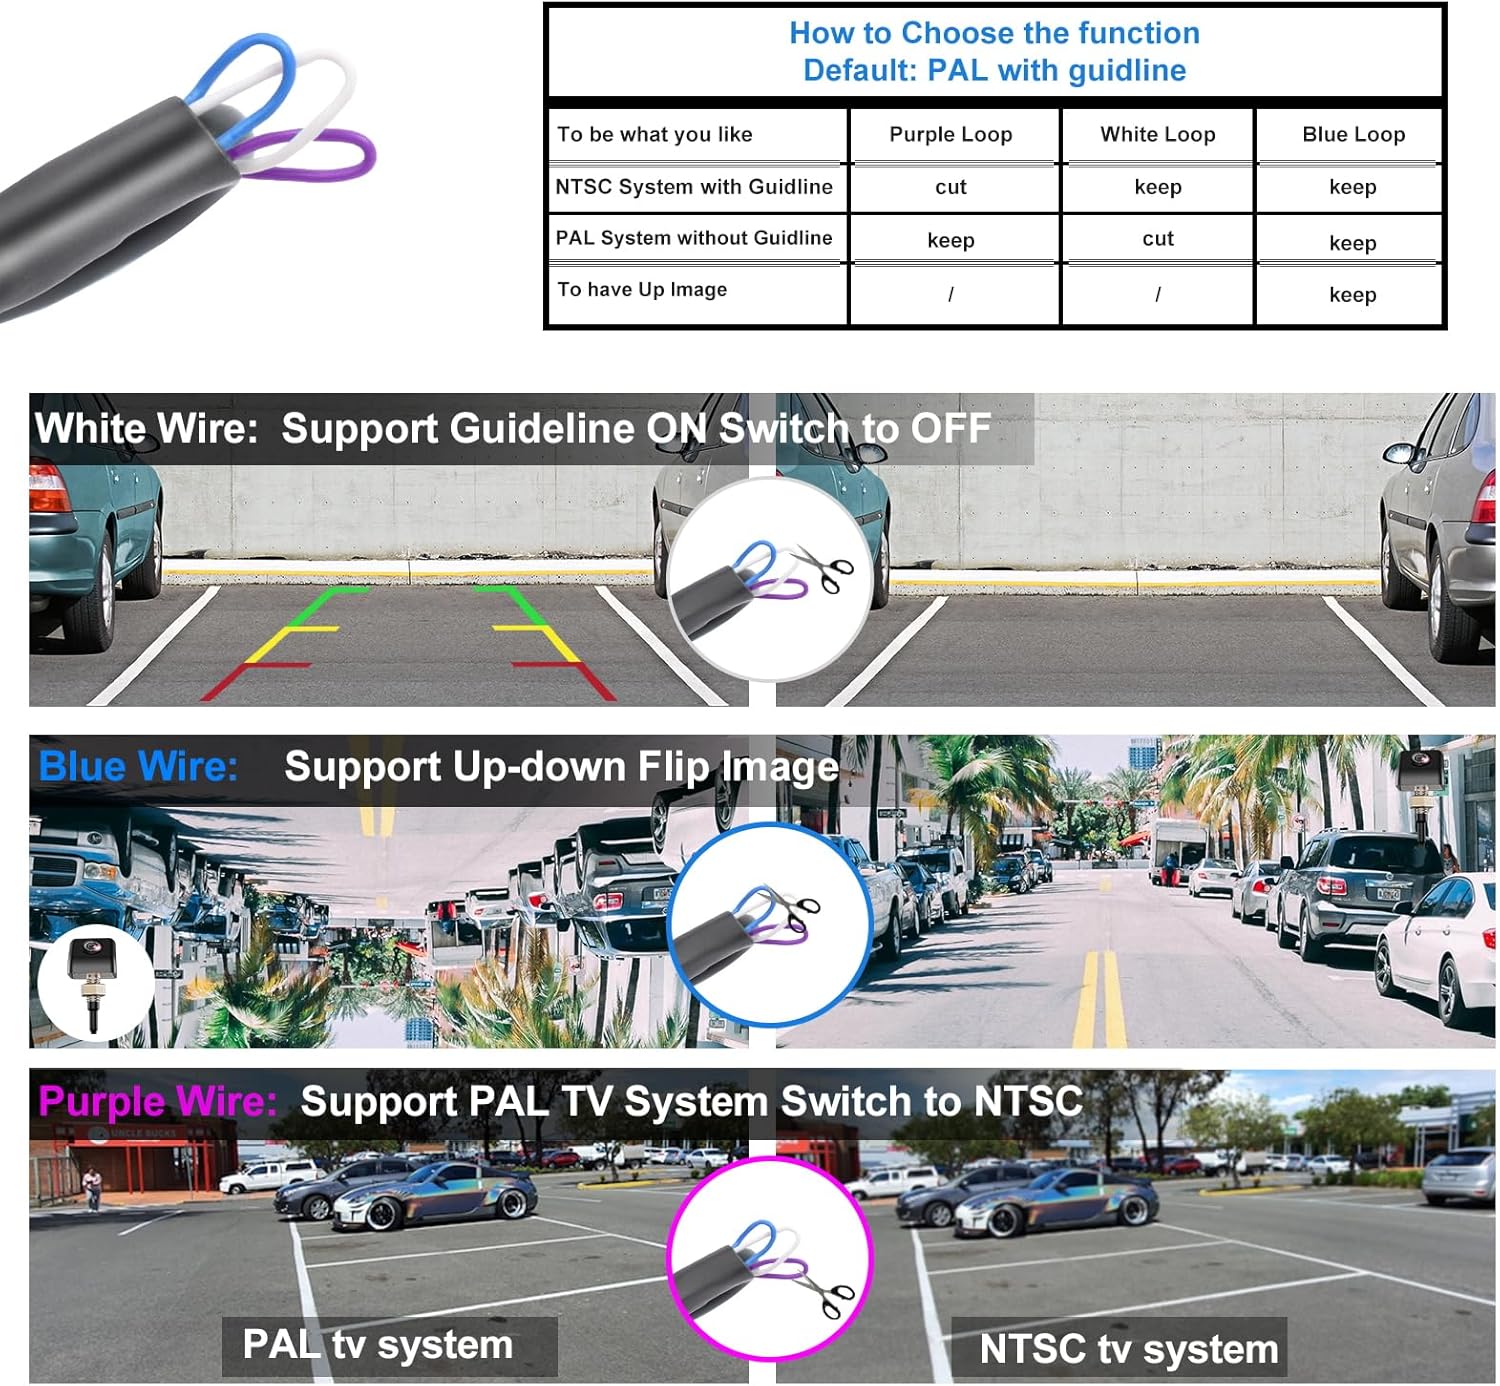
Image 3.1: Illustration of control wires for function selection.
3.2 Mounting the Camera
The PAL-120 features a mini, compact design for discreet installation. It can be mounted in various locations, such as above the license plate or integrated into a suitable vehicle panel.
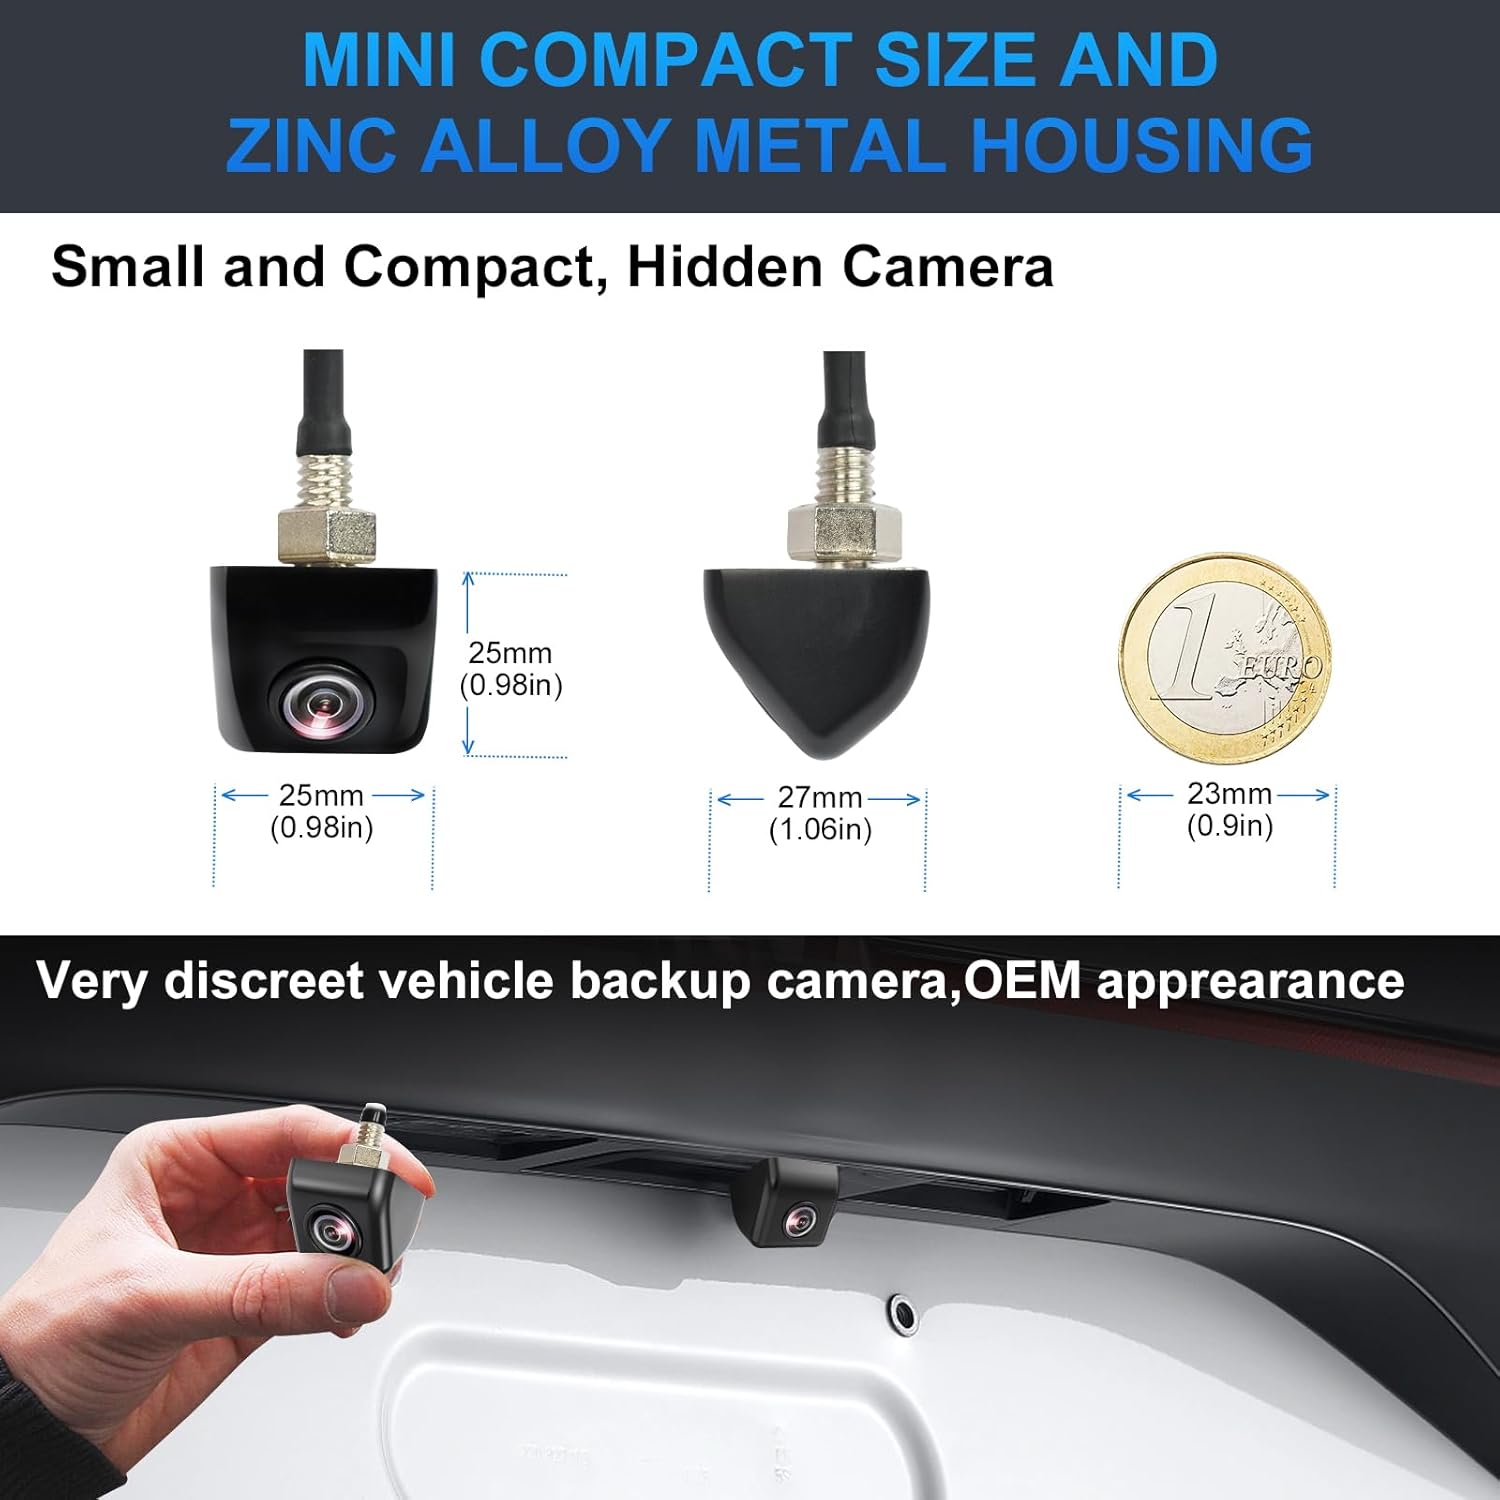
Image 3.2: Dimensions and discreet appearance of the camera.
3.3 Adjusting the Viewing Angle
The camera comes with two gaskets that allow for fine adjustment of the viewing angle. Each gasket can adjust the angle by approximately 5°, providing a total adjustment range of up to 10° when both are used. This helps optimize the camera's view based on your vehicle's specific mounting position.
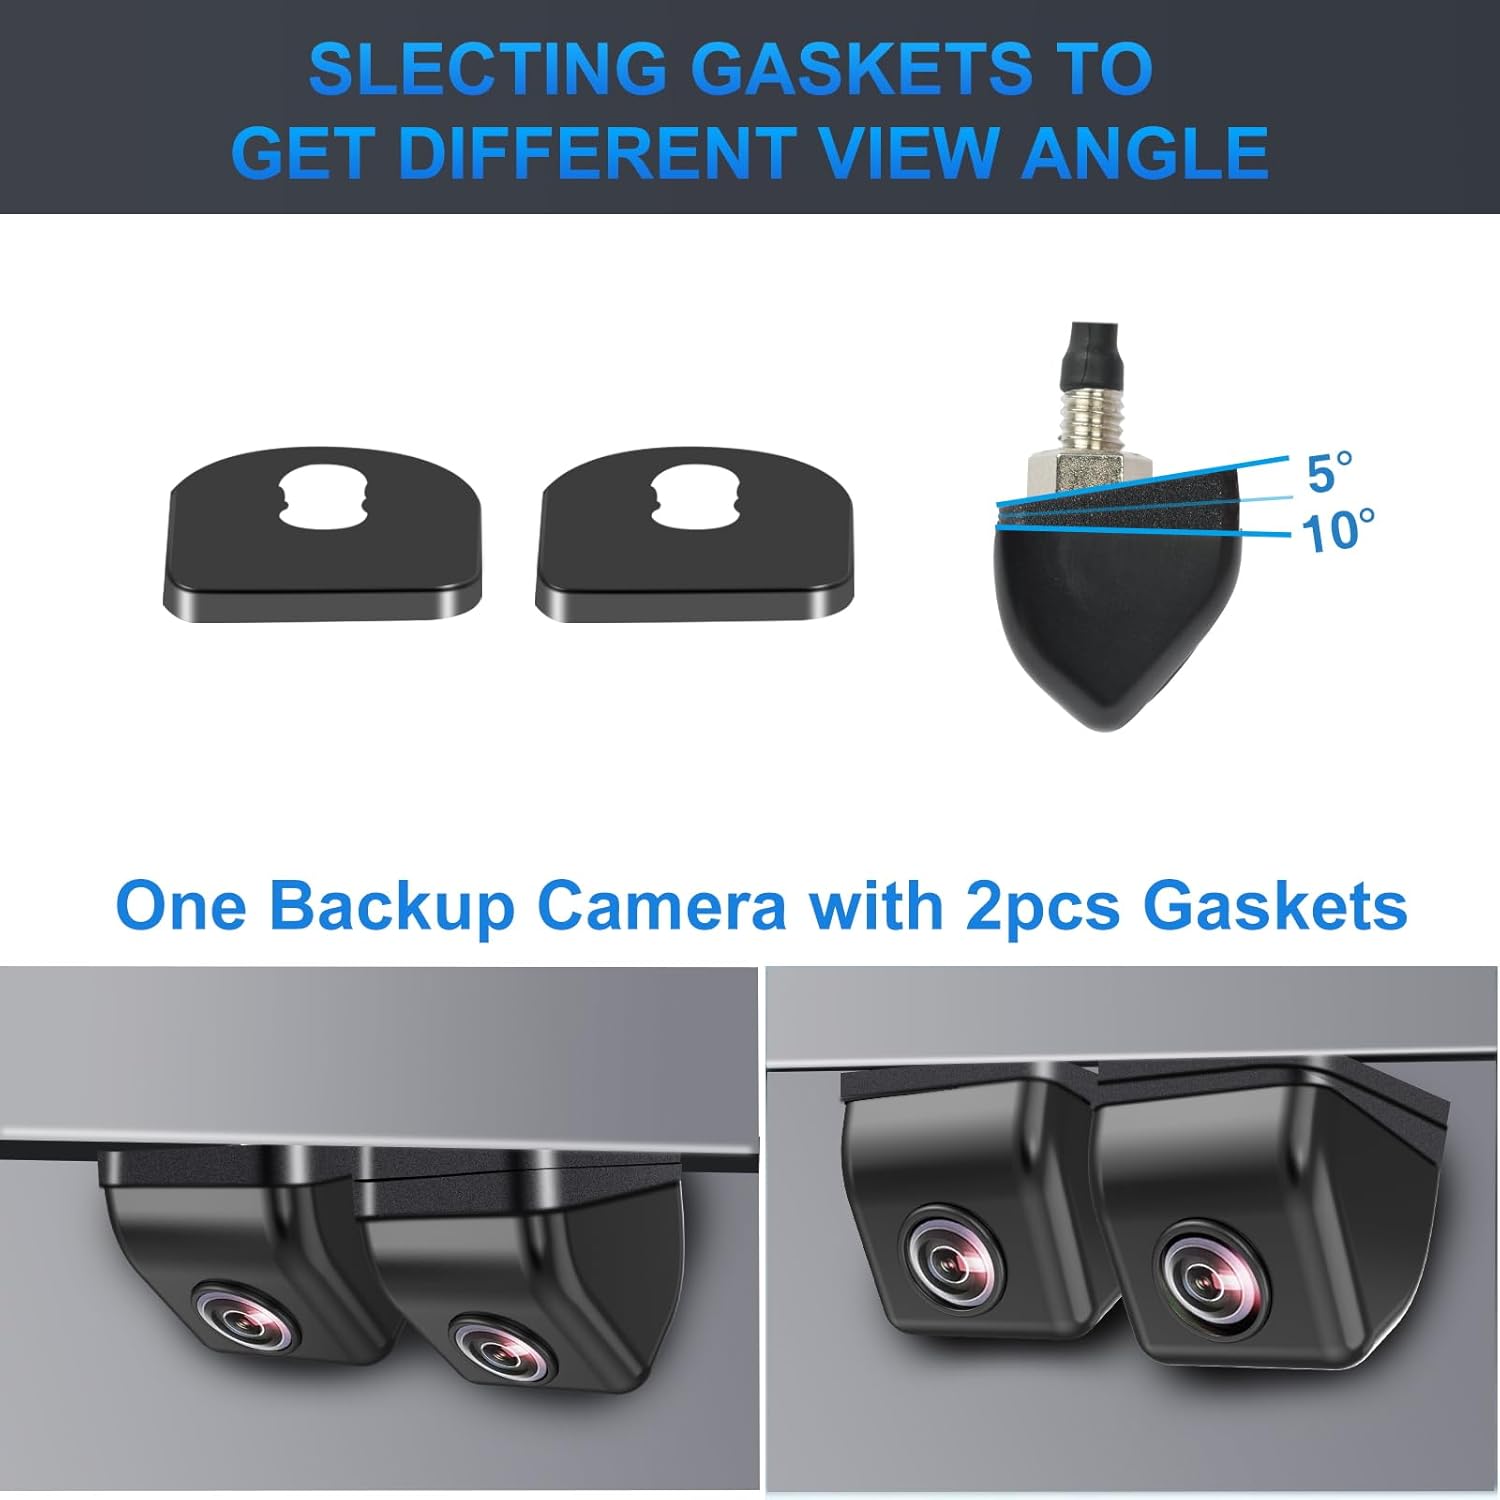
Image 3.3: Use of gaskets for angle adjustment.
4. Operating Instructions
The PARKVISION PAL-120 camera offers customizable settings via its control wires. After cutting any of the control wires, you must disconnect and then reconnect the power to the camera for the changes to take effect.
4.1 Control Wire Functions
- Purple Wire (PAL/NTSC Switch): By default, the camera operates in PAL system. Cut the purple wire to switch the video output to NTSC system.
- Blue Wire (Vertical Image Flip): If the camera lens is installed facing downwards, cut the blue wire to vertically invert the image (flip it upside down). This ensures the image is displayed correctly on your monitor.
- White Wire (Parking Guideline ON/OFF): Cut the white wire to disable the parking guidelines. By default, the guidelines are displayed.

Image 4.1: White wire controls parking guidelines (ON/OFF).

Image 4.2: Blue wire controls vertical image flip.

Image 4.3: Purple wire controls PAL/NTSC system switch.
4.2 Day and Night Vision
The camera is designed to provide clear images in both bright daylight and low-light conditions, ensuring reliable performance at all times.

Image 4.4: Comparison of day and night vision quality.
5. Maintenance
The PARKVISION PAL-120 camera is built for durability and requires minimal maintenance. Its IP68 waterproof rating ensures protection against dust and water ingress.
- Cleaning: Periodically clean the camera lens with a soft, damp cloth to ensure a clear view. Avoid abrasive cleaners that could scratch the lens.
- Connection Check: Occasionally inspect all cable connections to ensure they are secure and free from corrosion.
- Environmental Durability: The camera is designed to withstand temperatures from -20°C to 65°C for operation and -30°C to 80°C for storage, and is fully waterproof.

Image 5.1: Camera's IP68 waterproof rating and temperature resilience.
6. Troubleshooting
If you encounter issues with your PARKVISION PAL-120 camera, please refer to the following troubleshooting steps:
- No Image on Screen:
- Verify all power and video connections are secure.
- Ensure the camera is receiving power (e.g., check reverse light circuit).
- Check your display settings on the head unit/monitor.
- Test the camera with another device that has an RCA connector (e.g., a TV screen) to confirm camera functionality.
- Blurry, Flickering, or Horizontal/Vertical Bands on Image:
- Check all power and video connections for looseness or interference.
- Try using a different grounding point (a clean metal part of the vehicle chassis).
- Wrap power and video plugs with electrical tape to insulate them from interference.
- For certain vehicle models (e.g., Dodge, VW, AUDI, BMW, Mercedes, Benz), a 12V DC power filter rectifier may be necessary to resolve signal issues.
- Image Not Flipping/Guidelines Not Changing:
- Ensure you have cut the correct control wire (purple for PAL/NTSC, blue for vertical flip, white for guidelines).
- After cutting the wire, you must disconnect and then reconnect the camera's power supply for the change to take effect.
- Android Head Unit Displaying No AHD Image:
- Some Android head units may have an AHD video signal setting but do not support AHD images. In such cases, you can only use the CVBS video signal.
7. Specifications
| Feature | Specification |
|---|---|
| Brand | PARKVISION |
| Model Number | PAL-120 |
| Effective Pixels (PAL) | 960 x 480 |
| Effective Pixels (NTSC) | 960 x 576 |
| Image Sensor | 1/3" CMOS |
| Video Output Format | RCA (CVBS) |
| Voltage | DC 9V-16V |
| Operating Temperature | -20°C to 65°C |
| Storage Temperature | -30°C to 80°C |
| Waterproof Rating | IP68 |
| Lens Type | Wide Angle |
| Product Dimensions | 20L x 20W x 20H millimeters (approx.) |
8. Warranty and Support
For any questions, assistance, or to request the manual in a local or multiple languages (available in PDF electronic format), please contact PARKVISION customer support. You can reach us via email or through the Buyer Center.
Please note that if you need a longer extension cable, you can purchase a 4-pin camera extension cable separately from the PARKVISION Store.
If connecting the PARKVISION rear view camera to a factory radio, a suitable harness and program may need to be ordered separately, as different radios require different configurations.
