Introduction
Thank you for choosing the VEVOR A4 Manual Paper Guillotine Cutter. This robust and efficient paper cutter is designed for precise and high-volume paper cutting tasks in various professional and commercial environments. This manual provides essential information for the safe assembly, operation, and maintenance of your new paper guillotine. Please read these instructions carefully before use and retain them for future reference.

Figure 1: VEVOR A4 Manual Paper Guillotine Cutter. This image shows the overall design of the paper cutter, featuring its black metal base, long cutting handle, and paper press mechanism.
Safety Instructions
Your safety is paramount. This paper guillotine features a very sharp blade. Always follow these safety guidelines:
- Keep Hands Clear: Never place hands or fingers near the blade area, especially when the cutting arm is raised or being lowered.
- Use Safety Lock: Always engage the safety lock when the machine is not in use or when adjusting paper. The safety lock prevents accidental blade descent.
- Stable Surface: Operate the paper cutter on a stable, level surface to prevent tipping or movement during operation.
- Adult Supervision: This device is not a toy. Keep out of reach of children. Adult supervision is required if minors are present in the work area.
- Proper Handling: Use the extended handle with both hands if necessary to ensure a controlled and smooth cut.
- Blade Maintenance: Do not attempt to sharpen the blade yourself unless you are a qualified technician. A dull blade can cause uneven cuts and require more force, increasing risk.
- One Operator: Only one person should operate the paper cutter at a time.

Figure 2: Safety Lock and Ergonomic Handle. This image highlights the red safety lock button (ON/OFF) and the comfortable, extended handle designed for ease of use and safety.
Package Contents
Upon unpacking, please verify that all items are present and undamaged:
- 1 x VEVOR A4 Manual Paper Guillotine Cutter
- 1 x Wrench (for assembly and adjustments)
Product Overview
Familiarize yourself with the main components of your paper guillotine:
- Cutting Handle: The long lever used to lower the blade for cutting.
- Paper Press Handle: A rotating handle that operates the paper clamp to secure paper firmly.
- Safety Lock: A red button mechanism that locks the cutting handle in the up position.
- Base: The sturdy metal platform with measurement grids.
- Measurement Grid: Printed scales in inches and millimeters for precise paper alignment.
- Blade: High-hardness steel blade for clean cuts.
- Non-slip Feet: Rubber feet on the base for stability.

Figure 3: Key Components. This image provides a clear view of the paper cutter with its main parts labeled, including the paper cutter handle, paper press handle, safety lock, and base.
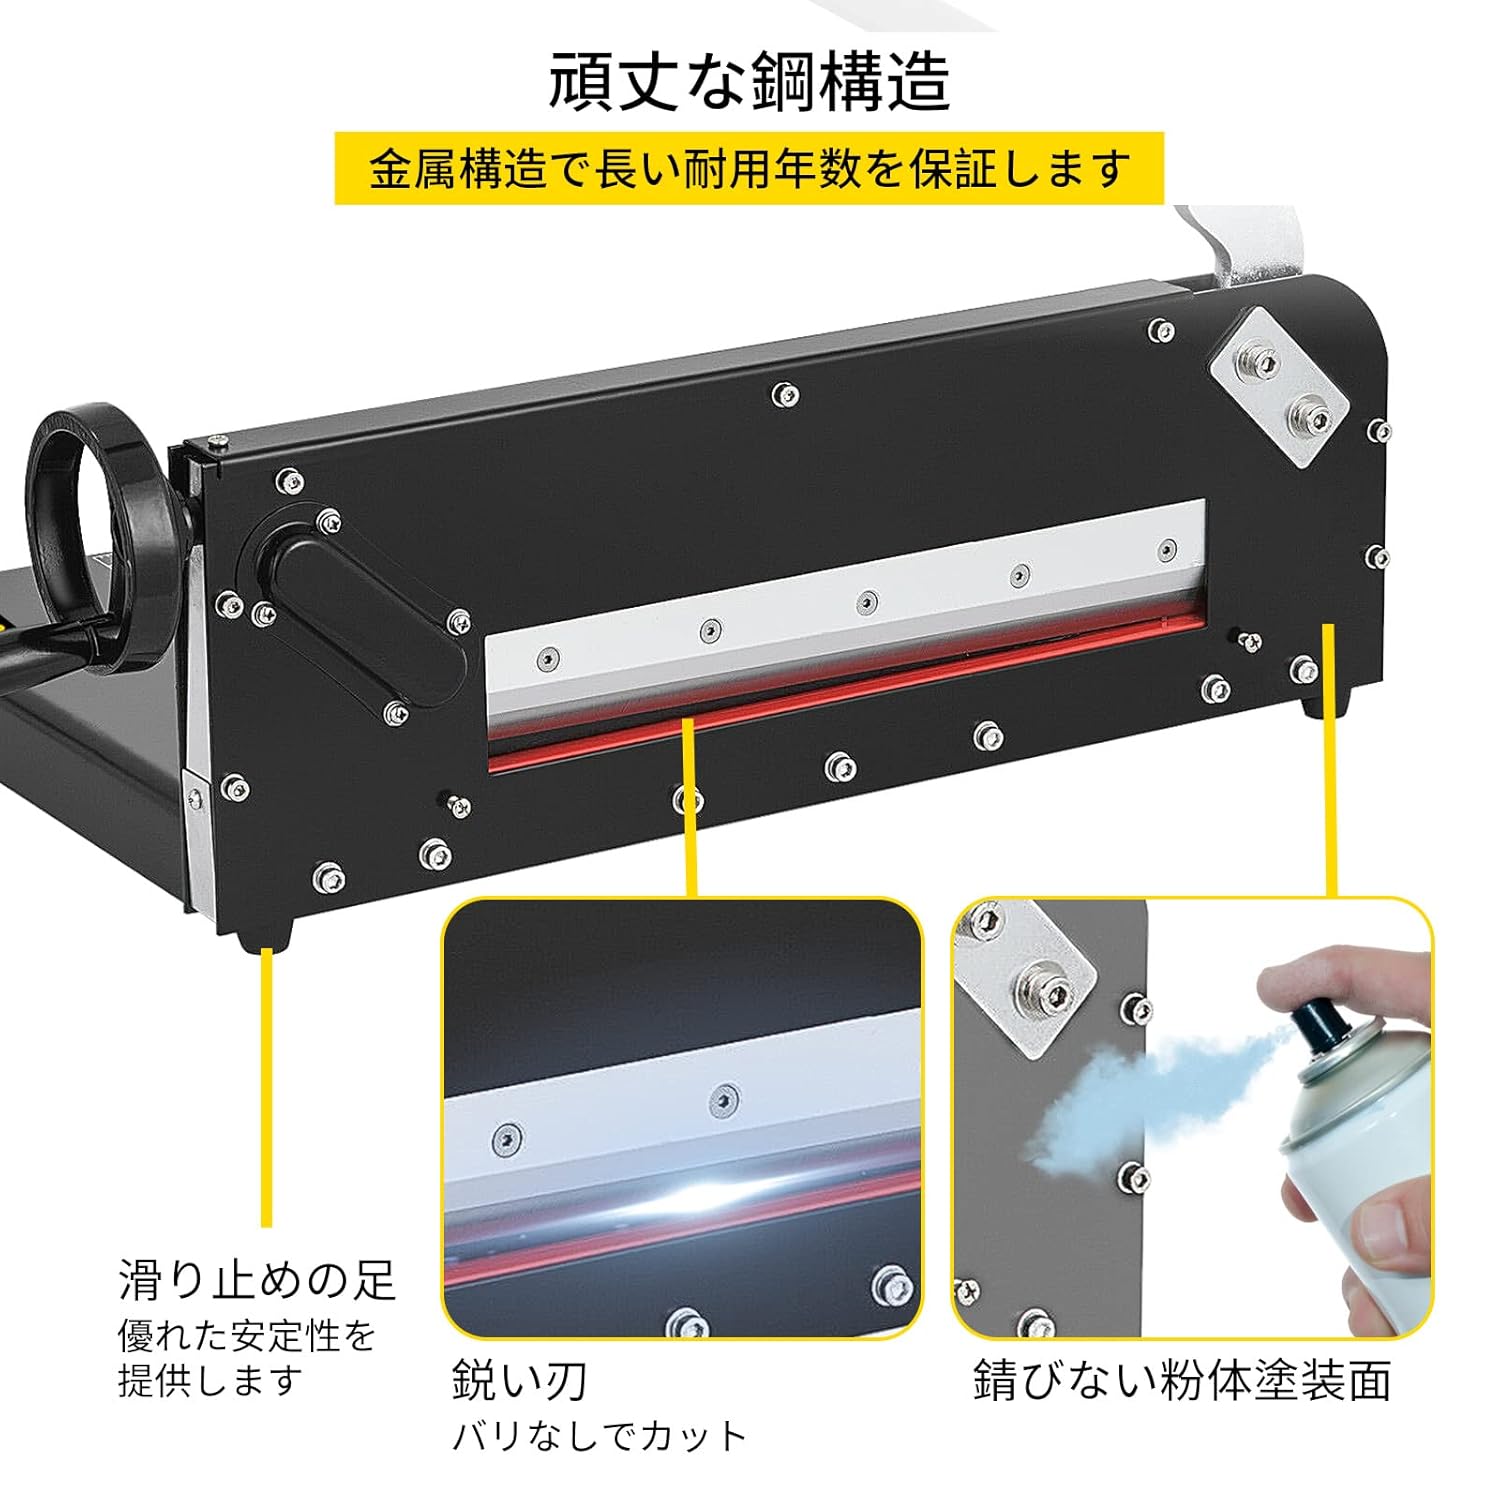
Figure 4: Durable Construction. This image shows a close-up of the sharp blade, non-slip feet, and the powder-coated metal structure, emphasizing the robust build quality.
Setup
Before operating the paper cutter, ensure it is properly set up:
- Unpack: Carefully remove all components from the packaging.
- Placement: Place the paper cutter on a sturdy, flat, and level workbench or table. Ensure there is sufficient space around the unit for safe operation and paper handling.
- Secure the Handle: Attach the cutting handle to the main body if it is not already installed. Use the provided wrench to tighten any bolts securely.
- Check Stability: Verify that the non-slip feet are making full contact with the surface to prevent movement during use.
Operating Instructions
Follow these steps for safe and efficient paper cutting:
- Prepare Paper: Stack the paper neatly and evenly. The maximum cutting capacity is 300 sheets of 20 lb paper (0.5-4 cm thickness).
- Unlock Safety: Disengage the safety lock by pressing the red button to the 'ON' position (if applicable, or release the latch).
- Position Paper: Place the paper stack onto the cutting base, aligning it with the desired measurements on the grid. Use the adjustable backstop for consistent cuts.
- Secure Paper: Rotate the paper press handle clockwise to lower the paper clamp firmly onto the paper stack. This prevents the paper from shifting during the cut.
- Perform Cut: Hold the cutting handle firmly with both hands (if preferred for stability) and pull it down in a smooth, continuous motion until the cut is complete.
- Release Paper: Lift the cutting handle back to its upright position. Rotate the paper press handle counter-clockwise to release the paper clamp.
- Remove Cut Paper: Carefully remove the cut paper.
- Engage Safety: Always engage the safety lock after use or when leaving the machine unattended.
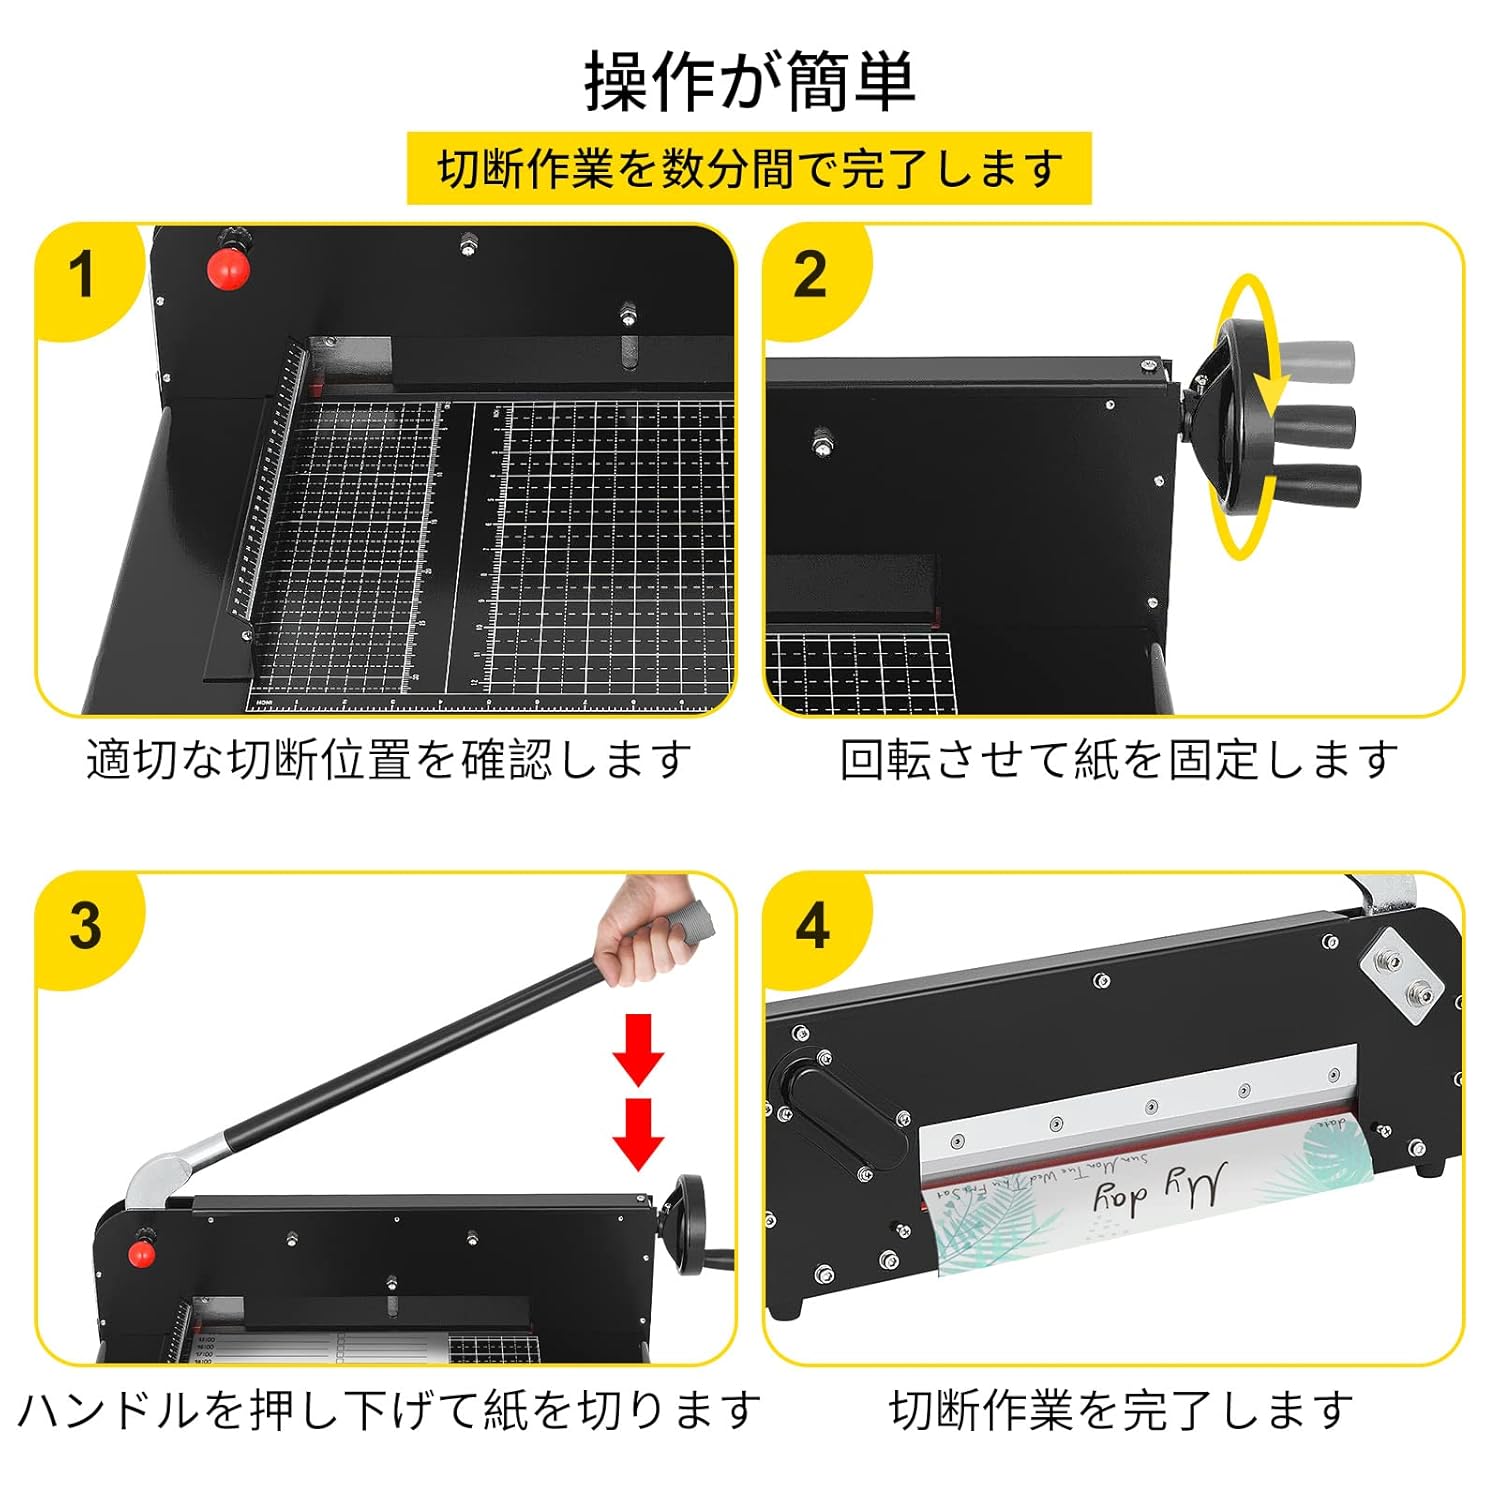
Figure 5: Simple 4-Step Operation. This image illustrates the four key steps for operating the paper cutter: 1. Confirm cutting position, 2. Secure paper by rotating the press, 3. Lower the handle to cut, 4. Cutting complete.
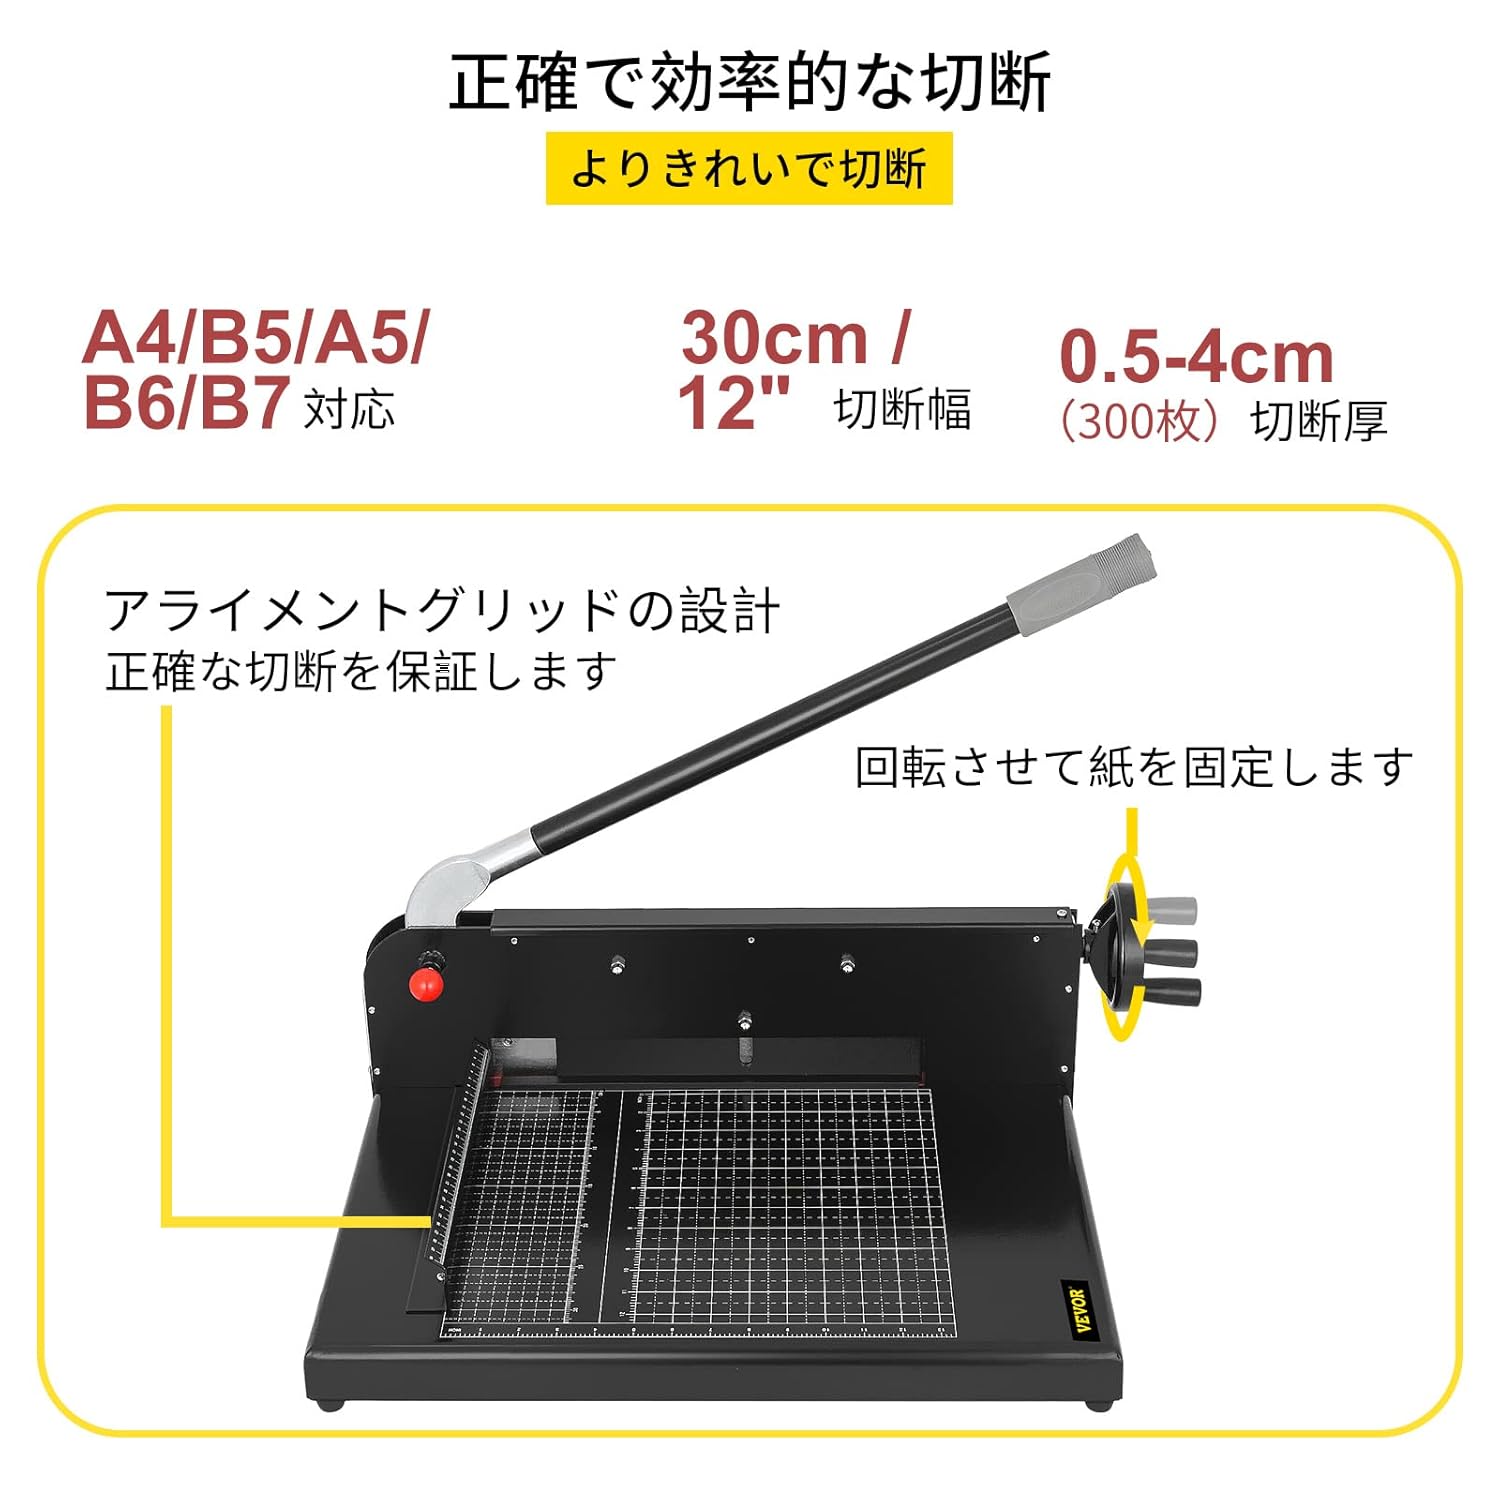
Figure 6: Precision Cutting Features. This image highlights the 30 cm (12 inch) cutting width, 0.5-4 cm (300 sheets) cutting thickness, and the alignment grid design for accurate cuts. It also shows the paper press mechanism.
Maintenance
Regular maintenance ensures the longevity and optimal performance of your paper cutter:
- Cleaning: Regularly wipe down the cutting base and blade with a dry, soft cloth to remove paper dust and debris. Do not use abrasive cleaners or solvents.
- Blade Inspection: Periodically inspect the blade for any signs of dullness or damage. A dull blade can lead to uneven cuts and require more force.
- Lubrication: Apply a small amount of light machine oil to moving parts, such as the pivot points of the cutting arm and the paper press mechanism, to ensure smooth operation.
- Storage: When not in use, store the paper cutter in a dry, clean environment. Always engage the safety lock.
Troubleshooting
If you encounter issues with your paper cutter, refer to the following common problems and solutions:
| Problem | Possible Cause | Solution |
|---|---|---|
| Uneven or rough cuts | Dull blade; paper not secured; blade not hitting bottom plate flush. | Inspect blade for sharpness. Ensure paper clamp is tight. Check blade alignment and adjust if necessary (consult a professional if unsure). |
| Paper slips during cutting | Paper clamp not tight enough; too much paper; slippery paper material. | Ensure the paper press handle is rotated fully to secure the stack. Reduce the number of sheets. For slippery materials like PVC, apply extra pressure or cut in smaller batches. |
| Cutting handle is stiff or difficult to operate | Lack of lubrication; debris in mechanism. | Apply light machine oil to pivot points. Clean any visible debris from the mechanism. |
Specifications
Technical details for the VEVOR A4 Manual Paper Guillotine Cutter:
- Brand: VEVOR
- Model Number: SG-299A4
- Materials: Metal + Steel
- Craftsmanship: Powder Coating
- Cutting Width: 30 cm (12 inches)
- Cutting Thickness: 0.5 – 4 cm (up to 300 sheets of 20 lb paper)
- Blade Hardness: 45 HRC
- Product Dimensions (L x W x H): 63.5 x 36.3 x 40.6 cm (25 x 14.3 x 16 inches)
- Product Weight: 14.5 kg (32 lbs)
- Included Components: Paper Cutter, Wrench
- Batteries Required: No

Figure 7: Dimensions and Applications. This image displays the key dimensions of the paper cutter and illustrates its suitability for various environments such as offices, schools, stationery stores, and print shops.

Figure 8: Wide Range of Applications. This image shows the paper cutter being used or suitable for use in an office, school, stationery store, and print shop, highlighting its versatility.
Warranty and Support
Information regarding product warranty and customer support is not provided within this manual. Please refer to the product packaging, your purchase receipt, or the VEVOR official website for details on warranty coverage and how to contact customer service for assistance.


