
1. Product Overview
The PRO VIBE Aeropursuit Handlebar is an aerodynamic aluminum handlebar designed for road cycling. It features a 6066 aluminum construction, an aerodynamic top section, and internal cable routing for both mechanical and Shimano Di2 systems. This model has a 10-degree flare and a 12-degree sweep, providing an optimized ergonomic and aerodynamic riding position.

Image 1.1: Side view of the PRO VIBE Aeropursuit Handlebar, showcasing its aerodynamic profile.
2. Safety Information
Always prioritize safety during installation and use. Improper installation can lead to serious injury or product damage. If you are unsure about any installation steps, consult a professional bicycle mechanic.
- Ensure all bolts are tightened to the manufacturer's specified torque settings. Overtightening or undertightening can cause failure.
- Regularly inspect the handlebar for any signs of damage, cracks, or stress. Replace immediately if damage is found.
- Do not modify the handlebar. Any alterations may compromise its structural integrity and void the warranty.
- Wear appropriate safety gear, including a helmet, when cycling.
3. Package Contents
Verify that your package contains the following items:
- PRO VIBE Aeropursuit Handlebar (360mm width)
No additional components are included with the handlebar itself.
4. Setup and Installation
This section outlines the general steps for installing your PRO VIBE Aeropursuit Handlebar. Specific torque values and detailed procedures for brake levers and shifters should be referenced from their respective manufacturer manuals.
4.1 Tools Required
- Torque wrench
- Hex keys (various sizes, typically 4mm, 5mm)
- Grease (for stem clamp bolts)
- Cable cutters (for mechanical cables)
- Di2 wire routing tools (if applicable)
4.2 Handlebar Installation on Stem
- Remove your old handlebar from the stem.
- Clean the stem clamp area and apply a thin layer of grease to the stem clamp bolts.
- Position the PRO VIBE Aeropursuit Handlebar in the stem clamp. Ensure the handlebar is centered and at the desired angle. The clamp diameter is 31.8mm.
- Tighten the stem faceplate bolts gradually and evenly, following a cross-pattern if applicable, to the manufacturer's specified torque (typically 5-8 Nm). Refer to your stem manufacturer's instructions for exact torque values.

Image 4.1: Front view of the PRO VIBE Aeropursuit Handlebar, showing the clamp area and overall shape.
4.3 Brake Lever and Shifter Installation
- Slide your brake levers and shifters onto the handlebar.
- Position them ergonomically for comfortable reach and control.
- Tighten the clamp bolts for the brake levers and shifters to their manufacturer's specified torque. Do not overtighten.
4.4 Internal Cable Routing
The PRO VIBE Aeropursuit Handlebar features internal routing for brake and shifter cables/wires. This provides a clean aesthetic and aerodynamic benefit.
- Carefully feed the brake and shifter cables/wires through the designated entry and exit ports on the handlebar.
- For Shimano Di2 systems, ensure the wires are routed correctly to avoid pinching or damage. The handlebar is designed for Di2 integration.
- Once cables are routed, install handlebar tape.
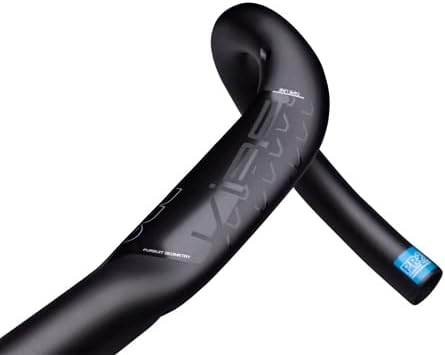
Image 4.2: Close-up of the handlebar bend, illustrating the internal cable routing ports.
5. Operating Instructions
The PRO VIBE Aeropursuit Handlebar is designed to enhance your cycling experience through its ergonomic and aerodynamic features.
- Top Section: The aerodynamic top section provides a comfortable and efficient hand position for cruising or climbing.
- Hoods Position: The primary riding position, offering access to brake levers and shifters.
- Drops Position: The flared and swept drops (10-degree flare, 12-degree sweep) offer an aggressive, aerodynamic position for sprinting or descending, while maintaining wrist comfort and control.
6. Maintenance
Proper maintenance ensures the longevity and safe operation of your handlebar.
- Cleaning: Clean the handlebar regularly with a mild soap and water solution. Avoid harsh chemicals that could damage the finish.
- Inspection: Periodically check the handlebar for any signs of fatigue, such as cracks, dents, or deep scratches, especially around the stem clamp and lever clamp areas.
- Bolt Checks: Ensure all stem and lever clamp bolts remain tightened to their specified torque settings. Loose bolts can lead to component slippage or failure.
- Handlebar Tape: Replace worn or damaged handlebar tape to maintain grip and comfort.
7. Troubleshooting
This section addresses common issues you might encounter with your handlebar.
| Problem | Possible Cause | Solution |
|---|---|---|
| Handlebar slipping in stem | Loose stem clamp bolts; insufficient friction | Check and retighten stem clamp bolts to specified torque. Consider using carbon assembly paste if recommended by stem manufacturer. |
| Brake levers/shifters slipping | Loose lever/shifter clamp bolts | Check and retighten lever/shifter clamp bolts to specified torque. |
| Creaking noise from handlebar area | Loose bolts; dirt/grit in clamp interface | Disassemble, clean all contact surfaces, reapply grease to bolts (if applicable), and reassemble to specified torque. |
8. Specifications
| Feature | Detail |
|---|---|
| Brand | PRO |
| Model | VIBE Aeropursuit Handlebar |
| Part Number (OEM) | PRHA0470 (R20RHA0470X) |
| GTIN | 08717009419260 |
| Material | 6066 Aluminum |
| Color | Black |
| Width | 360mm (also available in 380mm, 400mm) |
| Clamp Diameter | 31.8mm |
| Flare | 10 degrees |
| Sweep | 12 degrees |
| Weight | Approximately 330g (for 360mm) |
| Cable Routing | Internal (compatible with Shimano Di2) |
9. Warranty and Support
PRO products are manufactured to high standards. For specific warranty information, please refer to the official PRO website or contact your authorized PRO dealer. Keep your proof of purchase for any warranty claims.
For technical support or further assistance, please visit the official PRO website or contact their customer service department. PRO Official Website