1. Introduction
Thank you for choosing the THOMSON Coffee Maker with Integrated Grinder, Model THCOG6. This appliance is designed to provide you with a rich and authentic coffee experience, whether you prefer freshly ground beans or pre-ground coffee. Its compact design and user-friendly features make it an ideal addition to any kitchen. Please read this manual carefully before using the appliance to ensure safe and optimal operation.
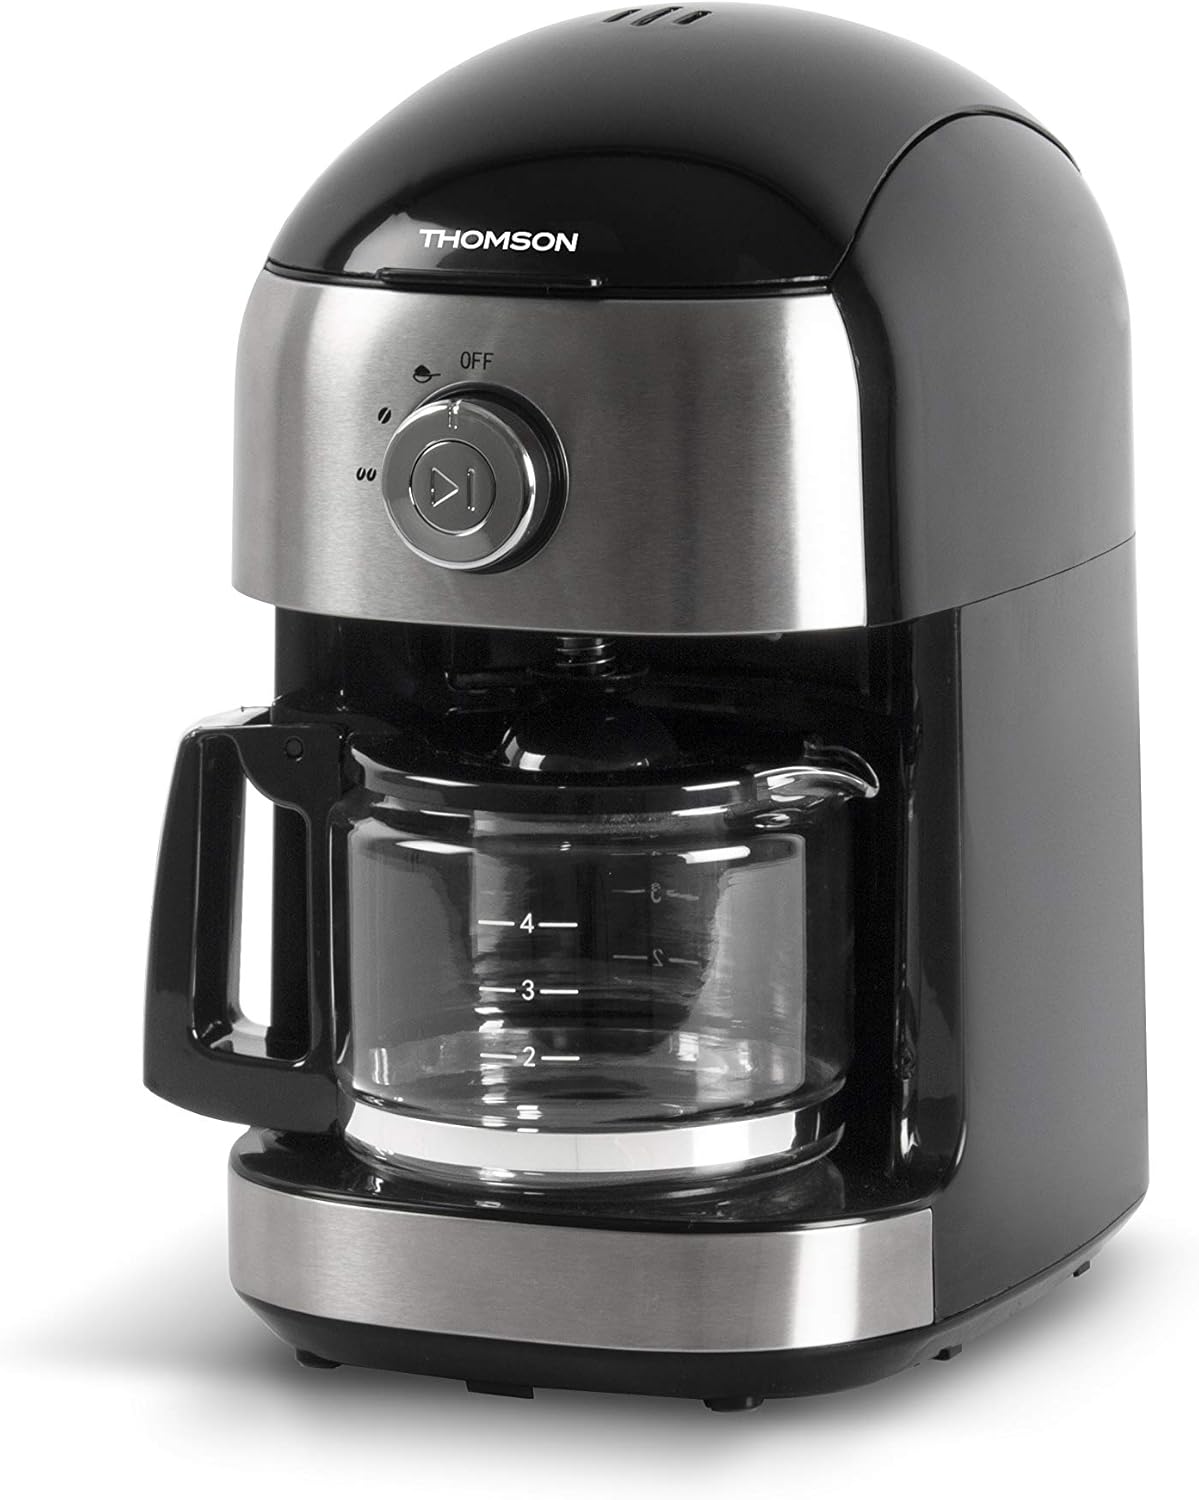
Image 1.1: Front view of the THOMSON Coffee Maker, showcasing its sleek black and stainless steel design with the glass carafe in place.
2. Safety Instructions
To prevent personal injury or damage to the appliance, always observe basic safety precautions when using electrical appliances. Keep this manual for future reference.
- Read all instructions before use.
- Do not immerse the appliance, cord, or plug in water or other liquids.
- Close supervision is necessary when any appliance is used by or near children.
- Unplug from outlet when not in use and before cleaning. Allow to cool before putting on or taking off parts, and before cleaning the appliance.
- Do not operate any appliance with a damaged cord or plug, or after the appliance malfunctions or has been damaged in any manner.
- The use of accessory attachments not recommended by the appliance manufacturer may result in fire, electric shock, or injury to persons.
- Do not use outdoors.
- Do not let the cord hang over the edge of a table or counter, or touch hot surfaces.
- Do not place on or near a hot gas or electric burner, or in a heated oven.
- Always attach plug to appliance first, then plug cord into the wall outlet. To disconnect, turn any control to "off", then remove plug from wall outlet.
- Do not use appliance for other than intended use.
- Exercise extreme caution when disposing of hot steam.
- The carafe is designed for use with this appliance only. It must never be used on a range top.
- Do not place a hot carafe on a cold or wet surface.
- Do not use a cracked carafe or a carafe having a loose or weakened handle.
- Do not clean carafe with cleansers, steel wool pads, or other abrasive material.
3. Parts and Components
Familiarize yourself with the different parts of your THOMSON Coffee Maker.
- Lid
- Water Tank
- Bean Hopper (with lid)
- Grinder Assembly
- Filter Basket (removable)
- Control Dial (OFF / Grind / Brew)
- Start/Stop Button
- Glass Carafe with Handle
- Warming Plate
- Power Cord

Image 3.1: The coffee maker with its main removable components, including the water tank and filter basket, displayed separately for clarity.
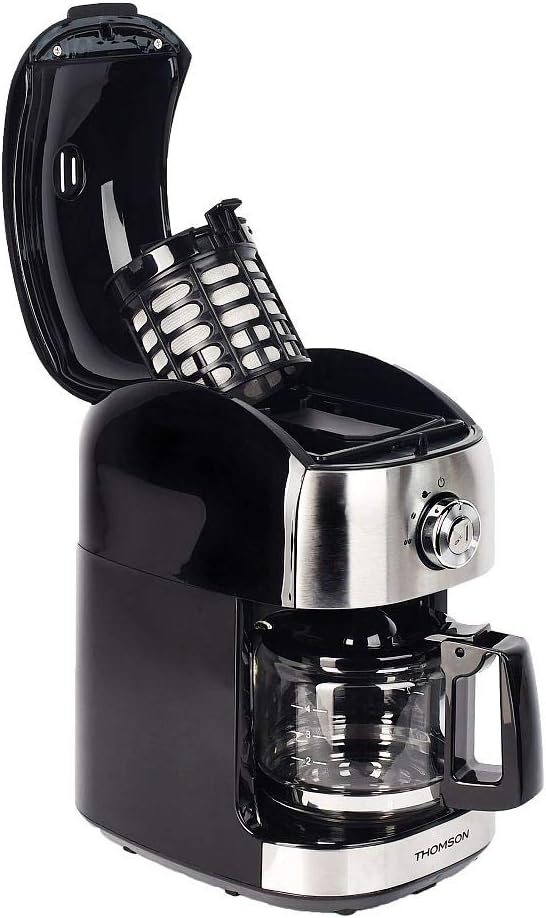
Image 3.2: Top view of the coffee maker with the lid open, showing the internal filter basket and bean hopper area.
4. Setup
Before first use, and for optimal performance, follow these setup steps:
- Unpacking: Carefully remove the coffee maker and all its components from the packaging. Retain packaging for future storage or transport.
- Cleaning: Wash the glass carafe, filter basket, and water tank with warm, soapy water. Rinse thoroughly and dry. Wipe the exterior of the appliance with a damp cloth.
- First Use Cycle (Cleaning Cycle):
- Fill the water tank with clean water up to the MAX level (500 ml).
- Place the empty filter basket into its position.
- Place the glass carafe on the warming plate.
- Plug the appliance into a suitable power outlet (240V).
- Turn the control dial to the "Brew" position.
- Press the Start/Stop button to begin the brewing cycle without coffee.
- Allow the full cycle to complete. Discard the hot water.
- Repeat this process 2-3 times to ensure the appliance is thoroughly cleaned and free of any manufacturing residues.
- Placement: Place the coffee maker on a stable, flat, heat-resistant surface, away from the edge of the counter and out of reach of children. Ensure adequate ventilation around the unit.
5. Operating Instructions
Your THOMSON Coffee Maker offers two brewing options: using whole coffee beans with the integrated grinder, or using pre-ground coffee.
5.1. Brewing with Whole Coffee Beans (Grind & Brew)
- Fill Water Tank: Open the lid and fill the water tank with fresh, cold water. The capacity is 500 ml, suitable for 4 to 6 cups. Do not exceed the MAX fill line.
- Add Coffee Beans: Open the bean hopper lid and add up to 32g of whole coffee beans. Close the bean hopper lid securely.
- Insert Filter Basket: Ensure the filter basket is correctly placed in its compartment.
- Place Carafe: Place the empty glass carafe onto the warming plate.
- Select Grind & Brew: Turn the control dial to the "Grind" position. This setting activates both the grinder and the brewing function.
- Start Brewing: Press the Start/Stop button. The grinder will activate first, grinding the beans, followed by the brewing process.
- Enjoy: Once the brewing cycle is complete, the appliance will automatically switch to the keep-warm function for up to 30 minutes. Carefully remove the carafe to pour and serve.

Image 5.1: The THOMSON Coffee Maker positioned on a kitchen counter, accompanied by a freshly brewed cup of coffee, illustrating its use in a home environment.
5.2. Brewing with Pre-Ground Coffee
- Fill Water Tank: Open the lid and fill the water tank with fresh, cold water up to the desired level (max 500 ml).
- Add Ground Coffee: Place the desired amount of pre-ground coffee into the filter basket. Do not overfill.
- Insert Filter Basket: Ensure the filter basket is correctly placed in its compartment.
- Place Carafe: Place the empty glass carafe onto the warming plate.
- Select Brew: Turn the control dial to the "Brew" position.
- Start Brewing: Press the Start/Stop button. The brewing process will begin immediately.
- Enjoy: Once the brewing cycle is complete, the appliance will automatically switch to the keep-warm function for up to 30 minutes.
5.3. Anti-Drip System
The appliance features an anti-drip system, allowing you to temporarily remove the carafe during the brewing cycle to pour a cup of coffee. The flow of coffee will pause. Return the carafe to the warming plate within 20 seconds to prevent overflow from the filter basket.
5.4. Keep Warm Function
After brewing, the warming plate will keep your coffee warm for up to 30 minutes. After 30 minutes, the appliance will automatically shut off for safety and energy saving.
6. Maintenance and Cleaning
Regular cleaning ensures optimal performance and extends the lifespan of your coffee maker. Always unplug the appliance and allow it to cool completely before cleaning.
- Carafe and Filter Basket: Wash the glass carafe and filter basket with warm, soapy water after each use. Rinse thoroughly and dry. These parts are not dishwasher safe.
- Exterior: Wipe the exterior surfaces of the coffee maker with a soft, damp cloth. Do not use abrasive cleaners or scouring pads, as they may scratch the surface.
- Grinder Assembly: Periodically clean the grinder assembly. Use a small brush to remove any residual coffee grounds from the bean hopper and grinder blades. Do not use water directly on the grinder.
- Descaling: Mineral deposits from water can build up over time and affect performance. Descale your coffee maker every 2-3 months, or more frequently if you have hard water.
- Prepare a descaling solution by mixing white vinegar and water in a 1:2 ratio (e.g., 1 part vinegar to 2 parts water).
- Pour the solution into the water tank.
- Place the empty carafe on the warming plate.
- Run a brewing cycle without coffee.
- After the cycle, let the solution sit in the carafe for 15 minutes.
- Discard the solution and rinse the carafe and water tank thoroughly.
- Run 2-3 cycles with fresh, clean water to remove any residual vinegar taste.
- Storage: When not in use, store the coffee maker in a clean, dry place.
7. Troubleshooting
If you encounter issues with your coffee maker, refer to the following table for common problems and solutions.
| Problem | Possible Cause | Solution |
|---|---|---|
| Coffee maker does not turn on. | Not plugged in; power outage; faulty outlet. | Ensure the power cord is securely plugged into a working outlet. Check your home's circuit breaker. |
| Coffee is not brewing. | No water in tank; carafe not correctly placed; control dial not set to "Brew" or "Grind". | Fill water tank. Ensure carafe is properly seated on the warming plate. Set control dial to the correct position and press Start/Stop. |
| Grinder is not working. | No beans in hopper; bean hopper lid not closed; grinder clogged. | Add coffee beans. Ensure bean hopper lid is securely closed. Clean the grinder assembly to remove any blockages. |
| Coffee tastes weak or watery. | Insufficient coffee grounds/beans; too much water; appliance needs descaling; grind setting too coarse. | Increase amount of coffee. Use less water. Descale the appliance. If using beans, ensure the grinder is set to a finer grind (if adjustable, though this model has a fixed grind). |
| Coffee overflows from filter basket. | Too much coffee grounds; carafe removed for too long; filter clogged. | Reduce amount of coffee. Return carafe quickly if removed. Clean filter basket thoroughly. |
| Loud noise during operation. | Normal grinding noise; foreign object in grinder; appliance needs descaling. | Grinding is naturally noisy. Check bean hopper for foreign objects. Descale the appliance if noise persists during brewing. |
If the problem persists after trying these solutions, please contact customer support.
8. Specifications
Key technical specifications for the THOMSON Coffee Maker (Model THCOG6):
| Feature | Detail |
|---|---|
| Model Number | THCOG6 |
| Brand | Thomson |
| Type | Filter Coffee Maker with Integrated Grinder |
| Capacity | 500 ml (approx. 4-6 cups) |
| Bean Hopper Capacity | 32 g |
| Power | 680 Watts |
| Voltage | 240V |
| Dimensions (L x W x H) | 24 x 17 x 27 cm |
| Weight | 2.1 kg |
| Material | Plastic |
| Special Features | Keep Warm Function (up to 30 min), Anti-drip System, Mechanical Control |

Image 8.1: Diagram showing the dimensions of the coffee maker (24cm x 17cm x 27cm) and icons indicating its compatibility with coffee beans and ground coffee, along with the 30-minute keep-warm function.
9. Warranty and Support
THOMSON products are manufactured to high-quality standards. This product is covered by a manufacturer's warranty against defects in materials and workmanship. The specific terms and duration of the warranty may vary by region. Please retain your proof of purchase for warranty claims.
For technical support, warranty inquiries, or spare parts, please contact your local THOMSON customer service or the retailer from whom you purchased the product. You may also visit the official THOMSON website for more information and contact details.
Customer Service Contact: Refer to your regional THOMSON website or product packaging for specific contact information.


