1. Introduction
This manual provides essential information for the safe and efficient use of your Candy CBD 485D1E/1-S integrated washer dryer. Please read these instructions carefully before installing and operating the appliance. Keep this manual for future reference.
1.1 Safety Information
- Always disconnect the appliance from the power supply before cleaning or performing maintenance.
- Do not allow children to play with the appliance.
- Ensure the appliance is properly earthed.
- Do not overload the washer dryer. Refer to capacity specifications.
- Keep packaging materials out of reach of children.
- Only use detergents and additives suitable for automatic washing machines.
- Do not dry unwashed items in the tumble dryer.
- Items soiled with substances such as cooking oil, acetone, alcohol, petrol, kerosene, spot removers, turpentine, waxes, and wax removers should be washed in hot water with an extra amount of detergent before being dried in the tumble dryer.
2. Setup and Installation
Proper installation is crucial for the performance and safety of your appliance. It is recommended that installation be performed by a qualified technician.
2.1 Unpacking
Remove all packaging materials, including the polystyrene base and any protective film. Inspect the appliance for any damage. Report any damage to your retailer immediately.
2.2 Positioning and Leveling
The appliance must be installed in a dry, well-ventilated room. Ensure the floor is stable and level. Adjust the feet of the appliance to ensure it is perfectly level. This prevents vibrations and excessive noise during operation.

Image: The Candy integrated washer dryer shown installed within a kitchen cabinet, demonstrating its built-in design.
2.3 Water Connection
Connect the water inlet hose to a cold water tap with a 3/4" thread. Ensure the hose is securely fastened to prevent leaks. The drain hose should be hooked into a standpipe or connected to a suitable drain, ensuring it is not kinked or obstructed.
2.4 Electrical Connection
Connect the power plug to a properly earthed electrical socket. The voltage and frequency must match the specifications on the appliance's rating plate. Do not use extension cords or multiple adapters.
2.5 Dimensions
Refer to the diagram below for detailed dimensions to ensure proper integration into your cabinetry.
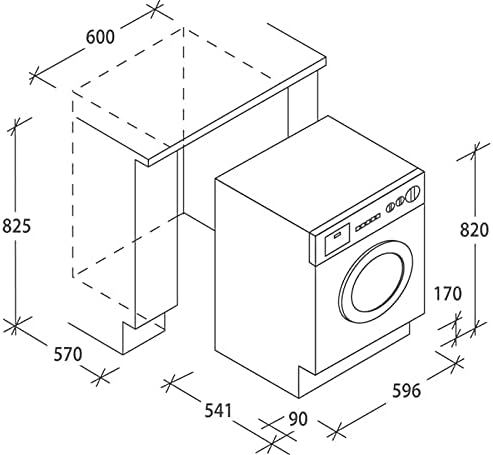
Image: A technical diagram illustrating the precise dimensions (length, width, height, and depth) of the Candy washer dryer, crucial for built-in installation.
3. Operating Instructions
This section guides you through the daily operation of your Candy washer dryer.
3.1 Control Panel Overview
The control panel features a digital display, program selector knob, and various function buttons. Familiarize yourself with these controls before starting a cycle.

Image: Front view of the Candy integrated washer dryer, highlighting the main control panel with its digital display and program selection knob, and the large front-loading door.
3.2 Loading Laundry
Open the door and load items one by one, ensuring they are not tangled. Do not overload the drum. The maximum wash capacity is 8 kg, and the maximum drying capacity is 5 kg.
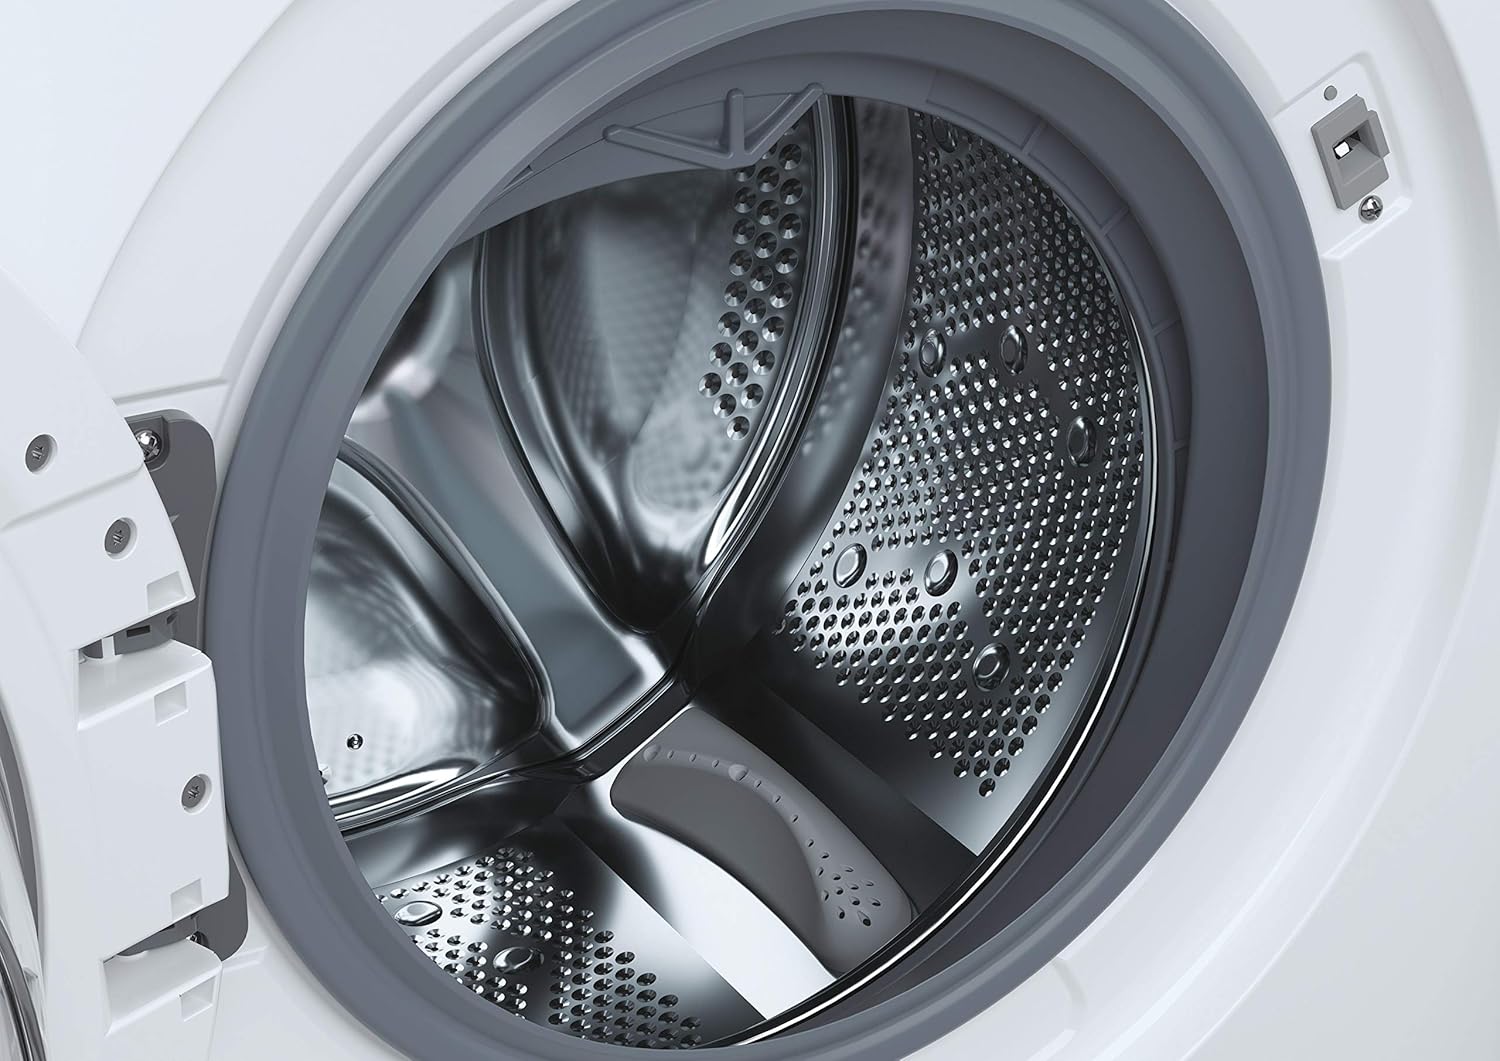
Image: A close-up view of the interior of the washer dryer drum, made of stainless steel, showing its textured surface designed for efficient washing and drying.
3.3 Adding Detergent and Additives
Pull out the detergent drawer. Add the appropriate amount of detergent to the main wash compartment and any fabric softener to its designated compartment. Do not exceed the maximum fill lines.
3.4 Program Selection
Turn the program selector knob to choose the desired wash or wash & dry program. Available programs include:
- Cotton: For durable cotton items.
- Synthetics: For synthetic and mixed fabrics.
- Delicates: For fragile items requiring gentle care.
- Wool: Specific program for woolens.
- Rapid Wash: Quick cycles (e.g., 14, 30, 44 minutes).
- Wash & Dry: Combined wash and dry cycles.
3.5 Function Buttons
Use the function buttons to customize your cycle:
- Temperature: Adjust the wash temperature.
- Spin Speed: Modify the spin speed (up to 1400 rpm).
- Delay Start: Postpone the start of the cycle by up to 24 hours.
- Drying Level: Select the desired drying level (e.g., Iron Dry, Cupboard Dry).
3.6 Starting and Stopping a Cycle
Press the Start/Pause button to begin the selected program. To pause a cycle, press the Start/Pause button again. To cancel a cycle, turn the program selector to the "OFF" position.
4. Maintenance and Care
Regular maintenance ensures the longevity and optimal performance of your appliance.
4.1 Cleaning the Detergent Drawer
Periodically remove and clean the detergent drawer under running water to prevent detergent residue buildup.
4.2 Cleaning the Filter
The filter should be cleaned regularly to prevent blockages. Locate the filter at the bottom front of the appliance. Place a shallow container underneath to catch any residual water. Unscrew the filter, remove any lint or debris, and rinse it thoroughly before reinserting.
4.3 Cleaning the Door Seal
Wipe the door seal after each wash to remove any lint or moisture, preventing mold and unpleasant odors.
4.4 Descaling
In areas with hard water, periodic descaling may be necessary. Use a descaling product suitable for washing machines and follow the manufacturer's instructions.
5. Troubleshooting
Before contacting customer service, refer to the following table for common issues and their solutions.
| Problem | Possible Cause | Solution |
|---|---|---|
| Appliance does not start. | No power supply; door not closed properly; program not selected. | Check power plug and fuse; ensure door is firmly closed; select a program and press Start. |
| Water not filling. | Water tap closed; inlet hose kinked or blocked; water pressure too low. | Open water tap; straighten hose; check household water pressure. |
| Water not draining. | Drain hose kinked or blocked; filter blocked. | Straighten drain hose; clean the filter. |
| Excessive vibration/noise. | Appliance not level; transport bolts not removed; uneven load. | Adjust leveling feet; ensure transport bolts are removed; redistribute laundry in the drum. |
| Drying performance is poor. | Overloaded; filter blocked; incorrect drying program. | Reduce load; clean filter; select appropriate drying program. |
| Error Code E03 (as per user review). | Drainage issue, possibly blocked pump or hose. | Check and clear the drain filter. Inspect the drain hose for kinks or blockages. If the problem persists, contact service. |
6. Technical Specifications
Detailed technical data for the Candy CBD 485D1E/1-S integrated washer dryer.
| Feature | Specification |
|---|---|
| Model Number | CBD485D1E/1-S |
| Brand | Candy |
| Type | Integrated Washer Dryer |
| Wash Capacity | 8 Kilograms |
| Drying Capacity | 5 Kilograms |
| Maximum Spin Speed | 1400 rpm |
| Dimensions (L x W x H) | 60 x 53 x 82 cm |
| Weight | 65 Kilograms |
| Voltage | 230 Volts |
| Power | 727 Watts |
| Annual Energy Consumption (Wash) | 326 Kilowatt-hours |
| Noise Level (Spin) | 77 Decibels |
| Drum Material | Stainless Steel |
| Control Type | Handle (Rotary Knob) |
| Installation Method | Integrated |
| Compliance | Energy Star |
Note: Specifications are subject to change without notice. Refer to the appliance rating plate for the most accurate information.
7. Warranty and Support
7.1 Product Warranty
This appliance comes with a standard manufacturer's warranty of 24 months from the date of purchase. This warranty covers manufacturing defects and faulty materials. Please retain your proof of purchase for any warranty claims.
The return policy for this product is 30 days from the date of purchase, covering refunds or replacements as per retailer terms.
7.2 Customer Support
For technical assistance, spare parts, or warranty claims, please contact your retailer or the authorized Candy service center. Information regarding spare parts availability is currently not provided by the manufacturer.
For further information, you may visit the official Candy website or contact their customer service department.


