
Proscenic M8
Contents
Proscenic M8 Robot Vacuum Cleaner
User Manual
1. Important Safety Information
Please read this manual carefully before using the Proscenic M8 robot vacuum cleaner and keep it for future reference. Adhere to all safety warnings and instructions to prevent electric shock, fire, or injury.
- This appliance can be used by children aged 8 years and above and persons with reduced physical, sensory or mental capabilities or lack of experience and knowledge if they have been given supervision or instruction concerning use of the appliance in a safe way and understand the hazards involved.
- Do not allow children to play with the appliance. Cleaning and user maintenance shall not be made by children without supervision.
- Use only the original power adapter provided by the manufacturer.
- Do not use the robot in wet environments or on wet surfaces.
- Before use, remove any loose cables, small objects, or fragile items from the cleaning area to prevent entanglement or damage.
- Do not operate the robot near open flames or flammable materials.
- Ensure the robot is placed on a stable surface when not in use or during charging.
- Do not attempt to repair or modify the robot yourself. Contact authorized service personnel for any repairs.
2. Package Contents
Verify that all items listed below are included in your package. If any items are missing or damaged, please contact Proscenic customer support.

This image displays the Proscenic M8 robot vacuum cleaner and its included accessories, each item clearly numbered for identification.
- Proscenic M8 Robot Vacuum Cleaner
- Dustbin (pre-installed or separate)
- Remote Control
- Main Brush
- Charging Dock
- Side Brushes (spare pair)
- 2-in-1 Water Tank with Mop Pad
- Power Adapter
- Spare Mop Cloths (2 pieces)
- User Manual & Quick Start Guide
3. Product Overview
Familiarize yourself with the components of your Proscenic M8 robot vacuum cleaner.

This image provides a top-down view of the Proscenic M8 robot vacuum cleaner, highlighting its main body, power button, and laser navigation sensor.
Robot Components
- LDS Laser Navigation Sensor: Located on top, used for 360-degree mapping and navigation.
- Power/Clean Button: Initiates or pauses cleaning, also used for power on/off.
- Recharge Button: Sends the robot back to the charging dock.
- Dustbin/Water Tank: Integrated unit for collecting dust and holding water for mopping.
- Main Brush: Located on the underside, responsible for deep cleaning.
- Side Brushes: Two brushes on the front-sides, sweep debris into the main brush path.
- Driving Wheels: Allow the robot to move across various surfaces and overcome obstacles up to 20mm.
- Cliff Sensors: Prevent the robot from falling down stairs.
- Charging Contacts: Connect with the charging dock for power replenishment.
Charging Dock Components
- Charging Pins: Connect with the robot's charging contacts.
- Power Indicator Light: Shows charging status.
- Power Port: Connects to the power adapter.
4. Setup Guide
4.1 Charging the Robot
- Place the Charging Dock: Position the charging dock against a wall in an open area, ensuring there is at least 0.5 meters (1.6 feet) of clear space on both sides and 1.5 meters (4.9 feet) in front. Avoid placing it near stairs or obstacles.
- Connect Power: Plug the power adapter into the charging dock and then into a wall outlet. Ensure the power indicator light on the dock illuminates.
- Initial Charge: Place the robot onto the charging dock, aligning its charging contacts with the dock's pins. The robot will automatically begin charging. For first-time use, fully charge the robot for approximately 5-6 hours until the indicator light turns solid green.

This image shows the Proscenic M8 robot vacuum charging on its dock, illustrating its compatibility with smart app control and voice assistants like Alexa and Google Assistant.
4.2 App Installation and Wi-Fi Connection
The Proscenic app provides full control and advanced features for your robot.
- Download the App: Search for 'ProscenicHome' in the App Store (iOS) or Google Play Store (Android) and download it.
- Register/Log In: Open the app and create a new account or log in if you already have one.
- Add Device: Tap '+' to add a new device. Select the Proscenic M8 from the list.
- Connect to Wi-Fi: Follow the in-app instructions to connect your robot to your home Wi-Fi network. Note: The robot only supports 2.4GHz Wi-Fi networks. Ensure your phone is connected to a 2.4GHz network during the setup process.
- First Mapping Run: Once connected, initiate a full cleaning cycle from the app. The robot will use its LDS laser navigation to create a detailed map of your home. This map is crucial for advanced features like zone cleaning and virtual walls.

This image illustrates the Proscenic M8's upgraded laser navigation technology, showing how it maps the environment to create an efficient cleaning path, visible on the accompanying smartphone app.
5. Operating Instructions
5.1 Starting and Stopping Cleaning
- Start Cleaning: Press the Power/Clean button on the robot or tap 'Start Cleaning' in the Proscenic app. The robot will begin an automatic cleaning cycle.
- Pause Cleaning: Press the Power/Clean button again or tap 'Pause' in the app.
- Stop Cleaning/Return to Dock: Press the Recharge button on the robot or tap 'Recharge' in the app. The robot will return to its charging dock.
5.2 Cleaning Modes
The Proscenic M8 offers various cleaning modes to suit your needs, controllable via the app or remote control.
- Auto Cleaning: The robot intelligently plans the optimal cleaning path for your entire home based on its map.
- Spot Cleaning: Directs the robot to clean a specific small area with concentrated suction.
- Scheduled Cleaning: Set specific times for the robot to automatically start cleaning.
5.3 Suction Power and Water Flow Adjustment
Customize cleaning performance through the Proscenic app:
- Suction Power: Choose from 3 levels of suction power, up to 3000 Pa, to match different cleaning requirements.
- Carpet Boost: The robot automatically increases suction power to maximum when it detects carpet, ensuring deeper cleaning.
- Water Flow: When mopping, adjust the water flow to 4 different levels to suit various floor types and cleaning needs.

This image demonstrates the robot's ability to detect carpets and automatically increase its suction power for more effective cleaning, ranging from 900 Pa on hard floors to 3000 Pa on carpets.
5.4 Advanced App Features
Leverage the Proscenic app for a personalized cleaning experience:
- Real-time Mapping: View the robot's cleaning path and real-time map of your home.
- Zone Cleaning: Define specific areas on the map for the robot to clean.
- Virtual Walls/No-Go Zones: Draw virtual boundaries on the map to restrict the robot from entering certain areas for vacuuming or mopping.
- Multi-Floor Mapping: The robot can store multiple maps, ideal for multi-story homes.
- Cleaning History: Review past cleaning reports, including cleaned area and duration.
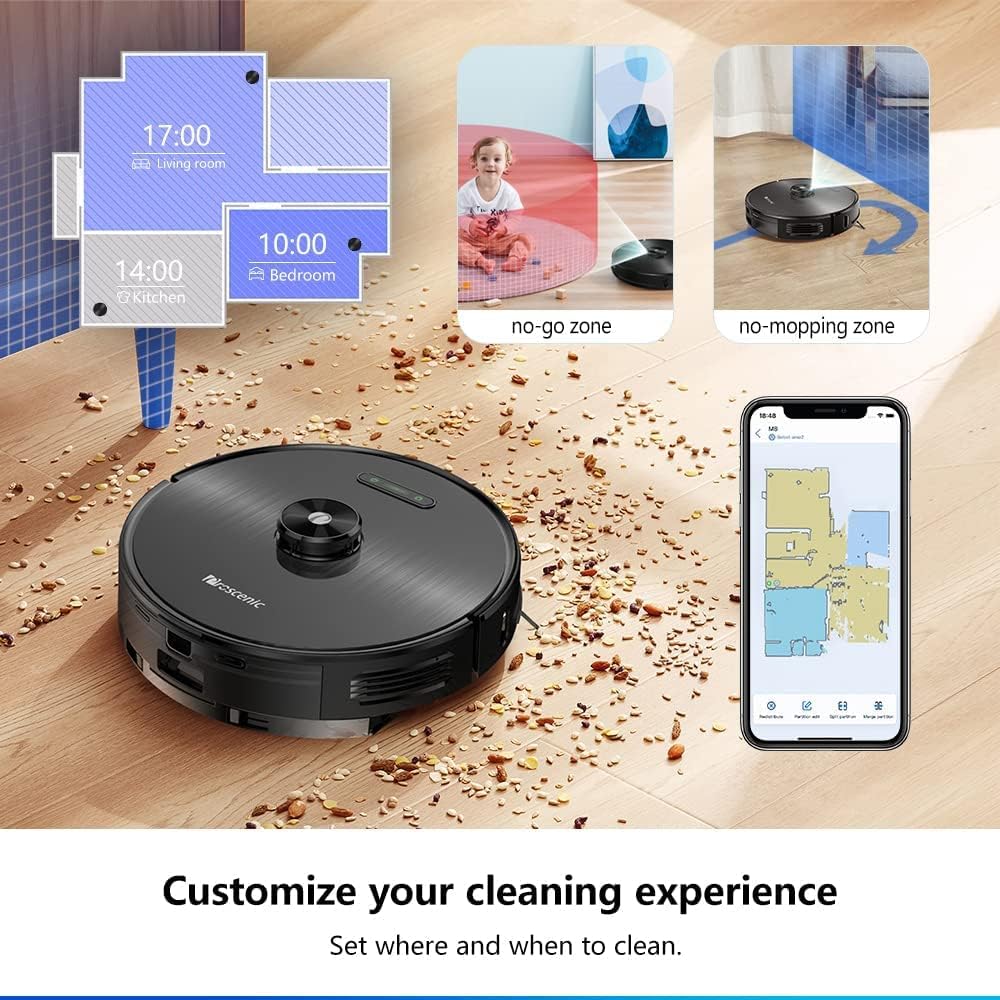
This image shows the Proscenic M8 robot vacuum cleaner in a cleaning scenario, with a smartphone displaying the app's interface for customizing cleaning experiences, including setting schedules and defining specific areas.
5.5 Voice Control
The Proscenic M8 is compatible with Amazon Alexa and Google Assistant. Link your robot to your smart home system to control it with voice commands.
- Enable Skill/Action: In your Alexa or Google Home app, search for and enable the 'ProscenicHome' skill or action.
- Link Account: Follow the instructions to link your ProscenicHome account.
- Voice Commands: Use commands such as "Alexa, start cleaning with M8" or "Hey Google, tell M8 to go home."
6. Maintenance
Regular maintenance ensures optimal performance and extends the lifespan of your robot vacuum cleaner. Always power off the robot before performing any maintenance.
6.1 Dustbin and Filter Cleaning
Clean the dustbin after each use and the filter regularly.
- Press the dustbin release button and pull out the dustbin.
- Open the dustbin cover and empty the debris.
- Remove the HEPA filter and sponge filter. Tap them gently to remove dust. Do not wash the HEPA filter with water.
- Rinse the dustbin with water (ensure it's completely dry before re-installing).
- Re-install the filters and dustbin.
6.2 Water Tank and Mop Pad Cleaning
Clean the water tank and mop pad after each mopping session.
- Remove the 2-in-1 water tank from the robot.
- Empty any remaining water from the tank.
- Detach the mop pad from the tank. Wash the mop pad with water and mild detergent. Allow it to air dry completely.
- Rinse the water tank with clean water. Allow it to air dry completely before refilling.

This image highlights the Proscenic M8's integrated 2-in-1 vacuuming and mopping system, featuring a 280ml dust box and a 300ml water tank, along with estimated cleaning times based on battery life.
6.3 Main Brush and Side Brushes Cleaning
Inspect and clean brushes weekly or as needed.
- Main Brush: Open the main brush cover on the robot's underside. Remove the main brush. Use the cleaning tool to cut and remove any tangled hair or debris. Re-install the brush.
- Side Brushes: Gently pull the side brushes off. Remove any tangled hair or debris. If brushes are bent or damaged, replace them with new ones. Push them back into place.
6.4 Sensor and Charging Contact Cleaning
Wipe sensors and charging contacts monthly with a clean, dry cloth.
- Cliff Sensors: Locate the cliff sensors on the robot's underside and wipe them clean.
- Charging Contacts: Wipe the metal charging contacts on both the robot and the charging dock.
7. Troubleshooting
If you encounter issues with your Proscenic M8, refer to the following common problems and solutions.
| Problem | Possible Cause | Solution |
|---|---|---|
| Robot does not turn on | Low battery; Power button not pressed correctly | Charge the robot; Press and hold the power button for 3 seconds. |
| Robot cannot charge | Charging contacts dirty; Charging dock not powered; Robot not aligned | Clean charging contacts on robot and dock; Ensure dock is plugged in; Re-position robot on dock. |
| Robot gets stuck frequently | Too many obstacles; Loose cables/rugs | Clear the cleaning area; Use virtual walls/no-go zones in the app. |
| Poor cleaning performance | Dustbin full; Filters clogged; Brushes tangled/worn | Empty dustbin; Clean/replace filters; Clean/replace brushes. |
| App connection issues | Incorrect Wi-Fi (not 2.4GHz); Weak Wi-Fi signal; App/robot firmware outdated | Ensure 2.4GHz Wi-Fi; Move robot closer to router; Update app/firmware; Re-pair device. |
| Mopping function not working | Water tank empty; Mop pad not attached; Water outlet clogged | Fill water tank; Attach mop pad correctly; Clean water outlets. |
For more detailed troubleshooting or persistent issues, please refer to the ProscenicHome app's help section or contact customer support.
8. Specifications
Technical specifications for the Proscenic M8 robot vacuum cleaner.
| Feature | Detail |
|---|---|
| Brand | Proscenic |
| Model Name | M8 |
| Color | Black |
| Product Dimensions | 35 x 35 x 9.7 cm; 5.12 kg (13.8 x 13.8 x 3.8 inches; 11.3 lbs) |
| Noise Level | 72 dB |
| Compatible Models | Amazon Echo, Google Home |
| Special Features | 2-in-1 Vacuuming and Mopping, APP & Alexa & Google Home control, Climbing ability, 5200 mAh battery capacity, Map storage, Carpet recognition, IPNAS 4.0 Technology, up to 200 min runtime. |
| Surface Recommendation | Carpet, Hard Floors |
| Controller Type | Google Assistant, App, Remote Control |
| Included Components | Water tank, Mop attachment, 5200 mAh advanced battery, Charging adapter |
| Filter Type | HEPA |
| Battery Run Time | 200 Minutes |
9. Warranty and Support
For warranty information, technical support, or service inquiries, please contact Proscenic customer support through the official website or the ProscenicHome app. Keep your purchase receipt as proof of purchase for warranty claims.
Documents and downloads
Ask a question about this manual
Ask about setup, troubleshooting, compatibility, parts, safety, or missing instructions. Manuals+ will review the question and use this page’s manual context to help answer it.