
HealthTree B08R1GPJ4M
HealthTree Fingertip Pulse Oximeter Blood Oxygen Monitor User Manual
Model: B08R1GPJ4M
1. Introduction
This manual provides instructions for the proper use and maintenance of your HealthTree Fingertip Pulse Oximeter. This device is designed to measure pulse oxygen saturation (SpO2) and pulse rate through a user's finger. It is suitable for use at home and in various settings for monitoring purposes.

Image: The HealthTree Fingertip Pulse Oximeter shown in use by individuals engaged in activities like hiking, running, and daily life, illustrating its portability and versatility for tracking SpO2 anytime, anywhere.
2. Safety Information
Please read all safety information carefully before using the device. This device is intended for general wellness and health applications. It is not intended to diagnose, treat, cure, or prevent any disease or health condition. Consult a medical professional for any health concerns.
- Do not use the oximeter as the sole basis for medical decisions.
- Keep the device away from young children.
- Avoid strong electromagnetic fields during use.
- Do not use the device in an MRI or CT environment.
- Do not immerse the device in water or other liquids.
3. Product Overview
3.1 Device Components

Image: A detailed diagram of the pulse oximeter, labeling key components such as the Plethysmograph, Oxygen Saturation Level, Perfusion Index, Pulse Rate, One-Button Operation, Pulse Rate Bar Graph, Battery Cover, Battery Indicator, and Finger Sensor.
3.2 Key Features
- Accurate and Fast Readings: Determines SpO2 and pulse rate within 10 seconds.
- OLED Display: Clear and easy-to-read screen.
- One-Button Operation: Simple and convenient to use.
- Automatic Shutdown: Powers off after 10 seconds of inactivity to conserve battery.
- Portable Design: Lightweight and small size, includes a detachable lanyard for easy carrying.
- Battery Powered: Uses 2 AAA batteries (included).

Image: Icons representing the key features of the pulse oximeter: Accurate Reading, Small and Portable, One Button Operation, Perfusion Index, 5-8s Fast Measurement, 10S Automatic Shut-down, Oxygen Saturation, and Pulse Rate.
4. Setup
4.1 Battery Installation
- Open the battery compartment cover located on the back of the device.
- Insert two AAA batteries according to the polarity indicators (+ and -) inside the compartment.
- Close the battery compartment cover securely.
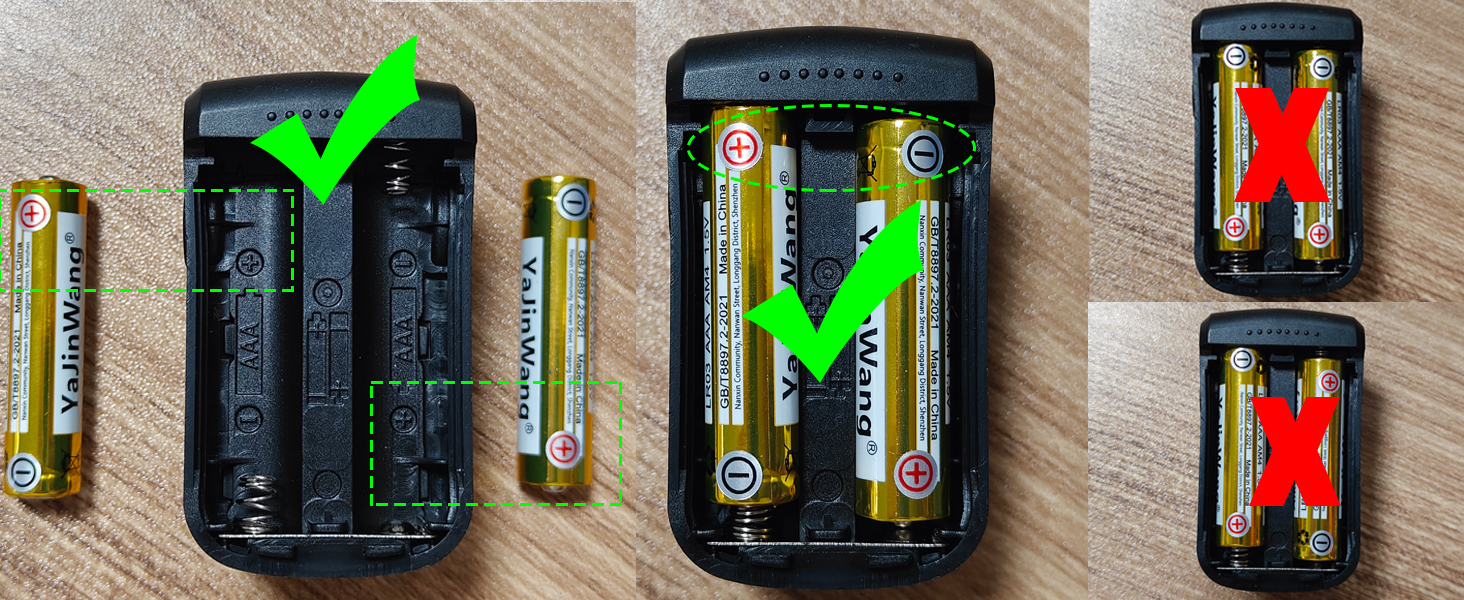
Image: A visual guide demonstrating the correct orientation for inserting AAA batteries into the pulse oximeter's battery compartment, contrasting with incorrect placements.
4.2 Attaching the Lanyard
- Thread the thin end of the lanyard through the loop hole on the side of the oximeter.
- Pass the thicker end of the lanyard through the looped thin end.
- Pull gently to secure the lanyard to the device.

Image: A three-step illustration showing how to correctly attach the provided lanyard to the HealthTree Fingertip Pulse Oximeter for convenient carrying.
5. Operating Instructions
5.1 Taking a Measurement
- Ensure the oximeter has batteries installed.
- Open the clamp of the oximeter.
- Insert one finger into the rubber opening of the oximeter, ensuring the finger is placed correctly within the sensor area.
- Release the clamp.
- Press the power button once to turn on the oximeter.
- Keep your hand still during the measurement. Readings will appear on the OLED display within 5-10 seconds.

Image: A hand demonstrating the "one-click measurement" process, showing a finger inserted into the oximeter and highlighting the sensing area.
5.2 Important Notes for Accurate Readings
- Keep your body still during the measurement.
- Ensure your fingers are warm.
- Avoid long fingernails.
- Do not have nail polish or artificial nails on the finger being measured.
- Do not measure on wet fingers.
- Strong ambient light (e.g., fluorescent lamps, dual-head lamps, infrared heaters) may affect results. Block the light or change the measuring environment if necessary.
- Measurement time may vary depending on skin tone. Users with darker skin may need a longer measuring time.

Image: A visual representation of the oximeter providing accurate and fast readings within 5-8 seconds, with a note on conditions to avoid for measurement failure.
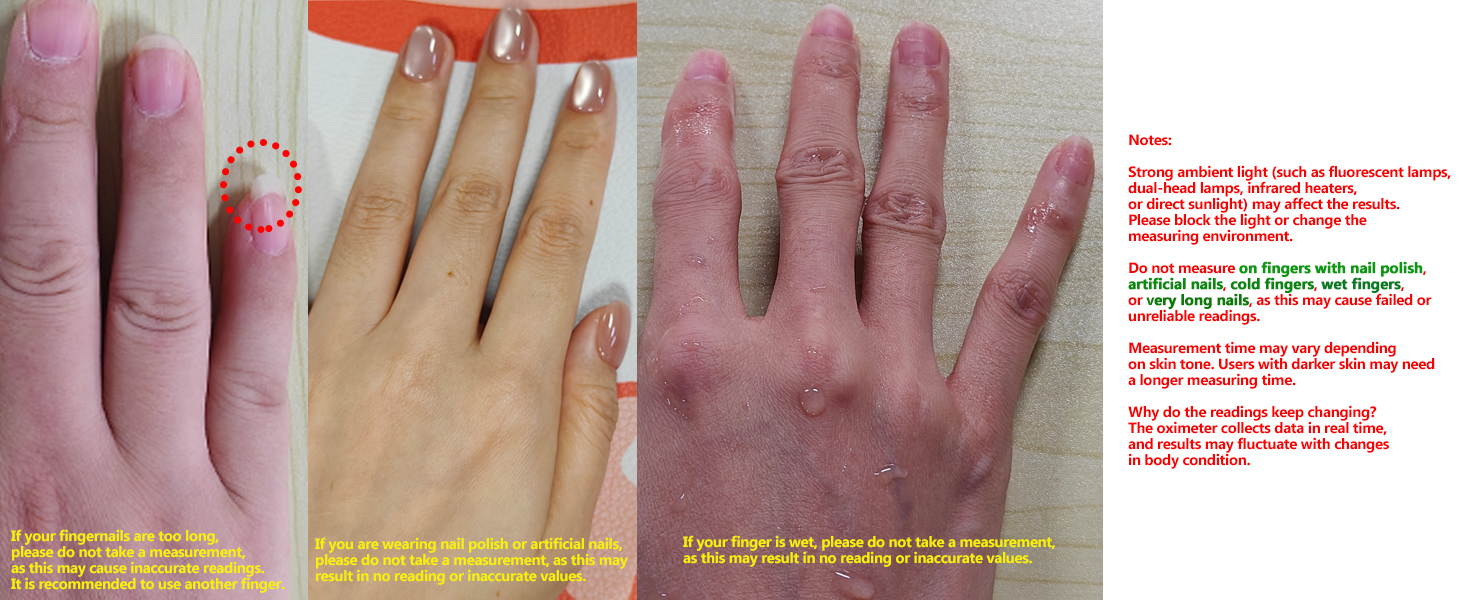
Image: A composite image illustrating various factors that can affect pulse oximeter readings, such as long fingernails, nail polish, artificial nails, cold fingers, and wet fingers, along with notes on ambient light and skin tone.
5.3 Automatic Shutdown
The oximeter will automatically power off after 10 seconds of inactivity (when a finger is removed from the unit) to conserve battery life.

Image: The pulse oximeter display showing a countdown for the 10-second auto-shutdown feature when a finger is removed.
5.4 Alarm Function
During measurement, if the SpO2 or Pulse Rate (PR) value exceeds the set threshold, the corresponding value will flash on the screen. This is a silent alarm feature.
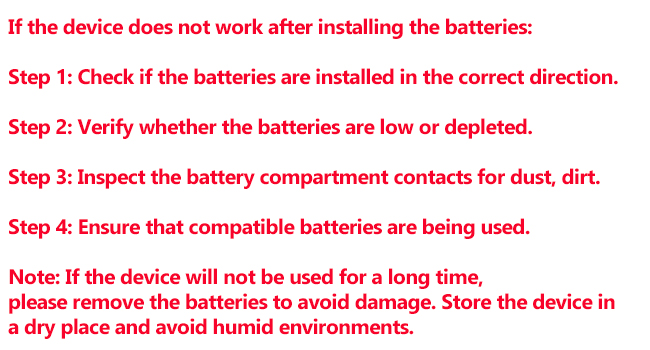
Image: A user measuring with the pulse oximeter, illustrating the text flashing alarm feature where SpO2 or PR values flash if they exceed set limits.
6. Maintenance
6.1 Cleaning
- Clean the surface of the oximeter with a soft cloth dampened with medical alcohol (70% ethanol or 75% isopropanol).
- Do not use abrasive cleaners or immerse the device in water.
- Ensure the device is completely dry before reuse.
6.2 Battery Care
- If the device will not be used for a long period, remove the batteries to prevent potential damage from battery leakage.
- Store the device in a dry place and avoid humid environments.
7. Troubleshooting
7.1 Device Not Working After Battery Installation
- Step 1: Check if the batteries are installed in the correct direction according to polarity markings.
- Step 2: Verify whether the batteries are low or depleted. Replace with new batteries if necessary.
- Step 3: Inspect the battery compartment contacts for dust or dirt. Clean gently if needed.
- Step 4: Ensure that compatible AAA batteries are being used.
Image: A visual guide outlining troubleshooting steps for when the device does not power on after battery installation, focusing on correct battery orientation, charge level, and contact cleanliness.
7.2 Inaccurate or Unreliable Readings
- Ensure your finger is warm and still during measurement. Cold fingers can lead to inaccurate readings.
- Remove any nail polish, artificial nails, or ensure fingernails are not excessively long. These can interfere with the sensor.
- Avoid measuring on wet fingers.
- Minimize strong ambient light exposure to the sensor area.
- Readings may fluctuate due to changes in body condition. If readings are consistently unusual, consult a healthcare professional.
8. Specifications
| Product Dimensions | 2.25 x 1.2 x 1.25 inches; 2.4 ounces |
| Batteries | 2 AAA batteries (included) |
| Brand | HealthTree |
| Model Name | B08R1GPJ4M |
| Measuring Range (SpO2) | 70% - 100% |
| Manufacturer | HealthTree |
9. Warranty and Support
For warranty information or technical support, please refer to the documentation included with your product or contact HealthTree customer service. Contact details can typically be found on the product packaging or the official HealthTree website.
Related documentsB08R1GPJ4M


Ask a question about this manual
Ask about setup, troubleshooting, compatibility, parts, safety, or missing instructions. Manuals+ will review the question and use this page’s manual context to help answer it.