
Cecotec ReadyWarm 9200 Smart Towel Steel
Cecotec ReadyWarm 9200 Smart Towel Steel Electric Towel Radiator 750W Instruction Manual
Model: ReadyWarm 9200 Smart Towel Steel | Brand: Cecotec
1. Introduction
Thank you for choosing the Cecotec ReadyWarm 9200 Smart Towel Steel Electric Towel Radiator. This appliance is designed to provide warmth to your bathroom and quickly dry your towels, enhancing comfort and convenience. Please read this instruction manual carefully before using the product and keep it for future reference.
2. Important Safety Instructions
- Ensure the power supply voltage matches the rating label on the appliance.
- Do not immerse the appliance, power cord, or plug in water or any other liquid.
- Keep the appliance out of reach of children and individuals with reduced physical, sensory, or mental capabilities.
- Do not operate the appliance if the cord or plug is damaged, or if it malfunctions or has been dropped.
- This towel radiator is designed for indoor use only, specifically in bathrooms, thanks to its IP24 rating, which provides protection against medium-sized dust particles and splashing water.
- Do not cover the appliance, as this may lead to overheating.
- Ensure proper ventilation around the appliance.
- The appliance features two safety systems: overheat protection and an anti-freeze system (activates near 0ºC) to protect the unit and your home.
- Always unplug the appliance before cleaning or maintenance.
3. Product Features
- High Power: 750 W for rapid towel heating and bathroom warming.
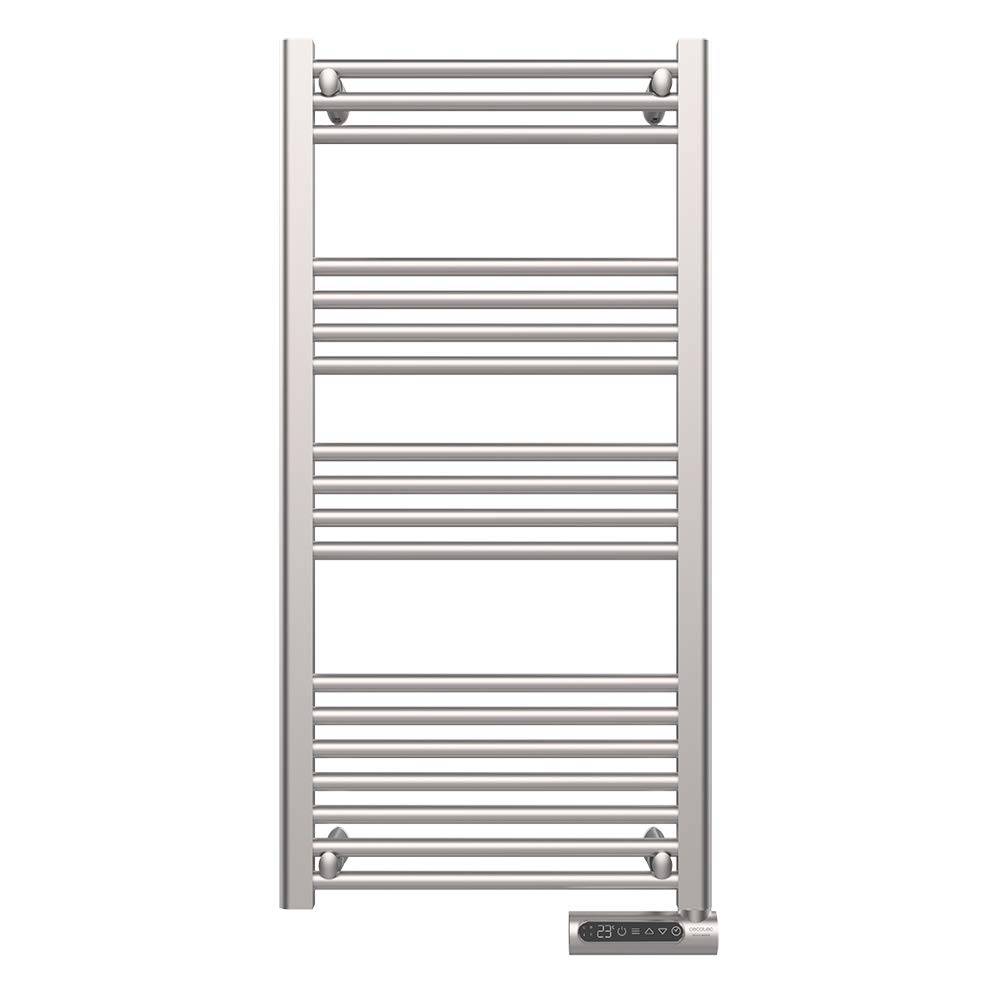
- LED Display & Touch Control: Shows current room temperature and allows easy selection of functions, temperature, and modes.
- Weekly Programmer: Set specific days and time slots for automatic operation.
- 3 Operating Modes: Comfort, Eco, and Open Window mode to suit various needs.
- Adjustable Temperature: Select temperature between approximately 10ºC and 35ºC for personalized comfort.
- IP24 Protection: Ideal for bathrooms, resistant to splashing water.
- Dual Safety Systems: Overheat protection and anti-freeze system for enhanced safety.
Product Overview

Product Video
Video 1: Overview of the Cecotec Ready Warm 9200 Smart Towel (White variant shown, features are identical to Steel model).
4. Setup and Installation
The Cecotec ReadyWarm 9200 Smart Towel Steel is designed for wall-mounted installation in your bathroom. Due to its dimensions and weight, professional installation is recommended to ensure proper and secure mounting.
Dimensions and Weight:
- Dimensions: 50 x 6 x 107 cm (Width x Depth x Height)
- Weight: 12 kg
Ensure the installation location is suitable for the appliance's weight and dimensions, and that it complies with local electrical safety regulations for bathroom installations.

5. Operating Instructions
The ReadyWarm 9200 features an intuitive LED display and touch control panel for easy operation. Refer to the following instructions for basic use and programming.
5.1. Power On/Off
- Press the RED power button (ON/Stand-by) to turn the appliance on or off.
5.2. Setting Date and Time
To set the date and time:
- In Stand-by mode, press and hold the RED power button for at least 3 seconds. The display will show "SEt" and then "tEd" or "ProG".
- Use the [+] or [-] buttons to select "tEd" (for time/date editing).
- Press the GREEN button to confirm.
- The display will show the day of the week (1 for Monday, 2 for Tuesday, etc.). Use [+] or [-] to select the current day, then press GREEN to confirm.
- The hour will flash. Use [+] or [-] to set the current hour, then press GREEN to confirm.
- Repeat for minutes and seconds.
5.3. Selecting Operating Modes
Once the appliance is on, press the GREEN button to cycle through the available modes:
- Comfort Mode: Use [+] or [-] to select your desired comfort temperature (e.g., 28.5ºC). Press GREEN to confirm.
- Eco Mode: Use [+] or [-] to select your desired minimum temperature (e.g., 18.0ºC). Press GREEN to confirm.
- Anti-freeze Mode: Activated automatically to protect the appliance at low temperatures (e.g., 7.0ºC).
- CRONO Mode (Personalized Programming): Allows daily and weekly programming. See section 5.4.
- TURBO-2h Mode: Provides 2 hours of turbo heating, regardless of the set temperature.
5.4. Weekly Programming (CRONO Mode)
To set a personalized weekly schedule:
- Put the appliance in Stand-by mode by pressing the RED button.
- Press and hold the [-] button for at least 3 seconds. The display will show "SEt".
- Use [+] or [-] to select "ProG" (for programming). Press GREEN to confirm.
- For each day (Day 1 Monday, Day 2 Tuesday, etc.), you can set different time slots and modes (Comfort or Eco).
- Use [+] to set hours for Comfort mode and [-] for Eco mode. Press GREEN to validate each hour.
- Repeat for all desired hours and days.
5.5. Open Window Detection Function
This function automatically switches the radiator to Eco mode if a sudden drop in temperature (e.g., from an open window) is detected, saving energy.
- Put the appliance in Stand-by mode by pressing the RED button.
- Press and hold the [+] button for 3 seconds. The display will show "SEt" and then "oFF" or "on".
- Use [+] or [-] to select "on" to activate or "oFF" to deactivate the function.
- Press the GREEN button to validate and return to Stand-by mode.
5.6. Keypad Lock Function
To prevent accidental changes to settings, you can lock the control panel.
- Press and hold the GREEN button for 3 seconds. A key icon will appear on the display, indicating the keypad is locked.
- To deactivate the lock, press and hold the GREEN button again for 3 seconds. The key icon will disappear.
Instructional Videos (General Programming)
Video 2: Tutorial on programming an electric towel radiator thermostat. While the brand shown is HJM, the programming logic and button functions may be similar to your Cecotec model. Please refer to your specific product's display and buttons.
6. Maintenance and Cleaning
- Always unplug the appliance from the power outlet and allow it to cool down completely before cleaning.
- Wipe the exterior surfaces with a soft, damp cloth. Do not use abrasive cleaners, solvents, or chemical agents, as these can damage the finish.
- Ensure no water enters the control panel or electrical components.
- Regularly check the power cord for any signs of damage.
7. Troubleshooting
If you experience issues with your Cecotec ReadyWarm 9200 Smart Towel Steel, please check the following:
- Appliance not turning on: Ensure the power cord is securely plugged into a working outlet. Check your home's circuit breaker.
- No heat: Verify that the appliance is in an active heating mode (Comfort, Eco, or Turbo) and the set temperature is higher than the current room temperature.
- Display not working: Try unplugging the unit for a few minutes and plugging it back in. If the issue persists, contact technical support.
- Unexpected mode changes: Check if the keypad lock is active. If not, ensure no buttons are being accidentally pressed.
For any problems not resolved by these steps, please contact Cecotec customer support.
8. Technical Specifications
| Brand | Cecotec |
| Model Number | ReadyWarm 9200 Smart Towel Steel |
| Heat Output | 750 W |
| Dimensions (W x D x H) | 50 x 6 x 107 cm |
| Weight | 12 kg |
| Power Source | Electric Cable |
| Heating Method | Radiant |
| Special Features | Digital display, Timer, 3 operating modes, 2 safety systems |
| IP Rating | IP24 |
| Room Type | Bathroom |
9. Warranty and Support
This product is covered by a warranty in accordance with current legislation. For any questions, technical assistance, or warranty claims, please contact Cecotec customer support. You can find more information and contact details on the official Cecotec website or through your point of purchase.
Visit the Cecotec Official Store for additional products and support.
Related documentsReadyWarm 9200 Smart Towel Steel


Ask a question about this manual
Ask about setup, troubleshooting, compatibility, parts, safety, or missing instructions. Manuals+ will review the question and use this page’s manual context to help answer it.