1. Product Overview
The VEMER VE787200 CW is a wall-mounted Wi-Fi programmable thermostat designed for controlling heating and air conditioning systems. It features a large display for easy viewing of temperature and programming status. Remote control is available via a dedicated smartphone application for iOS and Android devices. The thermostat supports weekly programming with three temperature levels plus an anti-freeze function and automatically adjusts for daylight saving time.

Image 1.1: Front view of the VEMER VE787200 CW Wi-Fi Thermostat, showing its large blue backlit LCD display and control buttons.
2. Safety Information
- Installation must be performed by qualified personnel in compliance with local electrical regulations.
- Disconnect power before installation, maintenance, or any wiring procedures.
- The device operates on 230V AC. Ensure proper wiring to avoid electrical shock.
- Do not expose the thermostat to direct sunlight, drafts, or heat sources, as this may affect temperature readings.
- Keep the device away from moisture and extreme temperatures.
3. Package Contents
Verify that all components are present in the package:
- VEMER VE787200 CW Wi-Fi Thermostat
- Mounting bracket
- Power cable
- User Manual (this document)
4. Installation
The thermostat can be installed directly on a wall or over a standard 3-module flush-mounted box.
4.1. Mounting Location
Choose a central location in the room, away from direct sunlight, windows, doors, and heat sources (e.g., radiators, lamps) to ensure accurate temperature measurement.
4.2. Wiring
- Disconnect Power: Before starting, ensure the main power supply to the heating/cooling system is turned off at the circuit breaker.
- Mount the Bracket: Secure the mounting bracket to the wall or flush-mounted box using appropriate screws.
- Connect Wiring: Connect the 230V AC power supply wires and the control wires for your heating/cooling system to the terminals on the thermostat's backplate. Refer to the wiring diagram provided in the technical specifications. The thermostat requires both Live (Phase) and Neutral for power.
- Attach Thermostat: Carefully attach the thermostat unit to the mounted bracket, ensuring it clicks securely into place.
- Restore Power: Once installation is complete and all connections are secure, restore power to the system.
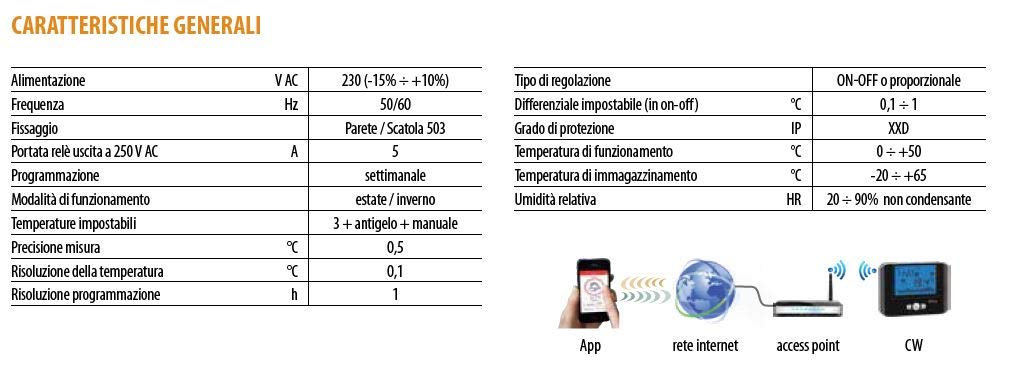
Image 4.1: Technical specifications table and a simplified connection diagram showing the thermostat, access point, internet, and app.
5. Initial Setup and Wi-Fi Connection
5.1. First Power-On
Upon first power-on, the thermostat will display default settings. You may need to set the current time and day. Use the control buttons on the device to navigate menus and adjust values.
5.2. Wi-Fi Configuration
- Download App: Download the "Clima Wi-Fi" app from the Apple App Store (for iOS) or Google Play Store (for Android).
- Create Account: Open the app and follow the instructions to create a user account.
- Add Device: In the app, select the option to add a new device.
- Thermostat Pairing Mode: Follow the app's instructions to put the thermostat into Wi-Fi pairing mode. This usually involves pressing and holding a specific button combination on the thermostat until a Wi-Fi icon flashes on the display.
- Connect to Network: Use the app to connect the thermostat to your home Wi-Fi network. Ensure your Wi-Fi router is compatible (most standard 2.4GHz routers are).
- Confirmation: Once connected, the Wi-Fi icon on the thermostat display will become solid, and the app will confirm successful pairing.

Image 5.1: The VEMER VE787200 CW thermostat alongside a smartphone displaying the "Clima Wi-Fi" app interface, indicating remote control capabilities.
6. Operation
6.1. Display Overview
The large LCD display shows the current time, day, measured room temperature, and active programming. Icons indicate heating/cooling status, Wi-Fi connection, and other operational modes.

Image 6.1: Close-up of the thermostat display, showing time, day, temperature, Wi-Fi indicator, and a graphical representation of the weekly program.
6.2. Programming Modes
The thermostat supports weekly programming with three customizable temperature levels (T1, T2, T3) and an anti-freeze setting. It also features automatic summer/winter time adjustment.
- Weekly Program: Set different temperature schedules for each day of the week.
- Temperature Levels: Define T1 (comfort), T2 (economy), T3 (super economy) temperatures according to your preferences.
- Anti-freeze Mode: Maintains a minimum temperature (e.g., 5°C) to prevent pipes from freezing when the system is not actively heating.
- Manual Mode: Override the programmed schedule to set a constant temperature until the next program change or until manual mode is deactivated.
- Summer/Winter Mode: Select between heating (winter) and cooling (summer) operation.
6.3. Adjusting Settings
Use the physical buttons on the thermostat to navigate through menus and adjust settings. Typically, there are buttons for mode selection, temperature adjustment (up/down arrows), and confirmation.
7. Remote Control via App
The "Clima Wi-Fi" app provides full remote control over your thermostat, allowing you to manage your heating and cooling system from anywhere.
- Real-time Monitoring: View the current room temperature and thermostat status.
- Program Management: Create, modify, and activate weekly programs.
- Mode Selection: Switch between heating, cooling, anti-freeze, and manual modes.
- Temperature Adjustment: Change the set temperature remotely.
- Multi-device Control: Manage multiple VEMER Wi-Fi thermostats from a single app.

Image 7.1: Illustrative display of the thermostat's programming capabilities, showing different temperature settings across a 24-hour period.
8. Technical Specifications
| Feature | Specification |
|---|---|
| Power Supply | 230V AC, 50/60Hz |
| Relay Output | 5A (250V AC) |
| Programming | Weekly, 3 temperature levels + anti-freeze |
| Operating Modes | Summer (cooling) / Winter (heating) |
| Settable Temperatures | 3 levels + anti-freeze + manual |
| Measurement Precision | 0.5°C |
| Temperature Resolution | 0.1°C |
| Programming Resolution | 1 hour |
| Regulation Type | ON-OFF or Proportional |
| Settable Differential | 0.1 - 1°C |
| IP Rating | XXD (Not specified in detail, typically refers to protection against solids/liquids) |
| Operating Temperature | 0°C to +50°C |
| Storage Temperature | -20°C to +65°C |
| Relative Humidity | 20 - 90% (non-condensing) |
| Dimensions | 15.2 x 11.2 x 3.9 cm |
| Weight | 300 g |
| Material | Plastic |
| Display Type | LCD |
| Special Features | App remote control, weekly programming, automatic daylight saving, anti-freeze program |
9. Troubleshooting
| Problem | Possible Cause | Solution |
|---|---|---|
| Thermostat display is blank. | No power supply. | Check circuit breaker and wiring connections. Ensure 230V AC power is supplied. |
| Cannot connect to Wi-Fi. | Incorrect Wi-Fi password, router issues, or thermostat not in pairing mode. | Verify Wi-Fi password. Restart your router. Ensure the thermostat is in Wi-Fi pairing mode (flashing Wi-Fi icon). Check router compatibility (2.4GHz networks are typically supported). |
| Heating/Cooling system not responding. | Incorrect wiring, thermostat in wrong mode, or system fault. | Check wiring connections. Ensure the thermostat is in the correct operating mode (heating/cooling) and the set temperature is appropriate. Consult your HVAC system manual. |
| Inaccurate temperature reading. | Thermostat location affected by drafts, direct sunlight, or heat sources. | Relocate the thermostat to a more suitable position, away from external influences. |
| App not controlling thermostat. | No internet connection, app not logged in, or thermostat offline. | Check your smartphone's internet connection. Log into the app. Verify the thermostat's Wi-Fi connection status (solid Wi-Fi icon). |
10. Maintenance
- Cleaning: Clean the thermostat's exterior with a soft, dry cloth. Do not use abrasive cleaners, solvents, or spray directly onto the device.
- No User Serviceable Parts: The thermostat contains no user-serviceable parts. Do not attempt to open or repair the device yourself.
- Software Updates: Keep the "Clima Wi-Fi" app updated to the latest version for optimal performance and new features. Firmware updates for the thermostat may be pushed via the app.
11. Warranty and Support
VEMER products are covered by a standard manufacturer's warranty. For specific warranty terms and conditions, please refer to the documentation provided with your purchase or visit the official VEMER website. For technical support, troubleshooting assistance, or warranty claims, please contact VEMER customer service or your local distributor.
VEMER Official Website: www.vemer.it


