1. Introduction
Thank you for choosing the Bmax Mini PC B1 Mini. This compact and powerful micro computer is designed for various applications, from business office tasks to multimedia entertainment. This manual provides detailed instructions to help you set up, operate, and maintain your device for optimal performance.

Figure 1: Front view of the Bmax Mini PC B1 Mini, showcasing its compact design.
2. What's in the Box
Please verify that all items are present in the package:
- 1 x Bmax Mini PC B1 Mini (8GB RAM/128GB eMMC)
- 1 x HDMI Cable
- 1 x User Manual (this document)
- 1 x US Power Adapter
- 1 x VESA Mount with Screws
3. Product Specifications
| Feature | Description |
|---|---|
| Processor | Intel Celeron N4000 (up to 2.6GHz) |
| RAM | 8GB LPDDR4 |
| Storage | 128GB eMMC (expandable with M.2_2280 SATA SSD up to 1TB) |
| Graphics | Intel UHD Graphics 600 |
| Operating System | Windows 11 |
| Connectivity | 2.4GHz/5GHz Dual-Band Wi-Fi (802.11ac), Bluetooth 4.2, LAN 1000Mbps |
| Ports | HDMI x2, VGA, USB 3.0 x2, USB 2.0 x2, 3.5mm Headset Jack, Ethernet, Power In |
| Display Output | 4K (3840 x 2160) Ultra HD, Dual Display Support |
| Dimensions | Approx. 4.25 (L) x 4.17 (W) x 0.86 (H) inches |
| Weight | Approx. 8.5 ounces (210g) |

Figure 2: Key specifications and features of the Bmax Mini PC B1 Mini.

Figure 3: Detailed view of the Intel Gemini Lake N4000 processor architecture.
4. Setup Guide
4.1 Connecting Your Mini PC
Connect to Display: Use the provided HDMI cable to connect the Mini PC to your monitor or TV. The device supports dual display output via HDMI and VGA ports. For optimal 4K resolution, ensure your display and HDMI cable support 4K.

Figure 4: Bmax Mini PC connected to a monitor, illustrating its compact size and storage capabilities.
Connect Peripherals: Plug in your USB keyboard and mouse into the available USB 2.0 or USB 3.0 ports. The device has two USB 3.0 ports and two USB 2.0 ports.

Figure 5: Overview of the various ports available on the Bmax Mini PC B1 Mini for connecting peripherals.
Connect Power: Connect the US Power Adapter to the DC-in port on the Mini PC, then plug it into a power outlet.
Power On: Press the power button located on the front of the Mini PC. The power indicator light will illuminate.
4.2 Initial Windows Setup
Upon first boot, the Mini PC will guide you through the Windows 11 setup process. Follow the on-screen prompts to:
- Select your region and keyboard layout.
- Connect to a Wi-Fi network or use a wired Ethernet connection.
- Sign in with your Microsoft account or create a new one.
- Set up privacy settings.
5. Operating Your Mini PC
5.1 Basic Operation
- Power On/Off: Press the power button to turn on the device. To turn off, click the Start button in Windows, then select Power > Shut down.
- Restart: To restart the device, click the Start button in Windows, then select Power > Restart.
- Sleep Mode: To put the device into sleep mode, click the Start button in Windows, then select Power > Sleep.
5.2 Storage Expansion
The Bmax Mini PC B1 Mini supports additional storage expansion via an M.2_2280 SATA SSD (up to 1TB, SSD not included). This allows you to significantly increase your storage capacity for applications and files.
To install an M.2 SSD:
- Power off the Mini PC and disconnect all cables.
- Locate the M.2 slot on the motherboard (refer to internal diagrams if available).
- Carefully insert the M.2 SSD into the slot at an angle, then gently push down and secure it with a screw.
- Reassemble the Mini PC and power it on. The new drive will need to be initialized and formatted in Windows Disk Management before use.
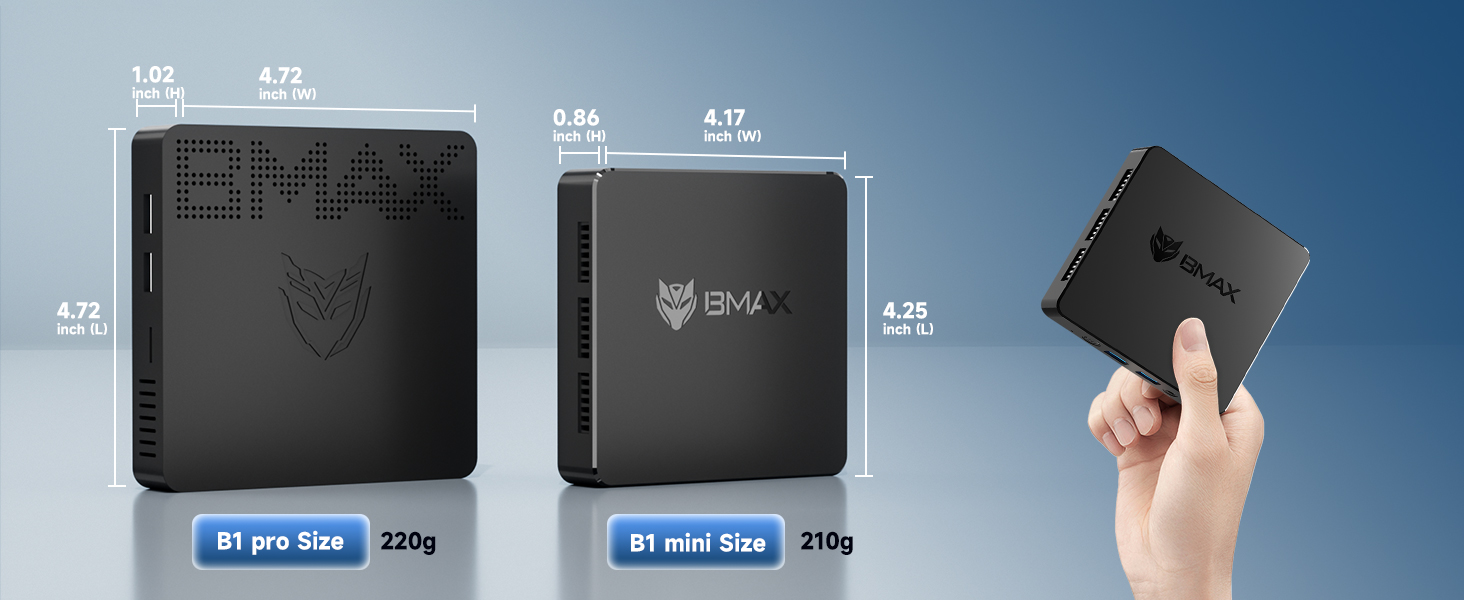
Figure 6: Instructions for expanding storage with an M.2_2280 SSD.
5.3 Dual Display Setup
The Mini PC supports connecting two monitors simultaneously using its HDMI and VGA ports. This can significantly enhance productivity for work or provide an immersive experience for entertainment.
- Connect your primary monitor to the HDMI port.
- Connect your secondary monitor to the VGA port.
- In Windows Display Settings, you can configure the display mode (Extend, Duplicate, or Second screen only).

Figure 7: Example of a dual monitor setup with the Bmax Mini PC.
5.4 VESA Mount Installation
The included VESA mount allows you to attach the Mini PC to the back of a compatible monitor or to a wall, saving desk space and creating a cleaner setup.
- Attach the VESA bracket to the back of your monitor using the provided screws, aligning with the VESA mounting holes.
- Slide the Mini PC onto the bracket until it clicks securely into place.

Figure 8: Various mounting options for the Bmax Mini PC, including VESA mount for an all-in-one setup.
6. Maintenance
6.1 Cleaning
- Use a soft, dry cloth to clean the exterior of the Mini PC.
- Avoid using liquid cleaners or aerosols directly on the device.
- Ensure ventilation holes are clear of dust and debris to maintain optimal airflow.

Figure 9: Internal design highlighting the efficient heat dissipation system for silent operation.
6.2 Software Updates
Regularly check for and install Windows updates to ensure system stability, security, and performance. Go to Settings > Windows Update to check for updates.
7. Troubleshooting
| Problem | Possible Solution |
|---|---|
| No display on monitor. |
|
| Mini PC does not power on. |
|
| Slow performance. |
|
| Wi-Fi or Bluetooth connectivity issues. |
|
8. Warranty and Support
Bmax provides a 12-month warranty for the Mini PC B1 Mini. We also offer 7 days/24 hours serving and Lifetime technical support. If you encounter any issues or have questions, please feel free to contact our customer service by email.
For further assistance, please visit the official Bmax store on Amazon: Bmax Amazon Store.
9. Product Videos
Watch these official videos from Bmax Direct for more information on the Bmax Mini PC B7 Pro, which shares similar features and performance characteristics with the B1 Mini.
9.1 MINI PC BMAX B7pro - Powerful Performance
This video demonstrates the powerful performance of the BMAX B7 Pro Mini PC, highlighting its speed and efficiency for various tasks. While the video features the B7 Pro, the B1 Mini offers similar core functionalities for everyday computing.


