Nitecore FX3 2-Slot USB-C Quick Charge Battery Charger User Manual
Comprehensive guide for operating and maintaining your Nitecore FX3 charger.
Introduction
The Nitecore FX3 is a sophisticated 2-slot USB-C quick charge battery charger designed for Fujifilm X-T4 camera NP-W235 batteries. It offers simultaneous charging, real-time digital status display, and compact portability. This manual provides detailed instructions for setup, operation, maintenance, and troubleshooting to ensure optimal performance and longevity of your device.
Product Overview
The Nitecore FX3 charger system includes the main charging unit, a USB-C charging cable, and a QC3.0 charging adapter. Below are visual representations and descriptions of the components.

Figure 1: The Nitecore FX3 charger, accompanied by its USB-C charging cable and the QC 3.0 charging adapter, providing a complete charging solution.

Figure 2: Close-up view of the included QC 3.0 Charging Adapter, essential for enabling quick charge functionality.

Figure 3: The Nitecore FX3 dual-slot charger, specifically designed for Fujifilm NP-W235 camera batteries, highlighting its compatibility.
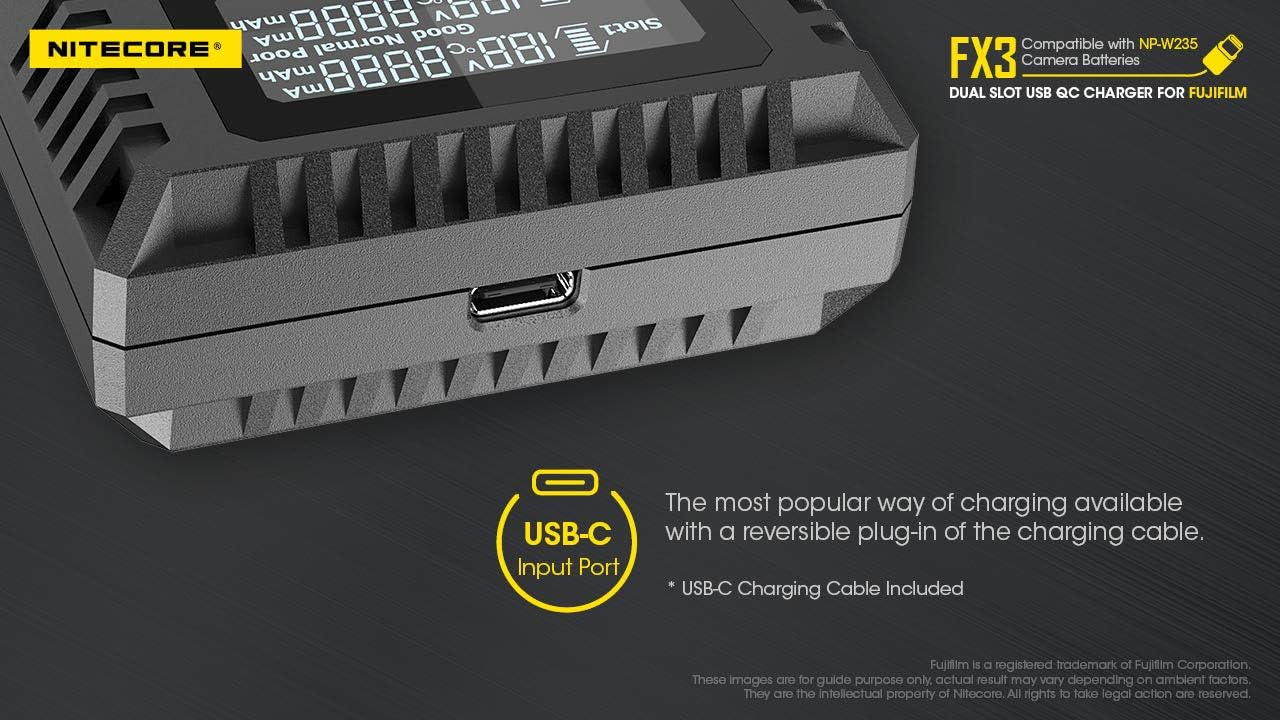
Figure 4: Detail of the USB-C input port on the Nitecore FX3, illustrating the convenient and reversible plug-in design for the charging cable.

Figure 5: The high-definition LCD display of the FX3, showing real-time charging information including battery health, charged volume, temperature, charging current, and voltage for each slot.
Setup
- Connect Power: Insert the USB-C charging cable into the USB-C input port on the Nitecore FX3 charger. Connect the other end of the cable to the provided QC3.0 charging adapter, and then plug the adapter into a wall outlet. Alternatively, you can connect the USB-C cable to any compatible USB power source (e.g., power bank, computer USB port), but for optimal quick charging, the QC3.0 adapter is recommended.
- Insert Batteries: Carefully align your Fujifilm NP-W235 batteries with the charging slots on the FX3. The charger features two slots, allowing for simultaneous charging. Ensure the battery is firmly seated in the slot. The LCD display will illuminate and begin showing charging information once a battery is correctly inserted.
Operating Instructions
Charging Process
Once batteries are inserted and power is connected, the FX3 automatically detects the battery type and begins the charging process. The LCD display provides comprehensive real-time information:
- Battery Health: Indicates the overall condition of the battery (e.g., Good, Normal, Poor).
- Charged Volume (mAh): Shows the amount of charge already delivered to the battery.
- Battery Temperature (°C): Displays the current temperature of the battery.
- Charging Current (mA): Indicates the rate at which the battery is being charged.
- Battery Voltage (V): Shows the current voltage of the battery.
The charger automatically applies the correct charging current and prevents damage from improperly inserted batteries. When using a QC power adapter, the charger can achieve a maximum charging current of 1500mA in one slot, significantly reducing charging time. Two batteries can be charged simultaneously in approximately 2 hours to 80% capacity with QC fast charge input.
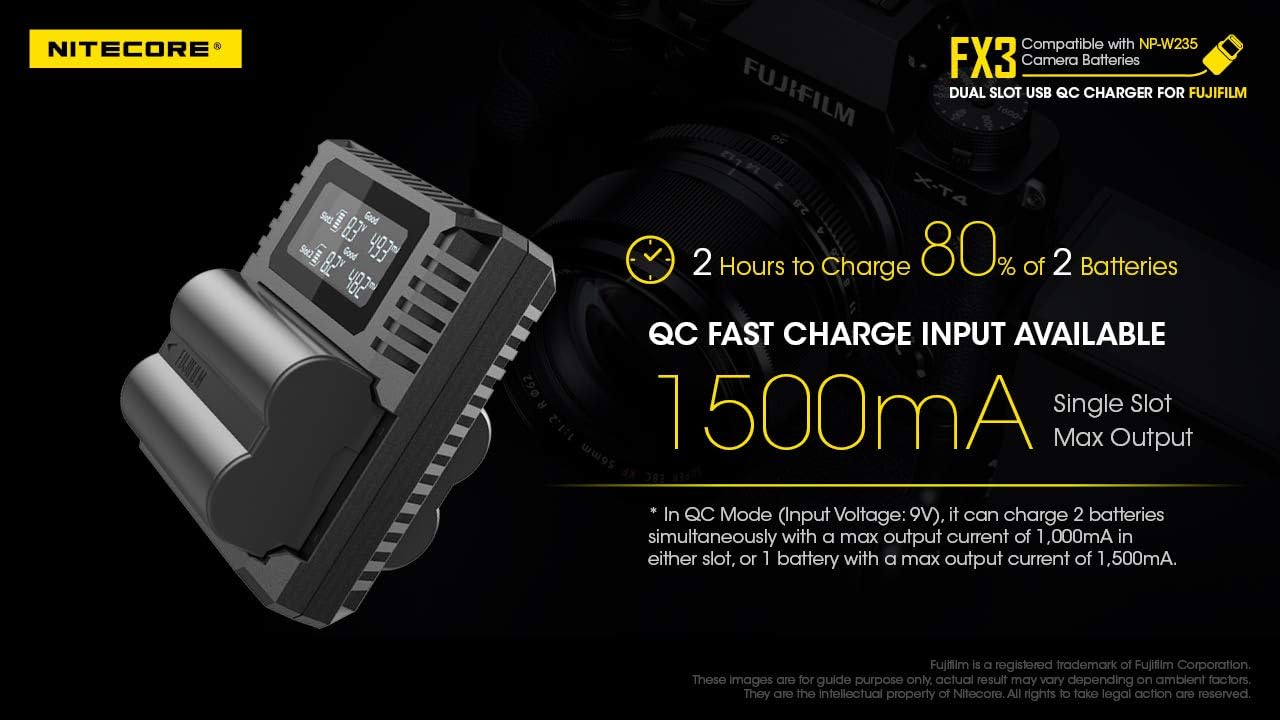
Figure 6: Illustration of the FX3's fast charging capability, showing that 80% of two batteries can be charged in approximately 2 hours with a 1500mA single slot max output in QC mode.
Removing Batteries
To remove a charged battery, gently but firmly push the battery towards the "open" end of the charger slot until it disengages from its locked position. Once disengaged, you can easily lift the battery out of the charger. Avoid pulling directly upwards without first disengaging the battery.
Maintenance
- Cleaning: Disconnect the charger from power before cleaning. Use a soft, dry cloth to wipe the exterior of the charger. Do not use liquid cleaners or solvents. Ensure no dust or debris accumulates in the charging slots or USB-C port.
- Storage: When not in use, store the Nitecore FX3 in a cool, dry place away from direct sunlight and extreme temperatures. It is recommended to store the charger and batteries separately.
- Handling: Avoid dropping the charger or subjecting it to strong impacts, as this can damage internal components.
Troubleshooting
- Charger Not Powering On:
- Ensure the USB-C cable is securely connected to both the charger and the power source.
- Verify that the power adapter is properly plugged into a working wall outlet.
- Try a different USB power source or cable to rule out a faulty component.
- Batteries Not Charging Fully or Unevenly:
- Ensure batteries are correctly seated in their slots.
- Confirm you are using the QC3.0 adapter for optimal performance, especially if charging two batteries simultaneously.
- Check the battery health indicator on the LCD. If a battery shows "Poor" health, it may need replacement.
- Clean the battery contacts and charger pins with a dry cloth.
- Difficulty Removing Batteries:
- As described in the "Operating Instructions" section, firmly push the battery towards the open end of the slot to disengage it before lifting. Do not force it.
- LCD Display Issues:
- If the display is blank or flickering, try reconnecting the power source.
- Ensure the charger is not exposed to extreme temperatures.
Specifications

Figure 7: Detailed specifications of the Nitecore FX3 charger, including input/output voltages, currents, and dimensions.
| Feature | Detail |
|---|---|
| Input | DC 5V/2A or 9V/2A |
| Output Voltage | Slot 1: 8.4V±1%, Slot 2: 8.4V±1% |
| Output Current (QC Mode) | 1,500mA * 1 (MAX), 1,000mA * 2 (MAX) |
| Output Current (Standard Mode) | 1,000mA * 1 (MAX), 500mA * 2 (MAX) |
| Interface | Input: USB-C |
| Battery Compatibility | Fujifilm camera battery NP-W235 |
| Compatible Models | X-T4 (Please refer to battery compatibility for more compatible models) |
| Dimensions | 82mm x 70mm x 27.5mm (3.23" x 2.76" x 1.08") |
| Weight | 70g (2.47oz) |
Warranty and Support
For warranty information, technical support, or service inquiries, please contact Nitecore customer service through their official website or the retailer from whom you purchased the product. Keep your proof of purchase for warranty claims.


