
proscenic P10 PRO
Contents
Proscenic P10 Pro Cordless Vacuum Cleaner User Manual
Model: P10 PRO
1. Introduction
Thank you for choosing the Proscenic P10 Pro Cordless Vacuum Cleaner. This manual provides essential information for the safe and efficient operation, maintenance, and troubleshooting of your new appliance. Please read it thoroughly before first use and retain it for future reference.
2. Package Contents
Carefully unpack all items and ensure you have received the following components:
- Main Vacuum Body with Dustbin
- Extension Wand
- Motorized Floor Brush
- Crevice Tool
- 2-in-1 Brush Tool
- Wall Mount Bracket
- Power Adapter
- User Manual

Image: The Proscenic P10 Pro Cordless Vacuum Cleaner shown with its main body, extension wand, motorized floor brush, and various cleaning attachments including a crevice tool and a 2-in-1 brush tool.
3. Product Components and Diagram
Familiarize yourself with the different parts of your vacuum cleaner:
- Main Unit: Contains the motor, dustbin, and control panel.
- Extension Wand: Connects the main unit to the floor brush or other attachments for extended reach.
- Motorized Floor Brush: Designed for effective cleaning on various floor types, featuring LED lights.
- Dustbin: Transparent container for collecting dust and debris.
- Battery Pack: Removable and rechargeable lithium-ion battery.
- LED Touch Screen: Displays power level, fault alerts, and allows mode selection.

Image: A detailed view of the vacuum's LED touch display, indicating (1) Power Display, (2) Fault Alert, (3) Auto Mode, (4) Eco Mode / Max Mode, and (5) Gear Switch Button.

Image: Demonstrates the versatility of the vacuum cleaner, showing it configured for cleaning under furniture, as a handheld unit for upholstery, and for high-reach areas.
4. Setup
4.1 Assembly
- Insert the extension wand into the main vacuum body until it clicks into place.
- Attach the desired cleaning head (e.g., motorized floor brush) to the other end of the extension wand until it clicks. For handheld use, attach accessories directly to the main unit.
4.2 Initial Charging
Before first use, fully charge the battery. The battery can be charged while attached to the main unit or separately.
- Connect the power adapter to the charging port on the battery or the main unit.
- Plug the adapter into a power outlet.
- The LED display will indicate charging status. A full charge typically takes approximately 3-4 hours.

Image: Illustrates the removable battery pack and its internal components, highlighting a runtime of up to 55 minutes on a full charge.
5. Operating Instructions
5.1 Powering On/Off
Press the power button on the handle to turn the vacuum cleaner on or off.
5.2 Adjusting Suction Modes
The P10 Pro features three adjustable suction modes:
- Eco Mode: For light cleaning and extended battery life.
- Auto Mode: Automatically adjusts suction power based on floor type (e.g., carpet vs. hard floor).
- Max Mode: Provides maximum suction for deep cleaning stubborn dirt.
Use the 'Gear Switch Button' on the LED touch screen to cycle through the modes.

Image: The vacuum cleaner in operation on a hard floor, demonstrating its strong suction power. The image also displays icons for Auto (17000Pa), Max (25000Pa), and Eco (9500Pa) suction modes.

Image: The vacuum cleaner transitioning from a hard floor to a carpet, illustrating its automatic carpet boost feature for enhanced cleaning on soft surfaces.
5.3 Using Attachments
Select the appropriate attachment for your cleaning task:
- Motorized Floor Brush: Ideal for carpets and hard floors.
- Crevice Tool: For narrow gaps, corners, and edges.
- 2-in-1 Brush Tool: Use the brush for dusting surfaces and the nozzle for upholstery or car interiors.
6. Maintenance
Regular maintenance ensures optimal performance and extends the lifespan of your vacuum cleaner.
6.1 Emptying the Dustbin
Empty the dustbin after each use or when the MAX line is reached. Press the dustbin release button to detach it from the main unit, then open the bottom flap to dispose of debris.
6.2 Cleaning Filters
The P10 Pro features a 4-stage filtration system. Regularly clean the filters to maintain suction power:
- HEPA Filter: Remove and tap out dust. Rinse with water if heavily soiled, ensure it is completely dry before reinserting.
- Sponge Filter: Rinse with water and allow to air dry completely.
- Mesh Filter: Clean any accumulated dust or debris.
- Cyclone System: Ensure no blockages are present within the cyclone assembly.
It is recommended to clean filters monthly, or more frequently with heavy use.
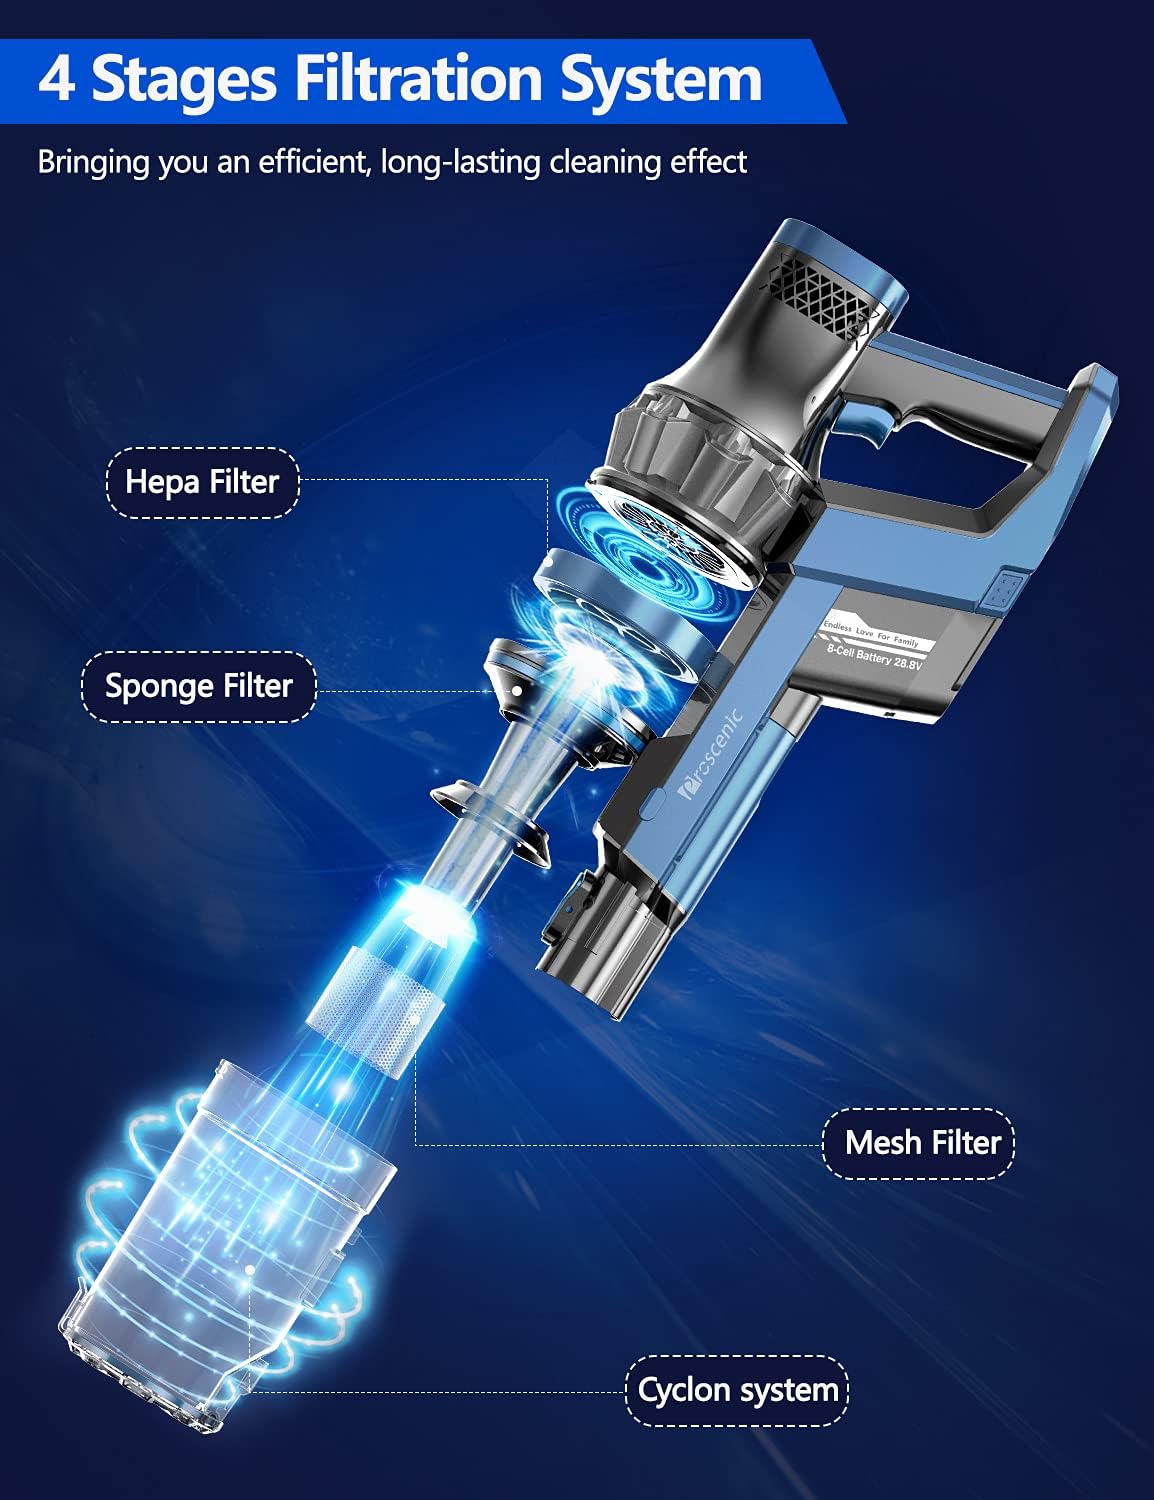
Image: An exploded view diagram illustrating the 4-stage filtration system of the Proscenic P10 Pro, including the Hepa Filter, Sponge Filter, Mesh Filter, and Cyclone System, designed for efficient and long-lasting cleaning.
6.3 Cleaning the Brush Roll
Periodically check the motorized floor brush for tangled hair or debris. Remove the brush roll (refer to the diagram in the manual for specific instructions) and cut away any tangled material with scissors. Reinsert the brush roll securely.
6.4 Battery Care
To prolong battery life, avoid fully discharging the battery frequently. Store the vacuum in a cool, dry place when not in use for extended periods, and charge it periodically.
7. Troubleshooting
If you encounter issues with your Proscenic P10 Pro, refer to the following common problems and solutions:
| Problem | Possible Cause | Solution |
|---|---|---|
| Vacuum does not turn on | Battery is not charged or not properly installed. | Charge the battery fully. Ensure the battery pack is securely clicked into place. |
| Low suction power | Dustbin is full, filters are clogged, or brush roll is obstructed. | Empty the dustbin. Clean all filters (HEPA, sponge, mesh). Remove any hair or debris from the brush roll. Check for blockages in the extension wand or main unit. |
| Motorized brush stops rotating | Brush roll is jammed by debris or hair. | Turn off the vacuum and remove any obstructions from the brush roll. |
| Error code displayed on screen | Indicates a specific issue (e.g., blockage, motor overheating). | Refer to the LED touch screen diagram (Section 3) for fault alert indicators. Consult the full manual for specific error code meanings and solutions. Generally, check for blockages and ensure filters are clean. |
8. Specifications
| Feature | Specification |
|---|---|
| Brand | proscenic |
| Model Number | P10 PRO |
| Power/Wattage | 260 watts |
| Voltage | 37 Volts |
| Noise Level | 80 dB |
| Number of Speeds | 3 (Eco, Auto, Max) |
| Item Weight | 3.72 kg (8.2 Pounds) |
| Product Dimensions | 74.2 x 30.5 x 15.2 cm |
| Special Features | HEPA, Lightweight, Portable, LED Touch Screen, Removable Battery |
| Filter Type | Cartridge (HEPA, Sponge, Mesh) |
| Surface Recommendation | Carpet, Hard Floor |
| Battery Runtime | Up to 55 minutes (Eco Mode) |
9. Warranty and Support
Proscenic products are manufactured to high-quality standards. For information regarding warranty coverage, please refer to the warranty card included with your purchase or visit the official Proscenic website. If you require technical support or have questions not covered in this manual, please contact Proscenic customer service through their official channels.
Documents and downloads
Ask a question about this manual
Ask about setup, troubleshooting, compatibility, parts, safety, or missing instructions. Manuals+ will review the question and use this page’s manual context to help answer it.