
Introduction
This manual provides comprehensive instructions for the safe and efficient setup, operation, and maintenance of your ABCCANOPY 10x10 ft Pop Up Canopy Tent, Premium-Series. Please read this manual thoroughly before assembly and use to ensure proper function and longevity of your product.

Image: The ABCCANOPY 10x10 ft Pop Up Canopy Tent in white, shown with a person easily transporting the wheeled storage bag, highlighting its portability and complete setup.
Safety Information
Important Safety Precautions:
- Always secure the canopy with the provided weight bags and stakes when using in windy conditions.
- Do not use this canopy in winds exceeding 50 km/h (31 mph).
- Ensure all locking mechanisms are fully engaged during setup and before use.
- Keep children and pets away from the canopy during assembly and disassembly.
- Avoid setting up near open flames or heat sources.
Package Contents
Verify that all components are present before beginning assembly:
- 1 x Premium Pop Up Canopy Frame
- 1 x Canopy Tent Top
- 3 x Side Walls
- 1 x Door Wall
- 1 x Roller Bag
- 4 x Weight Bags
- 4 x Ropes
- 4 x Stakes

Image: A visual representation of all items included in the package, such as the steel frame, canopy top, side walls, door wall, wheeled bag, sandbags, ropes, and stakes.
Setup Instructions
The ABCCANOPY Pop Up Canopy Tent is designed for easy setup by 1 or 2 people, requiring no additional tools. Follow these steps for assembly:
- Step 1: Unpack and Position Frame
Remove the folded frame from its roller bag and stand it upright in the center of your desired setup location. - Step 2: Partially Expand Frame
Gently pull the outer legs of the frame outwards until the frame is slightly expanded. - Step 3: Fully Expand Frame
Lift the frame into position by expanding the truss bars. Continue to pull the legs apart until the frame is fully expanded and the peak tensioner design lifts the top for a tight fit. Engage the thumb button release levers for secure locking. - Step 4: Attach Canopy Top and Sidewalls
Place the canopy tent top over the fully expanded frame. Secure it using the Velcro straps on each valance. Attach the three side walls and one door wall using the integrated Velcro straps and zippers as needed.

Image: A step-by-step visual guide illustrating the assembly process of the canopy tent, from removing the frame to attaching the sidewalls.
Height Adjustment
The canopy features three height positions. Adjust the clearance height from 6.4 ft, 6.7 ft, to 7 ft, and the peak height from 10.5 ft, 10.8 ft, to 11.1 ft. Use the thumb button release levers on the legs to select your desired height.
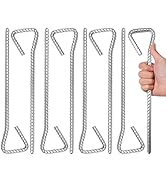
Image: Detail of the adjustable leg mechanism, demonstrating how to change the canopy's height.
Operating Instructions
Securing the Canopy
For optimal stability, especially in windy conditions, utilize the provided weight bags, ropes, and stakes. Steel D-rings on each corner allow for easy attachment of ropes to further secure the canopy. The Velcro straps on the valances ensure the canopy top remains firmly attached to the frame.
Water Collection Prevention
The canopy features a specially designed peak tensioner that lifts the top, ensuring it remains tight and firm. This design helps prevent water from collecting on the canopy surface during rainy weather.
Maintenance
Cleaning
- Clean the canopy fabric with mild soap and water. Do not use harsh detergents or abrasive cleaners.
- Rinse thoroughly and allow the fabric to air dry completely before folding and storing.
- Wipe down the steel frame with a damp cloth to remove dirt and debris.
Storage
When not in use, disassemble the canopy and store all components in the provided roller bag. The flexible big wheels on the roller bag facilitate convenient and smooth transportation and storage. Ensure the canopy is completely dry before storage to prevent mold and mildew.

Image: Detailed view of the wheeled storage bag, showcasing its features like heavy-duty handles, an accessory pocket, and robust wheels for easy transport.
Troubleshooting
- Difficulty Expanding Frame: Ensure the frame is on a flat surface and gently pull the outer legs. If stiff, check for any obstructions or misaligned parts.
- Canopy Not Stable: Verify that all legs are fully extended and locked. Use all provided weight bags, ropes, and stakes to secure the canopy to the ground. Do not use in high winds.
- Water Pooling on Top: Ensure the canopy top is properly tensioned and secured to the frame. The peak tensioner should be engaged to lift the top for optimal water runoff.
- Sidewalls Not Fitting: Check that the frame is fully expanded and the canopy top is correctly aligned. Ensure Velcro straps and zippers are properly engaged.
Specifications
| Feature | Detail |
|---|---|
| Brand | ABCCANOPY |
| Model Number | premium2.0 |
| Material | Polyester (Canopy), Alloy Steel (Frame) |
| Color | White |
| Item Weight | 69 Pounds |
| Product Dimensions | 120"L x 120"W x 132"H (10ft x 10ft x 11ft) |
| Leg Type | Hexagonal Legs, 1.77'' (45 mm) |
| UV Protection | Yes (Blocks 99.99% UV rays) |
| Water Resistance Level | Waterproof (Seam sealed stitching) |
| Fire Retardant | CPAI-84 certified |
| Number of Guylines | 4 |
| UPC | 840109905123 |

Image: A diagram illustrating the overall dimensions of the 10x10 ft canopy tent, including its height, width, and depth.
Warranty and Support
Warranty Information
Your ABCCANOPY Pop Up Canopy Tent comes with the following warranty:
- One year after-sale protection for the frame.
- Six months after-sale protection for fabrics and accessories.
Please retain your proof of purchase for warranty claims.
Customer Support
For any questions, concerns, or warranty claims, please contact ABCCANOPY customer service through the retailer where the product was purchased or visit the official ABCCANOPY website for support options.


