Introduction
Thank you for purchasing the Nostalgia MRF6AQ Mini Fridge. This portable thermoelectric unit is designed to keep your items cool or warm, making it suitable for various environments such as home, office, car, boat, or dorm room. Please read this manual thoroughly before operating your new appliance to ensure safe and efficient use.

Image: The Nostalgia MyMini Retro 6-Can Personal Refrigerator, showcasing its compact design and carry handle.
Important Safety Information
- Read all instructions before operating the appliance.
- Do not immerse the power cords, plugs, or the appliance itself in water or other liquids.
- Supervise children when the appliance is in use.
- Unplug from the outlet when not in use and before cleaning. Allow to cool before handling parts.
- Do not operate any appliance with a damaged cord or plug, or after the appliance malfunctions or has been damaged in any manner.
- Use only manufacturer-recommended attachments.
- Do not use outdoors.
- Do not place on or near a hot gas or electric burner, or in a heated oven.
- Always attach the plug to the appliance first, then plug the cord into the wall outlet. To disconnect, turn any control to "off," then remove the plug from the wall outlet.
- This appliance is for household use only.
- Ensure proper ventilation around the unit. Do not block air vents.
Package Contents
Verify that all items are present in the packaging:
- Nostalgia MRF6AQ Mini Fridge Unit
- AC Power Cord (for standard home outlets)
- DC Power Cord (for 12-volt car outlets)
- Removable Shelf
Setup
- Unpacking: Carefully remove the mini fridge and all accessories from the packaging. Retain packaging for future storage or transport.
- Placement: Place the mini fridge on a flat, stable surface. Ensure there is adequate ventilation around the unit, especially at the rear where the fan is located. Avoid placing it in direct sunlight or near heat sources.
- Insert Removable Shelf: Slide the removable shelf into the desired grooves inside the fridge compartment. This shelf provides flexibility for organizing contents.
- Connect Power:
- For Home Use (AC): Connect the AC power cord to the AC port on the back of the fridge, then plug the other end into a standard 120V AC wall outlet.
- For Car Use (DC): Connect the DC power cord to the DC port on the back of the fridge, then plug the other end into a 12-volt car outlet (cigarette lighter socket).
Important: Do not connect both AC and DC power cords simultaneously. Only use one power source at a time.

Image: Rear view of the mini fridge showing AC and DC power inputs, alongside images of the AC and DC power cords for home and car use.
Operating Instructions
- Power On: Once connected to a power source, locate the switch on the back of the unit.
- Select Mode:
- To COOL items, slide the switch to the "COOL" setting (typically indicated by a snowflake icon). The unit will begin to cool contents down to approximately 45°F (7°C) below ambient temperature.
- To HEAT items, slide the switch to the "HEAT" setting (typically indicated by a sun icon). The unit will warm contents up to approximately 130°F (54°C).
- Loading Contents: Open the door and place your items inside. The fridge has a capacity to hold up to six 12-ounce cans or various small food containers, baby bottles, or skincare products.
- Optimal Performance: For best cooling results, pre-chill beverages and food before placing them in the mini fridge. For best heating results, pre-warm food if possible. Close the door securely after each use to maintain internal temperature.
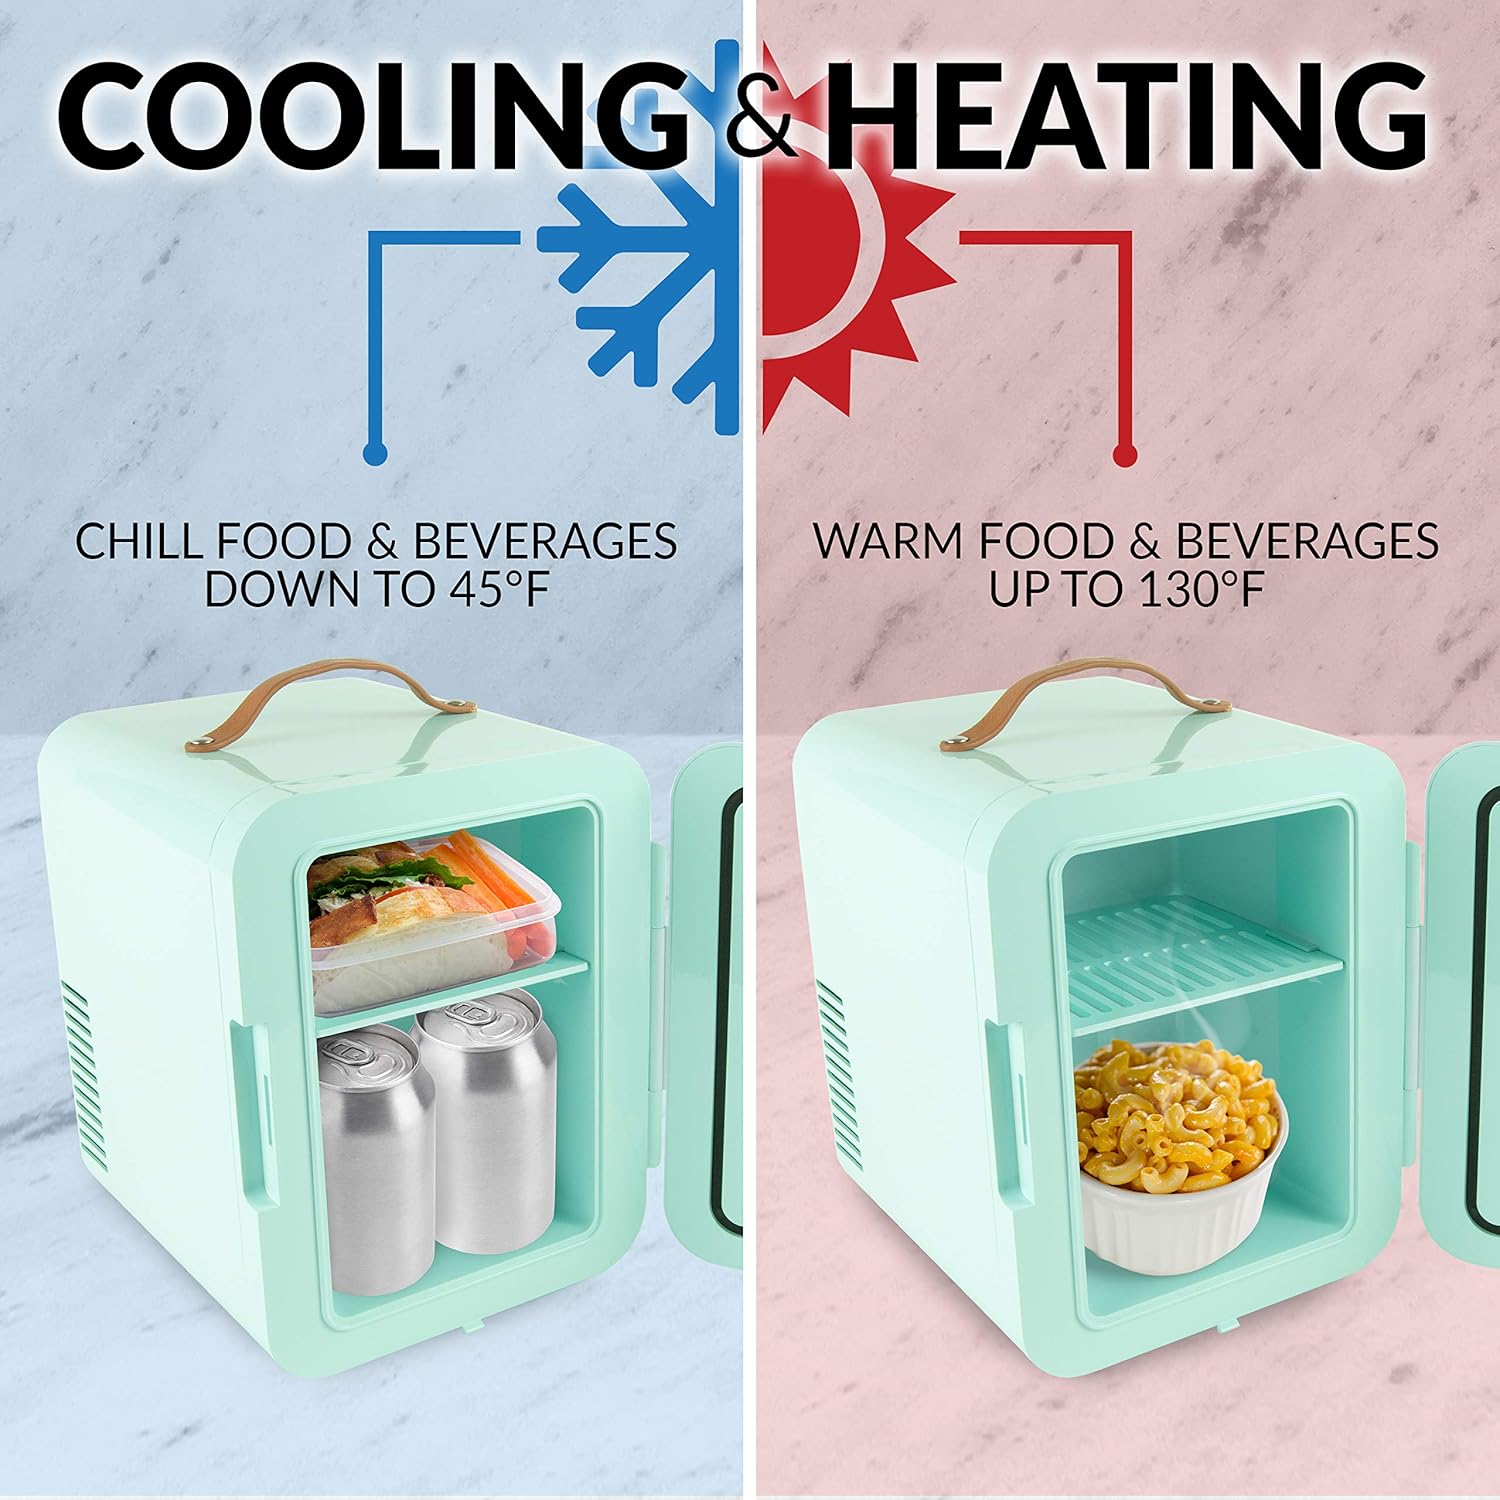
Image: Visual representation of the cooling and heating capabilities of the mini fridge, showing temperature ranges.

Image: The interior of the mini fridge demonstrating its capacity to hold six 12 oz cans, with examples of other items it can store.
Maintenance
- Cleaning: Disconnect the power cord before cleaning. Wipe the interior and exterior surfaces with a soft, damp cloth and mild soap. Do not use abrasive cleaners or immerse the unit in water. Ensure the unit is completely dry before reconnecting power.
- Fan Maintenance: Periodically check the fan vent on the back of the unit for dust or debris. Gently clean with a soft brush or vacuum cleaner to ensure proper airflow.
- Storage: If storing the unit for an extended period, ensure it is clean and dry. Store in a cool, dry place away from direct sunlight.
Troubleshooting
| Problem | Possible Cause | Solution |
|---|---|---|
| Unit does not power on. | No power supply; loose connection; faulty outlet. | Check if the power cord is securely plugged into both the unit and the outlet. Try a different outlet. Ensure only one power cord (AC or DC) is connected. |
| Unit is not cooling/heating effectively. | Blocked fan vent; ambient temperature too high/low; door not sealed properly; unit overloaded. | Ensure the fan vent on the back is clear of obstructions. Verify the door is closed tightly. Do not overload the unit. Allow sufficient time for temperature change (thermoelectric units are not as powerful as compressor-based fridges). |
| Excessive noise from the unit. | Fan obstruction; unit not on a level surface. | Check the fan vent for obstructions. Ensure the unit is placed on a stable, level surface. |
Specifications
| Feature | Detail |
|---|---|
| Model Number | MRF6AQ |
| Capacity | 6 x 12-oz cans (approx. 1 Cubic Foot) |
| Cooling Temperature | Cools to 45°F (7°C) below ambient temperature |
| Heating Temperature | Warms to 130°F (54°C) |
| Power Input | AC 120V, DC 12V |
| Power Consumption | 45 Watts |
| Product Dimensions | 9.84 x 7.09 x 10.43 inches |
| Item Weight | 4.41 pounds |
| Installation Type | Freestanding |
| Special Features | Portable, Cooling & Heating Function |
Warranty and Support
For warranty information or technical support, please refer to the warranty card included with your product or visit the official Nostalgia website. Do not attempt to repair the unit yourself, as this may void the warranty and pose safety risks. Contact customer service for assistance with any issues not covered in the troubleshooting section.


