
Hikvision TurboHD 1080p 4-Channel DVR & 4 Bullet Cameras
Contents
Hikvision TurboHD 1080p Surveillance Kit User Manual
Model: TurboHD 1080p 4-Channel DVR & 4 Bullet Cameras
1. Introduction
This manual provides comprehensive instructions for the installation, operation, and maintenance of your Hikvision TurboHD 1080p Surveillance Kit. This kit includes a 4-channel Digital Video Recorder (DVR) and four 1080p metal bullet cameras, along with necessary power supply and installation accessories. Please read this manual thoroughly before using the product to ensure proper and safe operation.
2. Safety Information
Observe the following safety precautions to prevent injury or damage to the equipment:
- Ensure the power supply voltage is within the specified range.
- Do not expose the equipment to water or moisture.
- Avoid placing the DVR in direct sunlight or near heat sources.
- Handle all components with care to prevent physical damage.
- Only use accessories specified by the manufacturer.
- Disconnect power before cleaning or servicing.
3. Package Contents
Verify that all items listed below are included in your package:
- 1 x Hikvision 4-Channel TurboHD DVR
- 4 x Hikvision 1080p Metal Bullet Cameras
- 1 x Power Supply for DVR
- 4 x Power Supplies for Cameras (or a centralized power supply with splitter)
- 4 x Video/Power Cables (pre-made or separate)
- 1 x USB Mouse
- Mounting Screws and Plugs
- Quick Start Guide

Image 3.1: Overview of the Hikvision TurboHD Surveillance Kit packaging and main components, including the DVR, four bullet cameras, and cabling.
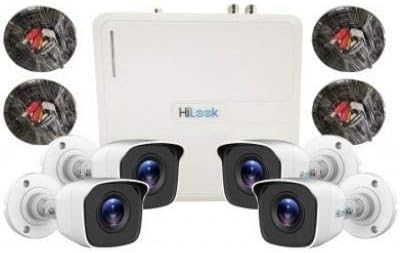
Image 3.2: Close-up view of the Hikvision DVR unit and the four bullet cameras, showing their design and included cables.
4. Setup and Installation
4.1 DVR Setup
- Connect Monitor: Connect a monitor to the DVR's HDMI or VGA port.
- Connect Mouse: Plug the USB mouse into a USB port on the DVR.
- Network Connection (Optional): For remote viewing, connect an Ethernet cable from the DVR to your router.
- Power On: Connect the DVR power adapter and plug it into an electrical outlet. The DVR will power on automatically.
- Initial Configuration: Follow the on-screen wizard to set up language, date/time, network settings, and create a strong password for the admin account.
4.2 Camera Installation
- Choose Location: Select suitable locations for your cameras, considering coverage area, lighting, and cable routing. Ensure the location is secure and provides a clear view.
- Mount Cameras: Use the provided screws and plugs to securely mount each bullet camera. Adjust the camera angle for optimal viewing.
- Cable Routing: Route the video/power cables from each camera to the DVR location. Ensure cables are protected from environmental elements and physical damage.
- Connect Cables: Connect the BNC video connector from each camera cable to the corresponding video input port on the DVR. Connect the power connector from each camera cable to its respective power supply or power splitter.
5. Operating Instructions
5.1 Live View
After successful setup, the DVR will display the live view from all connected cameras on the monitor. You can switch between single-camera view, multi-camera view, and sequence display using the on-screen controls or mouse.
5.2 Recording
- Continuous Recording: The DVR is typically configured for continuous recording by default.
- Motion Detection Recording: To enable motion detection, navigate to the "Record" or "Event" settings in the DVR menu. Configure motion detection zones and sensitivity for each camera.
- Scheduled Recording: Set specific recording schedules for different times of the day or week via the DVR's menu.
5.3 Playback
To review recorded footage:
- From the live view, right-click and select "Playback" or navigate through the main menu.
- Select the camera(s) and the date/time range you wish to review.
- Use the playback controls (play, pause, fast forward, rewind) to navigate through the footage.
5.4 Remote Access (Optional)
For remote viewing on a smartphone or computer, download the Hik-Connect app (or equivalent) and follow the in-app instructions to add your DVR. This typically involves scanning a QR code or entering the DVR's serial number. Ensure your DVR is connected to the internet.
6. Maintenance
- Cleaning: Regularly clean the camera lenses with a soft, dry cloth to ensure clear image quality. Clean the DVR's exterior with a damp cloth; avoid abrasive cleaners.
- Firmware Updates: Periodically check the Hikvision official website for firmware updates for your DVR model. Firmware updates can improve performance, add features, and enhance security. Follow the provided instructions carefully when updating firmware.
- Hard Drive Health: Monitor the health of the DVR's hard drive through the system menu. Consider replacing the hard drive if errors or warnings are reported to prevent data loss.
- Cable Inspection: Periodically inspect all cables for signs of wear, damage, or loose connections. Repair or replace damaged cables promptly.
7. Troubleshooting
| Problem | Possible Cause | Solution |
|---|---|---|
| No image on monitor | No power to DVR/monitor; loose video cable; incorrect input selected on monitor. | Check power connections; ensure video cable is securely connected; select correct input source on monitor. |
| No camera image | No power to camera; loose BNC connection; faulty cable/camera. | Check camera power supply; ensure BNC connector is secure; test with a known working cable/camera. |
| DVR not recording | Hard drive full or faulty; recording schedule not set; motion detection not configured. | Check hard drive status and format if necessary; verify recording schedule; configure motion detection settings. |
| Cannot access remotely | No internet connection; incorrect network settings; firewall blocking access. | Verify internet connection; check DVR network settings (IP address, gateway, DNS); configure router port forwarding or enable P2P/Cloud access. |
8. Specifications
| Feature | Detail |
|---|---|
| Brand | Hikvision |
| Model | TurboHD 1080p Kit (4-Channel DVR, 4 Bullet Cameras) |
| Video Capture Resolution | 1080p |
| Number of Channels | 4 |
| Connectivity Technology | Wired |
| Special Features | High Video Resolution (1080p), Continuous Recording |
| Camera Material | Metal |
| Power Source | Corded Electric |
| Package Dimensions | 42 x 30 x 18 cm; 4.68 kg |
9. Warranty and Support
Hikvision products typically come with a limited manufacturer's warranty. Please refer to the warranty card included in your package or visit the official Hikvision website for detailed warranty terms and conditions specific to your region and product model.
For technical support, product inquiries, or service requests, please contact Hikvision customer support through their official website or the contact information provided in your product documentation. Ensure you have your product model and serial number ready when contacting support.
Online Resources:
Documents and downloads
Ask a question about this manual
Ask about setup, troubleshooting, compatibility, parts, safety, or missing instructions. Manuals+ will review the question and use this page’s manual context to help answer it.