1. Introduction
This manual provides essential information for the safe and efficient operation of your Bomann GSP 7407 freestanding dishwasher. Please read these instructions thoroughly before installation, use, or maintenance to ensure proper function and to prevent potential hazards. Keep this manual for future reference.
2. Safety Instructions
Always adhere to the following safety guidelines to reduce the risk of fire, electric shock, injury, or damage to the appliance.
- Ensure the dishwasher is properly grounded before use.
- Do not operate the dishwasher if the power cord is damaged. Contact qualified service personnel.
- Keep children away from the dishwasher, especially when it is operating or when the door is open. Detergents can be corrosive.
- Only use detergents and rinse aids specifically designed for automatic dishwashers.
- Do not wash plastic items unless they are marked "dishwasher safe."
- Avoid opening the door during operation, as hot water may spray out.
- Always turn off the power and disconnect the appliance from the mains before cleaning or performing maintenance.
- Do not tamper with the controls or safety mechanisms.
3. Product Overview
The Bomann GSP 7407 is a freestanding dishwasher designed for efficient dish cleaning. It features a user-friendly control panel and adjustable racks.
3.1 External View

This image displays the front of the Bomann GSP 7407 dishwasher, highlighting its sleek black finish and the integrated control panel at the top of the door.
3.2 Control Panel

A detailed view of the dishwasher's control panel, featuring an LED display showing the remaining time, power button, program selection buttons, and indicators for salt and rinse aid.
3.3 Interior Components
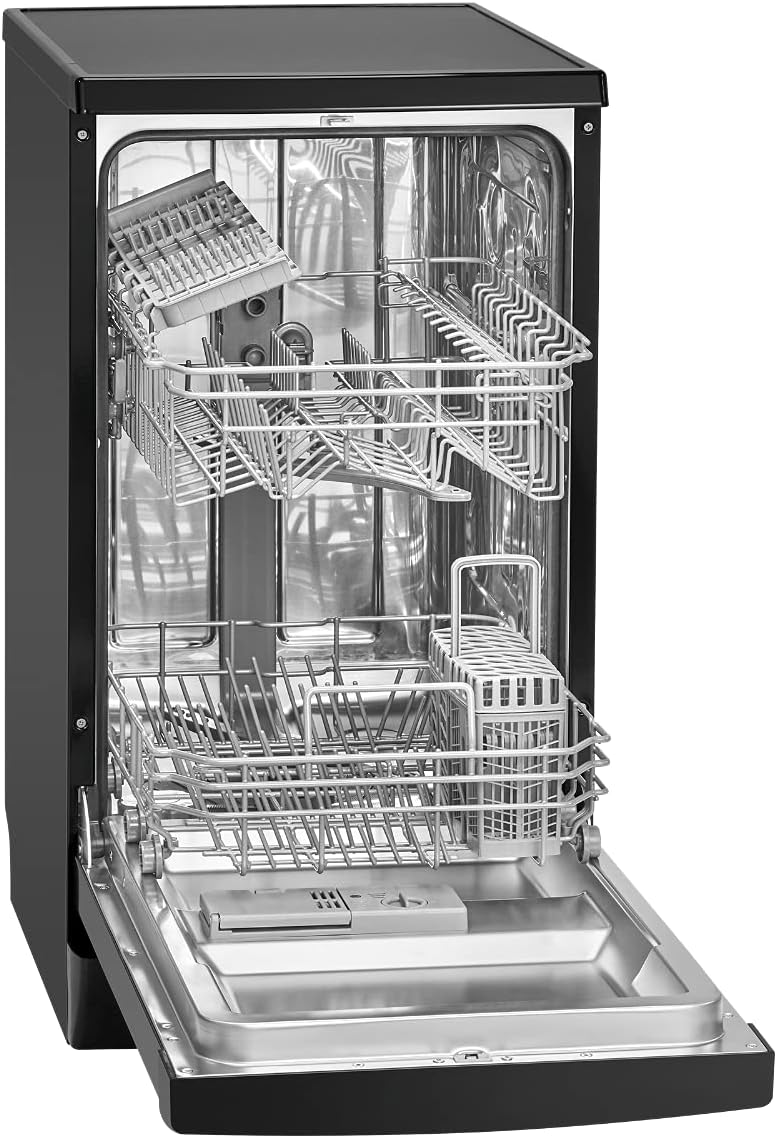
This image shows the interior of the dishwasher with the door open, revealing the empty upper and lower dish racks, and the cutlery basket, ready for loading.
- Upper Rack: For delicate items, glasses, and smaller plates.
- Lower Rack: For larger plates, pots, and pans.
- Cutlery Basket: For forks, knives, and spoons.
- Detergent Dispenser: Located on the inner door.
- Rinse Aid Dispenser: Located next to the detergent dispenser.
- Salt Container: Located at the bottom of the wash tub.
4. Setup and Installation
Proper installation is crucial for the dishwasher's performance and safety. It is recommended that installation be performed by a qualified technician.
4.1 Positioning the Dishwasher
- Place the dishwasher on a firm, level surface.
- Ensure there is adequate space for the door to open fully.
- Locate the dishwasher near a water supply, drain, and electrical outlet.
4.2 Water Connection
- Water Inlet: Connect the water inlet hose to a cold water supply tap with a 3/4 inch thread. Ensure the connection is secure to prevent leaks.
- Drain Hose: Connect the drain hose to a suitable drain pipe or sink trap. Ensure the hose is not kinked or obstructed. The drain hose should be positioned at a height between 40 cm and 100 cm from the floor.
4.3 Electrical Connection
- Connect the dishwasher to a grounded electrical outlet. The voltage requirement is 240V.
- Do not use extension cords or adapters.
- Ensure the electrical circuit is protected by a fuse or circuit breaker of appropriate rating.
4.4 Initial Setup
- Filling the Salt Dispenser: Unscrew the cap of the salt container located at the bottom of the wash tub. Using a funnel, pour approximately 1 kg of dishwasher salt into the container, then fill with water until full. Replace the cap securely.
- Filling the Rinse Aid Dispenser: Open the rinse aid dispenser cover. Pour rinse aid into the dispenser until it reaches the maximum level indicator. Close the cover firmly.
- Adjusting Water Hardness: Refer to your local water supplier for water hardness information. Adjust the dishwasher's water softener setting according to the water hardness level.
5. Operating Instructions
Follow these steps for effective and efficient dishwashing.
5.1 Loading the Dishwasher

This image illustrates the proper loading of dishes into the Bomann GSP 7407 dishwasher, showing plates, glasses, and cutlery arranged in the racks for optimal cleaning.
- Scrape off large food particles from dishes before loading.
- Place glasses, cups, and smaller items in the upper rack.
- Arrange larger plates, bowls, and pots in the lower rack.
- Place cutlery in the cutlery basket with handles down for forks and spoons, and handles up for knives to ensure safety.
- Ensure that no items block the spray arms from rotating freely.
5.2 Adding Detergent
- Open the detergent dispenser cover.
- Add the appropriate amount of dishwasher detergent according to the program selected and the soil level of the dishes.
- Close the dispenser cover firmly until it clicks.
5.3 Selecting a Program
Press the program selection button on the control panel to cycle through the available wash programs. The LED display will indicate the selected program or its duration.
- Intensive: For heavily soiled dishes and pots.
- 90min: A standard program for normally soiled dishes.
- Economy (Eco): Energy-efficient program for normally soiled dishes.
- Glass/Delicate: For lightly soiled, delicate items and glassware.
- Pre-rinse: For rinsing dishes that will be washed later.
- Rinse: A quick rinse cycle.
5.4 Starting a Cycle
- Close the dishwasher door securely.
- Press the Start/Pause button to begin the selected program.
- The LED display will show the remaining cycle time.
5.5 Special Functions
- Half Load: Use this function when the dishwasher is not fully loaded to save water and energy.
- Delay Start: Allows you to postpone the start of a wash cycle by a set number of hours.
5.6 End of Cycle
Once the program is complete, the dishwasher will signal with an audible alert or display "End". Open the door slightly to allow steam to escape and dishes to cool before unloading.
6. Maintenance and Cleaning
Regular maintenance ensures optimal performance and extends the lifespan of your dishwasher.
6.1 Cleaning the Filters
- The filter system, located at the bottom of the wash tub, should be cleaned regularly.
- Twist and remove the coarse filter, then separate the fine filter and microfilter.
- Rinse all filter components under running water to remove food particles. Use a soft brush if necessary.
- Reassemble the filters and place them back into the dishwasher, ensuring they are securely locked in place.
6.2 Cleaning the Spray Arms
- Periodically check the spray arm nozzles for blockages.
- If blocked, remove the spray arms (they usually unclip or unscrew) and clear the nozzles with a thin wire or toothpick.
- Rinse and reattach the spray arms securely.
6.3 Exterior and Interior Cleaning
- Wipe the exterior surfaces with a soft, damp cloth. Do not use abrasive cleaners.
- Clean the door seal regularly with a damp cloth to remove food residues.
- For interior cleaning, run an empty cycle with a dishwasher cleaner periodically.
6.4 Refilling Salt and Rinse Aid
- The salt indicator light on the control panel will illuminate when the salt container needs refilling. Follow the instructions in Section 4.4.
- The rinse aid indicator light will illuminate when the rinse aid dispenser needs refilling. Follow the instructions in Section 4.4.
7. Troubleshooting
Before contacting customer service, refer to the following table for common issues and their solutions.
| Problem | Possible Cause | Solution |
|---|---|---|
| Dishwasher does not start. | No power supply; Door not closed properly; Program not selected. | Check power connection and fuse; Ensure door is latched; Select a wash program and press Start. |
| Dishes are not clean. | Improper loading; Clogged spray arms; Insufficient detergent; Incorrect program. | Reload dishes correctly; Clean spray arm nozzles; Use adequate detergent; Select a more intensive program. |
| Water not draining. | Clogged filter; Kinked drain hose; Blocked drain pump. | Clean the filter system; Check and straighten the drain hose; Contact service if pump is blocked. |
| White streaks on dishes. | Too much rinse aid; Water hardness setting incorrect. | Reduce rinse aid dosage; Adjust water softener setting. |
| Dishwasher is noisy. | Items hitting spray arms; Improper loading; Foreign object in pump. | Rearrange dishes; Check for and remove any foreign objects. |
If the problem persists after attempting these solutions, please contact qualified service personnel.
8. Technical Specifications
Key technical data for the Bomann GSP 7407 dishwasher.
| Feature | Specification |
|---|---|
| Model Name | GSP 7407 |
| Form Factor | Freestanding |
| Dimensions (L x W x H) | 61 x 44.8 x 84.5 cm |
| Weight | 35 Kilograms |
| Voltage | 240 Volts |
| Power | 2100 Watts |
| Annual Energy Consumption | 76 Kilowatt-hours per 100 cycles |
| Capacity | 10 Place Settings (45 Liters) |
| Noise Level | 49 Decibels |
| Display Type | LED |
| Control Type | Front Control |
| Material | Stainless Steel |
| Special Features | Water softener, Delay start timer, Half load, Overflow protection, Salt indicator, Rinse aid indicator |
| Programs | 90min, Economy, Glass/delicate, Intensive, Pre-rinse, Rinse |
9. Warranty and Support
For warranty information and customer support, please refer to the warranty card included with your product or visit the official Bomann website. Keep your proof of purchase for any warranty claims.
In case of technical issues or questions not covered in this manual, contact Bomann customer service or an authorized service center.


