1. Introduction
Thank you for choosing the VASAGLE Side Table with Storage and Charging Station. This versatile furniture piece is designed to enhance your living space with convenient charging capabilities and ample storage. Please read this manual carefully before assembly and use to ensure safe and proper operation.

Image: The VASAGLE Side Table, featuring rustic brown particleboard and black steel legs, positioned between two sofas. A laptop is in use on one side, and a phone is charging on the other, demonstrating its integrated charging capabilities and storage options.
2. Safety Information
- Ensure all parts are securely fastened during assembly to prevent tipping or instability.
- Do not exceed the maximum weight recommendations for the tabletop (22 lbs), storage compartment, or bottom shelf.
- The integrated power strip is for indoor use only. Do not expose to moisture or liquids.
- Avoid overloading the electrical outlets. Refer to the specifications for maximum electrical load.
- Keep children and pets away from the power strip and electrical cords.
- Always unplug the unit from the wall outlet before cleaning or moving.
3. Package Contents
Before beginning assembly, ensure all parts listed below are present and undamaged. If any parts are missing or damaged, please contact customer service.
- 1 x Side Table (disassembled components)
- 1 x Accessory Bag (containing screws, nuts, and other small parts)
- 1 x Assembly Guide
- 1 x Reversible Screwdriver (may be included)
- 1 x Hex Key (may be included)

Image: An exploded diagram illustrating the individual components of the side table, including the wooden panels, metal frame, and the power strip, before assembly.
4. Assembly Instructions
Follow these steps carefully for proper assembly. It is recommended to assemble the unit on a soft, clean surface to prevent scratches.
- Unpack and Identify Parts: Lay out all components and hardware. Refer to the parts list in the Assembly Guide to ensure everything is present.
- Assemble the Metal Frame: Connect the vertical metal legs to the horizontal support bars using the provided screws and hex key. Do not fully tighten screws until all parts are aligned.
- Attach Bottom Shelf: Secure the bottom particleboard shelf to the assembled metal frame using the designated screws.
- Install the Inner Storage Box: Place the wooden panels for the inner storage compartment into the frame. Ensure the cut-out grooves for cables are facing the desired direction (typically towards the sides).
- Secure the Power Strip: Mount the power strip with 2 AC outlets and 2 USB ports into its designated slot within the storage compartment using the provided screws. Ensure the power cord is routed correctly.
- Attach the Flip-Top Tabletop: Carefully align the hinged tabletop pieces with the top of the storage compartment and secure them with the provided screws. Ensure the hinges operate smoothly.
- Install Fabric Bags (Optional): Attach the fabric storage bags to the side of the table using the integrated Velcro straps or hooks.
- Final Tightening: Once all parts are in place and aligned, fully tighten all screws.
- Adjust Feet: Adjust the leveling feet at the bottom of the legs to ensure the table is stable and level on your floor.

Image: A detailed view of the side table's top compartment, highlighting the integrated power strip with two AC outlets and two USB ports. Cables are shown neatly exiting through the side grooves, allowing the lid to close while devices charge.
5. Features
- Integrated Charging Station: Features 2 AC outlets and 2 USB ports with a 4.9 ft extension cord, allowing simultaneous charging of multiple devices. The outlets are spaced to accommodate larger adapters.
- Hidden Storage with Flip-Top: The tabletop conveniently flips open to reveal a spacious hidden compartment, perfect for concealing miscellaneous items and keeping your space tidy.
- Open Storage Shelf: A lower open shelf provides easy access storage for books, magazines, or decorative items.
- Attachable Fabric Bags: Includes multi-sized fabric bags (9.1"W x 6.7"H large, 9.1"W x 5.2"H middle, 3 small bottom bags) for organizing remotes, phones, tablets, and other small accessories.
- Dual Cable Grooves: Thoughtfully designed grooves on both sides of the tabletop allow charging cables to pass through, ensuring a neat appearance and preventing cable damage when the lid is closed.
- Sturdy Construction: Built with a robust steel frame and durable particleboard panels for stability and long-lasting use.
- Adjustable Feet: Equipped with adjustable feet to ensure stability on uneven floors and protect your flooring from scratches.
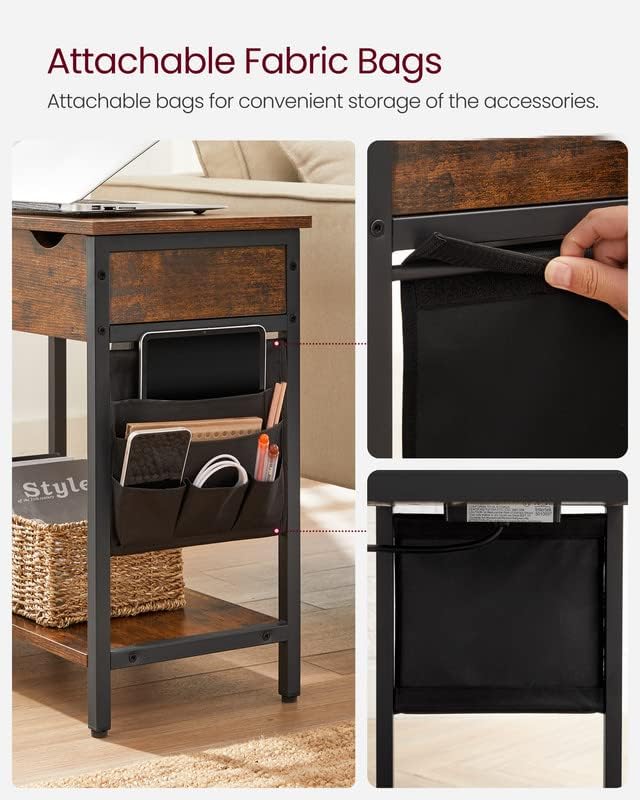
Image: A close-up of the attachable fabric storage bags on the side of the table, showcasing multiple pockets designed to hold items like a tablet, notebooks, pens, and charging cables, promoting organization.
6. Operating Instructions
- Powering the Charging Station: Plug the table's 4.9 ft extension cord into a standard wall outlet. The integrated power strip is now ready for use.
- Using the Charging Ports: Lift the flip-top tabletop to access the 2 AC outlets and 2 USB ports. Plug in your devices (phones, tablets, lamps, game consoles) as needed. Route cables through the side grooves to close the lid while charging.
- Accessing Hidden Storage: Lift the flip-top tabletop to store or retrieve items from the concealed compartment.
- Utilizing Fabric Bags: Place remote controls, magazines, adapters, or other small items into the various pockets of the attachable fabric bags for easy access and organization.
Video: An official product video from VASAGLE demonstrating the features of the side table, including the integrated USB ports and outlets, and how to use the flip-top storage. This video highlights the convenience of charging devices and organizing items within the table.
7. Maintenance
- Cleaning: Wipe the table surfaces with a dry, soft cloth. Avoid using harsh chemicals or abrasive cleaners that may damage the finish.
- Electrical Components: Ensure the power strip and cables are free from dust and debris. Do not attempt to disassemble or repair the electrical components yourself.
- Tightening Screws: Periodically check and tighten all screws to maintain the table's stability.
8. Troubleshooting
- Table is Wobbly: Check that all screws are fully tightened. Adjust the leveling feet at the bottom of the legs to compensate for uneven flooring.
- Charging Station Not Working: Ensure the main power cord is securely plugged into a functional wall outlet. Check if the devices being charged are properly connected to the USB ports or AC outlets. Avoid overloading the power strip.
- Lid Not Closing Properly: Ensure no items are obstructing the closing mechanism of the flip-top lid. Check that cables are routed through the side grooves.
9. Specifications
| Attribute | Value |
|---|---|
| Brand | VASAGLE |
| Model | ULET310B01V1 |
| Product Dimensions (D x W x H) | 23.6" x 12.4" x 23.6" |
| Item Weight | 10 Kilograms |
| Maximum Weight Recommendation | 22 Pounds |
| Frame Material | Steel Frame, Particleboard, Fabric Bag |
| Color | Rustic Brown + Black |
| Power Outlets | 2 AC Outlets (120V/12A) |
| USB Ports | 2 USB Ports (5V/2A) |
| Power Cord Length | 4.9 ft |
| Required Assembly | Yes |
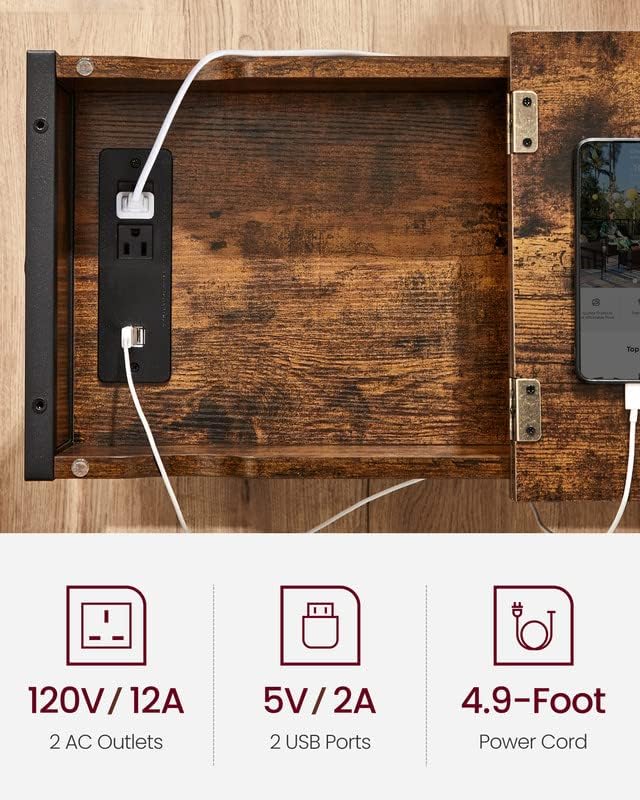
Image: A graphic detailing the electrical specifications of the integrated charging station, including voltage and amperage for AC outlets and USB ports, and the length of the power cord.
10. Warranty & Support
For any questions, concerns, or issues regarding your VASAGLE Side Table, please contact the seller or manufacturer directly. Keep your purchase receipt for warranty claims. Specific warranty details may vary; refer to your purchase documentation for more information.


