1. Introduction
Thank you for purchasing the Boytone BT-120MX 12 Channel Bluetooth Studio Audio Mixer. This professional audio mixer is designed for a variety of applications, including studio recording, live performances, and DJ setups. It features 12 channels, Bluetooth connectivity, a USB MP3 player, PC recording capabilities, 48V phantom power, and a 24-bit digital effect processor. This manual provides detailed instructions for setup, operation, and maintenance to ensure optimal performance and longevity of your device.
2. Safety Information
- Power Supply: Use only the specified power adapter. Ensure the voltage matches your local power supply.
- Water and Moisture: Do not expose the mixer to water, rain, or excessive moisture. Avoid placing liquid-filled objects on the unit.
- Ventilation: Ensure adequate ventilation around the unit. Do not block ventilation openings.
- Heat Sources: Keep the mixer away from heat sources such as radiators, heat registers, stoves, or other heat-producing appliances.
- Cleaning: Disconnect power before cleaning. Use a dry, soft cloth. Do not use liquid cleaners or aerosols.
- Servicing: Do not attempt to service this product yourself. Refer all servicing to qualified service personnel.
- Phantom Power: When using 48V phantom power, ensure condenser microphones are connected before activating to prevent damage.
3. Package Contents
Verify that all items are present in the package:
- Boytone BT-120MX Audio Mixer
- Power Adapter
- USB Cable
- User Manual (this document)
4. Product Overview
The Boytone BT-120MX is a versatile 12-channel mixer designed for comprehensive audio control. It features a robust metal chassis and intuitive controls for various audio sources.

Figure 4.1: Front view of the Boytone BT-120MX Audio Mixer. This image displays the full layout of the mixer's controls and input/output sections.
4.1 Input/Output Connections
The mixer offers a wide range of connectivity options for various audio equipment.

Figure 4.2: Detailed view of the input and output ports on the Boytone BT-120MX. This includes XLR/1/4" combo jacks, RCA inputs, 1/4" mono/stereo inputs, send/return jacks, and main outputs.
- XLR/1/4" Combo Inputs (Channels 1-4): For microphones (XLR) or line-level instruments (1/4").
- 1/4" Line Inputs (Channels 5-12): For line-level instruments or audio devices.
- RCA Inputs (Stereo Pairs): For connecting consumer audio devices.
- Main Outputs (1/4" L/R): Connect to power amplifiers or powered speakers.
- Headphone Jack (1/4"): For monitoring audio.
- USB Port: For PC recording/playback and USB MP3 player functionality.
4.2 Control Panel Features
The mixer's control panel provides comprehensive adjustments for each channel and master output.

Figure 4.3: Close-up of the Bluetooth and USB section of the Boytone BT-120MX. This highlights the USB port for media playback and PC connection, and the Bluetooth indicator.
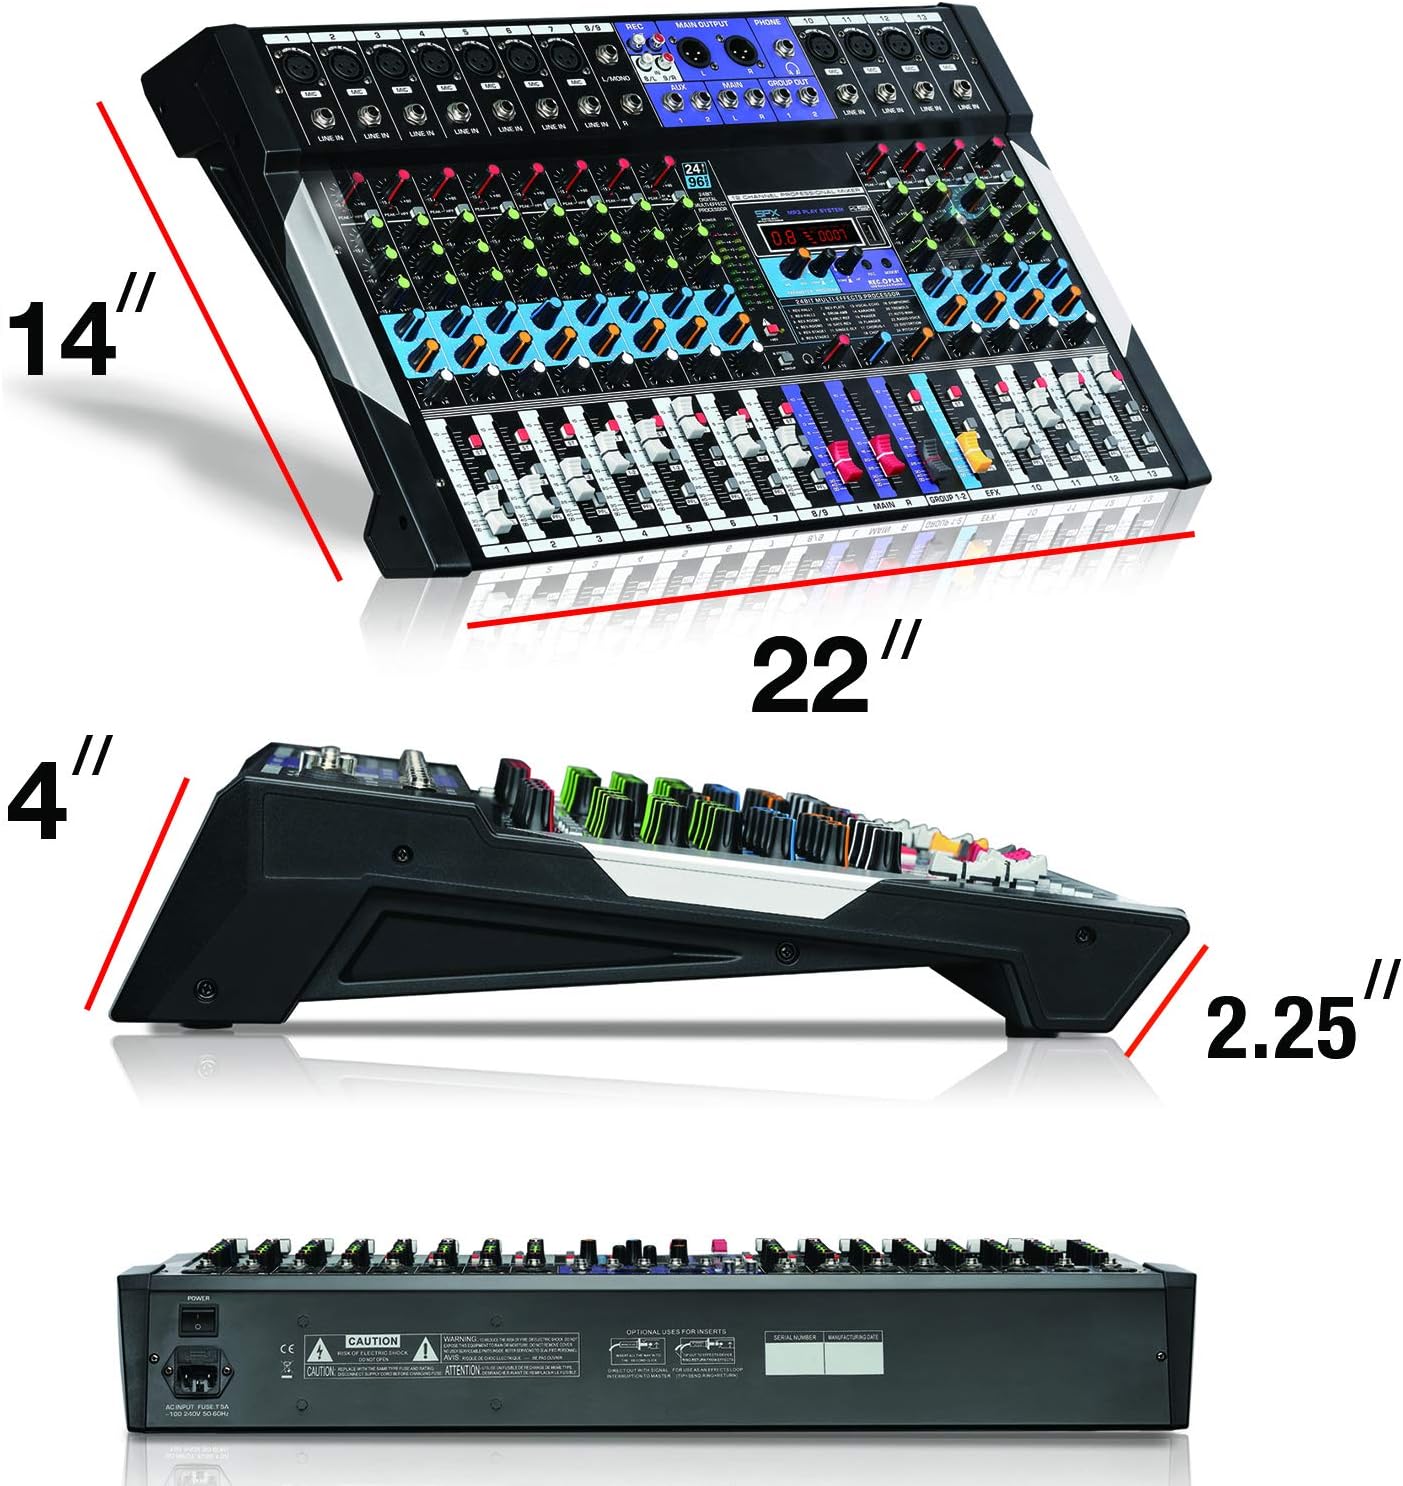
Figure 4.4: Close-up of the 24-bit digital multi-effect processor section. This shows the display, parameter controls, and effect selection options.
- Gain Control: Adjusts the input sensitivity for each channel.
- High, Mid, Low EQ: Three-band equalizer for tone shaping on each channel.
- AUX Send: Controls the level of the channel signal sent to the AUX output for external effects or monitoring.
- Pan Control: Adjusts the stereo position of the channel signal.
- Channel Faders: Controls the volume level of individual channels.
- Main Mix Faders: Controls the overall output volume.
- +48V Phantom Power Switch: Activates phantom power for condenser microphones.
- 24BIT Digital Multi Effect Processor: Provides various digital effects (e.g., reverb, delay) with parameter adjustments.
- USB/MP3 Player Controls: Playback, pause, skip, and mode selection for USB media.
- Bluetooth Indicator: Shows Bluetooth connection status.
5. Setup Guide
Follow these steps to set up your Boytone BT-120MX mixer.
5.1 Power Connection
- Ensure the mixer's power switch is in the OFF position.
- Connect the power adapter to the mixer's power input.
- Plug the power adapter into a suitable electrical outlet.
5.2 Connecting Audio Sources
- Microphones: Connect XLR microphones to the XLR inputs (Channels 1-4). If using condenser microphones, ensure the +48V phantom power is OFF before connecting, then activate it after connection.
- Instruments/Line Devices: Connect instruments (e.g., keyboards, guitars with preamps) or other line-level devices to the 1/4" line inputs or RCA inputs.
- USB Device: Insert a USB flash drive with MP3 files into the USB port for playback.
5.3 Connecting Output Devices
- Speakers/Amplifiers: Connect the mixer's MAIN OUT (1/4" L/R) to your power amplifier or powered speakers.
- Headphones: Connect headphones to the 1/4" HEADPHONE jack for monitoring.
5.4 PC Connection for Recording/Playback
- Connect the mixer to your computer using a USB cable.
- Your computer should recognize the mixer as an audio device. Select it as the input/output device in your audio software settings.
6. Operating Instructions
6.1 Basic Mixing
- Turn on the mixer and all connected audio devices.
- Set all channel faders and the main mix faders to their lowest position.
- For each active channel, gradually increase the GAIN control until the PEAK LED flashes only occasionally.
- Adjust the HIGH, MID, and LOW EQ controls to shape the tone of each input.
- Slowly raise the channel fader for each input to the desired level.
- Adjust the MAIN MIX faders to control the overall output volume.
- Use the PAN control to position the sound within the stereo field.
6.2 Bluetooth Connectivity
- Press the MODE button on the USB/MP3 player section until 'BT' or 'Bluetooth' is displayed.
- On your Bluetooth-enabled device (smartphone, tablet, etc.), search for available devices.
- Select 'Boytone Mixer' or a similar name from the list to pair.
- Once paired, audio from your device will stream wirelessly to the mixer. Adjust the USB/MP3 channel fader for volume control.
6.3 USB MP3 Playback
- Insert a USB flash drive containing MP3 audio files into the USB port.
- The mixer will automatically switch to USB mode or you may need to press the MODE button.
- Use the PLAY/PAUSE, PREVIOUS, and NEXT buttons to control playback.
- Adjust the USB/MP3 channel fader for volume control.
6.4 PC Recording
- Connect the mixer to your PC via USB.
- Open your preferred Digital Audio Workstation (DAW) software (e.g., Audacity, GarageBand, Ableton Live).
- In your DAW's audio settings, select the Boytone mixer as the input device.
- Arm a track for recording and begin recording. The main mix output of the mixer will be sent to your PC.
6.5 Digital Effects Processor
- Use the PROGRAM knob to select from the available 24 digital effects (e.g., Reverb, Delay, Chorus). The selected effect number will be displayed.
- Adjust the PARAMETER knob to fine-tune the selected effect (e.g., decay time for reverb, delay time for echo).
- Use the EFX SEND controls on each channel to send a portion of that channel's signal to the effects processor.
- Adjust the EFX RETURN fader to control the overall volume of the applied effect in the main mix.
6.6 +48V Phantom Power
The +48V phantom power supplies voltage to condenser microphones. Ensure dynamic microphones are not connected when phantom power is active, as this may cause damage.
- Connect your condenser microphone(s) to the XLR inputs.
- Locate the +48V PHANTOM POWER switch and activate it. The indicator LED will illuminate.
- Deactivate phantom power before disconnecting condenser microphones.
7. Maintenance
- Cleaning: Regularly wipe the mixer's surface with a soft, dry cloth. Avoid abrasive cleaners or solvents.
- Storage: When not in use, store the mixer in a cool, dry place, away from direct sunlight and extreme temperatures.
- Cable Management: Ensure cables are not tangled or stressed, which can lead to damage.
8. Troubleshooting
| Problem | Possible Cause | Solution |
|---|---|---|
| No sound output | Power off; incorrect connections; faders down; gain too low; output device issues. | Check power, all cable connections, channel faders, main mix faders, and gain controls. Verify external amplifier/speakers are on and working. |
| Distorted sound | Gain too high; input signal too strong; damaged cables. | Reduce GAIN control. Check input source level. Replace faulty cables. |
| Bluetooth not connecting | Mixer not in Bluetooth mode; device too far; interference; device already paired. | Ensure mixer is in BT mode. Move device closer. Disconnect from other Bluetooth devices. Try re-pairing. |
| USB MP3 not playing | Incorrect file format; USB drive not recognized; mixer not in USB mode. | Ensure files are MP3 format. Try a different USB drive. Press MODE to select USB. |
| Phantom power not working | Switch not activated; faulty microphone/cable. | Ensure +48V switch is ON and indicator is lit. Test with another condenser microphone or XLR cable. |
9. Specifications
| Feature | Detail |
|---|---|
| Brand | Boytone |
| Model | BT-120MX |
| Number of Channels | 12 |
| Connectivity Technology | Bluetooth, USB |
| Power Source | Corded Electric |
| Frequency Response | 20 Hz - 20 KHz |
| Output Connector Type | RCA, TRS (1/4") |
| Audio Input Types | XLR, RCA, 1/4" mono/stereo, USB |
| Voltage | 110V |
| Phantom Power | +48V |
| Digital Effects | 24-bit Multi Effect Processor |
| Item Weight | 18 Pounds |
| UPC | 643307992601 |
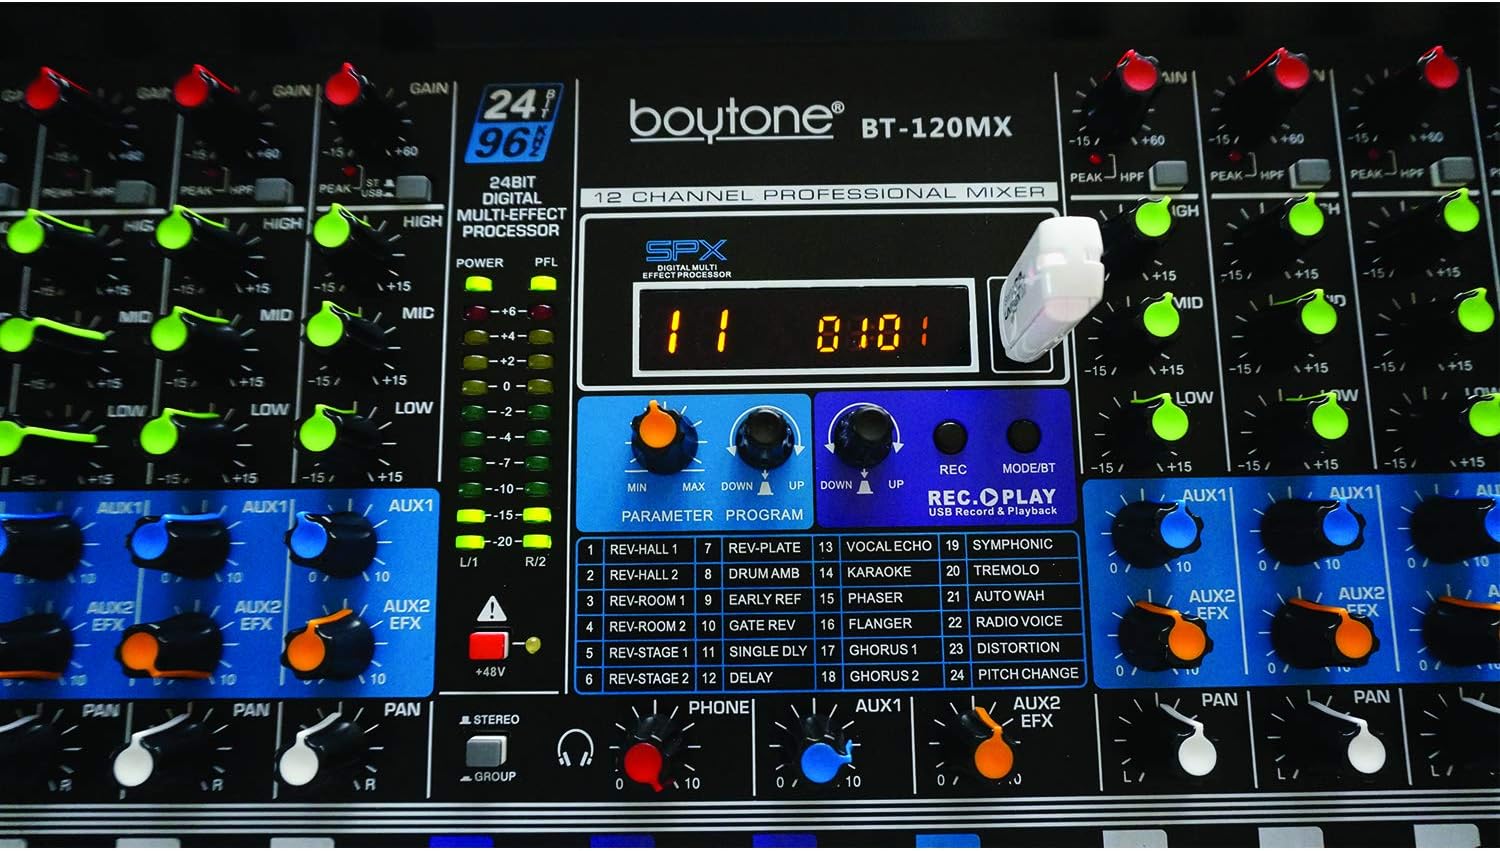
Figure 9.1: Dimensions of the Boytone BT-120MX mixer, showing approximate height, width, and depth.
10. Warranty & Support
Boytone products are designed for reliability and performance. This product is covered by a limited warranty against defects in materials and workmanship. For specific warranty terms and conditions, please refer to the warranty card included with your product or visit the official Boytone website.
For technical support, troubleshooting assistance, or service inquiries, please contact Boytone customer support through their official website or the contact information provided in your product packaging. Please have your model number (BT-120MX) and purchase information ready when contacting support.


