1. Introduction
Thank you for choosing the Thinlerain 17-inch LED Monitor. This manual provides essential information for setting up, operating, and maintaining your monitor. Please read it thoroughly before use to ensure optimal performance and safety.

Image: The Thinlerain 17-inch LED Monitor, showcasing its display capabilities.
2. Product Overview and Features
The Thinlerain 17-inch LED Monitor is designed for versatile use, offering a clear display and multiple connectivity options. Key features include:
- Display: 17-inch LED screen with a native resolution of 1280 x 1024, 4:3 aspect ratio, 250 nits brightness, and a 1000:1 contrast ratio.
- Connectivity: HDMI and VGA input ports for broad compatibility.
- Audio: Integrated 1.5W dual speakers and an audio output port.
- Mounting: Includes a desktop stand and supports VESA 100mm x 100mm wall mounting.
- Durability: Features an all-aluminum casing for enhanced protection.
- Wide Compatibility: Suitable for PC, gaming consoles (PS3/PS4/Xbox 360/Switch), Raspberry Pi, DSLR cameras, camcorders, FPV systems, and car backup cameras.

Image: Key features like HDMI connectivity, VisionCare technology, and wide viewing angles.

Image: TN panel technology providing 90-degree wide viewing angles.
3. What's Included
Please check the package contents upon unboxing:
- Thinlerain 17-inch LED Monitor
- Power Adapter
- HDMI Cable
- Desktop Stand
- User Manual (this document)

Image: Contents of the Thinlerain monitor package.
4. Setup Instructions
4.1 Assembling the Desktop Stand
- Carefully remove the monitor and stand components from the packaging.
- Attach the stand base to the stand neck using the provided screws.
- Secure the assembled stand to the back of the monitor. Ensure all connections are firm.

Image: The monitor stand allows for tilt adjustment from -10° to 15°.
4.2 VESA Wall Mounting (Optional)
The monitor supports VESA 100mm x 100mm mounting. To wall mount:
- Remove the desktop stand if it is already attached.
- Attach a VESA-compatible wall mount (not included) to the four screw holes on the back of the monitor.
- Follow the instructions provided with your VESA mount for secure installation.

Image: Rear view of the monitor, highlighting the 100x100mm VESA mounting points and built-in speakers.

Image: Detailed view of the monitor's rear, showing VESA mounting holes and speaker placement.
4.3 Connecting Cables
The monitor features DC 12V power input, audio output, VGA, and HDMI ports.
- Power Connection: Connect the power adapter to the DC 12V input port on the monitor, then plug the adapter into a power outlet.
- Video Connection:
- For HDMI: Connect one end of the HDMI cable to the monitor's HDMI port and the other end to your computer or device's HDMI output.
- For VGA: Connect one end of the VGA cable to the monitor's VGA port and the other end to your computer or device's VGA output.
- Audio Connection (Optional): If you wish to use external speakers or headphones, connect them to the audio output port. The monitor also has built-in speakers.

Image: HDMI and VGA cable types for video input.
5. Operating Instructions
5.1 Powering On/Off
Press the power button, usually located on the bottom right side of the monitor, to turn the monitor on or off. The power indicator light will illuminate when the monitor is on.
5.2 Input Source Selection
If you have multiple devices connected, you may need to manually select the input source. Use the monitor's control buttons (typically located on the bottom or back) to navigate the On-Screen Display (OSD) menu and select between HDMI and VGA inputs.
5.3 Adjusting Display Settings
The OSD menu allows you to adjust various display settings such as brightness, contrast, color temperature, and aspect ratio. Refer to the OSD menu for detailed options.
- Brightness/Contrast: Adjust these settings to suit your viewing environment.
- Color Settings: Modify color temperature or individual RGB values for desired color accuracy.
- Aspect Ratio: Ensure the aspect ratio is set correctly (e.g., 4:3) for optimal display without distortion.
6. Maintenance
To ensure the longevity and optimal performance of your Thinlerain monitor, follow these maintenance guidelines:
- Cleaning the Screen: Gently wipe the screen with a soft, lint-free cloth. For stubborn marks, slightly dampen the cloth with water or a non-abrasive screen cleaner. Avoid spraying liquids directly onto the screen.
- Cleaning the Casing: Use a soft, dry cloth to clean the monitor casing.
- Ventilation: Ensure the monitor's ventilation openings are not blocked to prevent overheating.
- Power Off: Always turn off the monitor and unplug it from the power outlet before cleaning or if it will be unused for an extended period.
7. Troubleshooting
If you encounter issues with your monitor, refer to the following common problems and solutions:
| Problem | Possible Cause | Solution |
|---|---|---|
| No image on screen |
|
|
| Image is distorted or blurry |
|
|
| No sound from speakers |
|
|
8. Specifications
Detailed technical specifications for the Thinlerain 17-inch LED Monitor (Model THD1700):
| Feature | Detail |
|---|---|
| Brand | Thinlerain |
| Model Number | THD1700 |
| Screen Size | 17 Inches |
| Resolution | 1280 x 1024 (SXGA) |
| Aspect Ratio | 4:3 |
| Panel Type | TN Panel |
| Brightness | 250 nits |
| Contrast Ratio | 1000:1 |
| Response Time | 5 milliseconds |
| Refresh Rate | 60 Hz |
| Connectivity | HDMI, VGA |
| Audio | Built-in 1.5W dual speakers, Audio output port |
| Mounting | VESA 100mm x 100mm compatible |
| Special Features | Portable design, All-aluminum casing |

Image: Monitor dimensions and screen size indication.

Image: Visual representation of the 4:3 aspect ratio.

Image: Graphic highlighting the 5ms response time.
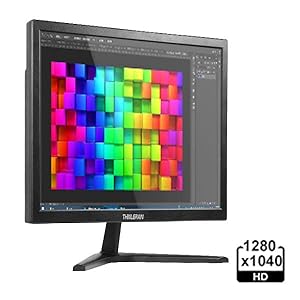
Image: Monitor screen showing 1280x1024 HD resolution.
Energy Information
For detailed energy consumption information, please refer to the official EU EPREL database:
View EPREL Product Information

Image: Product data sheet providing technical and energy specifications.

Image: EU Energy Label indicating energy efficiency class and consumption.
9. Warranty and Support
Thinlerain offers a 2-year warranty for this monitor and provides lifetime customer service. If you encounter any issues or require assistance, please contact Thinlerain customer support.
For support inquiries, please refer to the contact information provided with your purchase or visit the official Thinlerain website.