
XIDU XN1A
XIDU Tour Pro 12.5" Touchscreen Laptop User Manual
Model: XN1A
1. Introduction
Welcome to the user manual for your new XIDU Tour Pro 12.5" Touchscreen Laptop. This guide provides essential information on setting up, operating, maintaining, and troubleshooting your device. Please read this manual thoroughly to ensure optimal performance and longevity of your laptop.
The XIDU Tour Pro is designed for versatility and performance, featuring a 2K IPS touchscreen, a powerful Intel Celeron processor, and a compact, stylish design. We hope you enjoy your new device.
2. Product Overview
The XIDU Tour Pro is a highly portable and powerful laptop with a range of features designed for productivity and entertainment.
2.1 Key Features
- Full-view Touch Display: 12.5" 2K IPS (2560x1440) 10-point touchscreen with ultra-narrow 4.9mm bezel and 85% screen-to-body ratio.
- Convertible Hinge: 180-degree convertible hinge for flexible viewing and usage modes.
- Premium Design: Ultra-slim body in space gray magnalium material, only 0.6 inches thickness and 2.65 lbs weight.
- Backlit Keyboard: Full-size backlit keyboard for comfortable typing in various lighting conditions.
- Fast & Powerful Performance: Pre-installed Windows 10 Home OS, 8th Gen Intel Celeron 3867U processor, 8GB LPDDR3 RAM, and 128GB eMMC storage (expandable up to 1TB SSD).
- One-Touch Power Button: Integrated fingerprint reader for secure and fast login via Windows Hello.
- Connectivity: Dual-band WiFi (802.11a/b/g/n/ac) and Bluetooth 4.2.
- Long Battery Life: 39 Wh battery providing up to 8 hours of usage.
2.2 Visual Overview

Figure 2.1: The XIDU Tour Pro 12.5" Touchscreen Laptop, showcasing its sleek design and display.

Figure 2.2: Close-up of the laptop display highlighting its 12.5" touchscreen, 2K resolution, 4.9mm slim bezel, and IPS technology.

Figure 2.3: The laptop demonstrating its 180-degree lay-flat display capability, allowing for versatile viewing angles.

Figure 2.4: Detail of the backlit keyboard and the one-touch power button with integrated fingerprint reader.
2.3 Ports and Connectors
The XIDU Tour Pro is equipped with various ports for connectivity and expansion:
- 1x Type-C Port
- 1x USB 3.0 Port
- 1x MicroSD Card Reader
- 1x Headphone Jack (Audio/microphone combo)
- 1x Charging Port
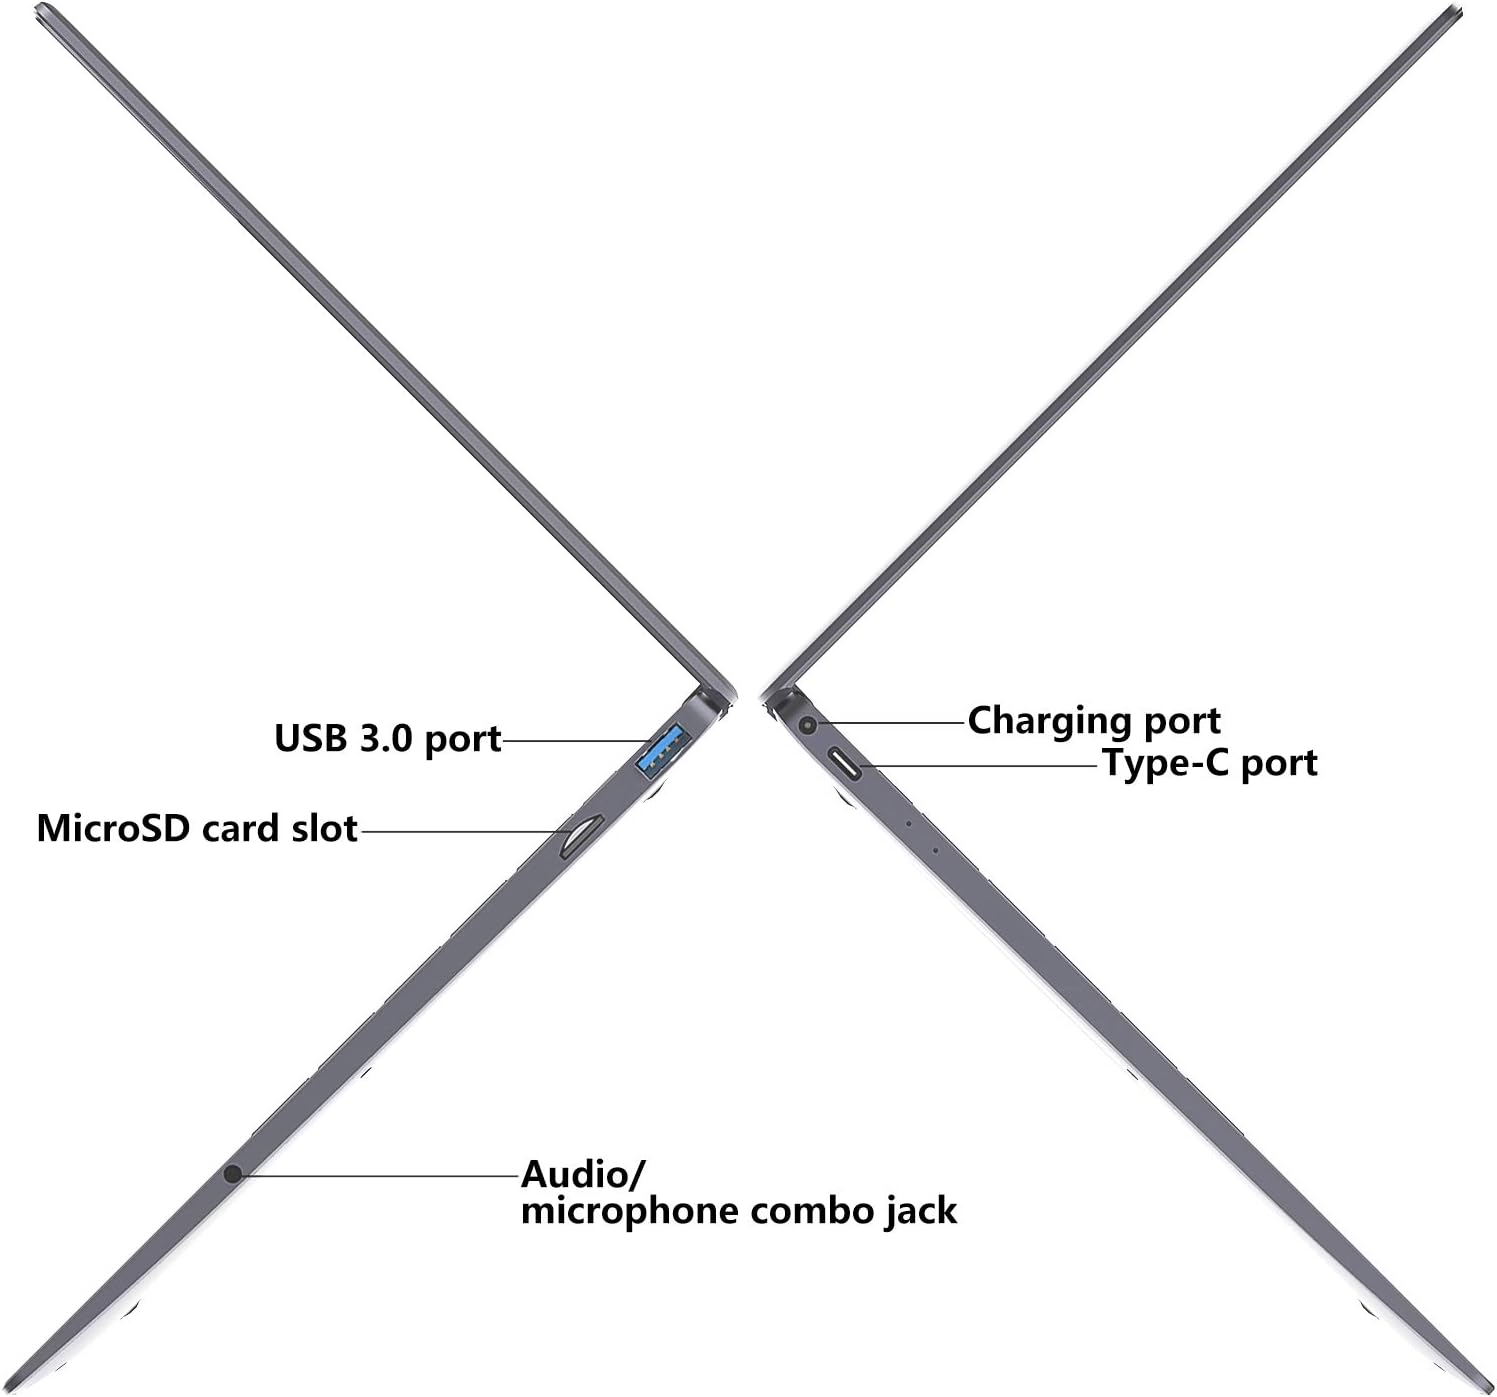
Figure 2.5: Diagram illustrating the location of the USB 3.0 port, MicroSD card slot, audio/microphone combo jack, charging port, and Type-C port.
3. Setup
3.1 Initial Charging
Before first use, it is recommended to fully charge your XIDU Tour Pro laptop. Connect the provided FCC certified US charger to the charging port on the laptop and plug it into a power outlet. The charging indicator light will illuminate.
3.2 Powering On
Press and hold the power button (located on the side, near the keyboard) for a few seconds until the XIDU logo appears on the screen. The laptop will then boot into the Windows 10 Home operating system.
3.3 First-Time Setup
Upon the first boot, you will be guided through the Windows 10 setup process. This includes selecting your region, language, connecting to a Wi-Fi network, accepting the license agreement, and creating a user account. Follow the on-screen prompts to complete the setup.
4. Operating Your Laptop
4.1 Using the Touchscreen
The 10-point multi-touch display allows for intuitive interaction with Windows 10. You can use gestures such as tapping, swiping, pinching, and zooming directly on the screen. The 180-degree hinge allows you to adjust the screen to various angles for comfortable touch interaction.
4.2 Keyboard and Touchpad
The full-size keyboard provides a comfortable typing experience. To activate or deactivate the keyboard backlight, use the designated function key combination (refer to the keyboard layout for the specific key, usually Fn + Fx).
The integrated touchpad supports multi-touch gestures for navigation, scrolling, and zooming. Refer to Windows settings for customizing touchpad gestures.
4.3 Fingerprint Reader (Windows Hello)
The one-touch power button integrates a fingerprint reader for quick and secure login. To set up Windows Hello fingerprint recognition:
- Go to Settings > Accounts > Sign-in options.
- Under "Windows Hello Fingerprint," click Set up.
- Follow the on-screen instructions to register your fingerprint.
Once set up, you can log in to your laptop by simply placing your registered finger on the power button.
4.4 Connecting to Wi-Fi and Bluetooth
To connect to a Wi-Fi network:
- Click the Wi-Fi icon in the taskbar.
- Select your desired network from the list and click Connect.
- Enter the network password if prompted.
To connect Bluetooth devices:
- Go to Settings > Devices > Bluetooth & other devices.
- Ensure Bluetooth is turned On.
- Click Add Bluetooth or other device and follow the pairing instructions for your device.
5. Maintenance
Proper maintenance ensures the longevity and optimal performance of your XIDU Tour Pro laptop.
- Cleaning the Screen: Use a soft, lint-free cloth specifically designed for electronics. For stubborn smudges, lightly dampen the cloth with water or a screen cleaner solution. Avoid harsh chemicals.
- Cleaning the Keyboard and Chassis: Use a soft, dry cloth to wipe down the keyboard and the laptop's body. A can of compressed air can be used to remove dust from between the keys.
- Battery Care: Avoid completely draining the battery frequently. For long-term storage, charge the battery to about 50-60% and store the laptop in a cool, dry place.
- Software Updates: Regularly check for and install Windows updates and driver updates to ensure system stability and security.
- Storage: Store the laptop in a clean, dry environment away from extreme temperatures, direct sunlight, and excessive dust.
6. Troubleshooting
This section addresses common issues you might encounter with your XIDU Tour Pro laptop.
6.1 Laptop Does Not Power On
- Ensure the laptop is connected to the power adapter and the adapter is plugged into a working electrical outlet.
- Check if the battery is completely drained. Allow it to charge for at least 30 minutes before attempting to power on again.
- Try holding the power button for 10-15 seconds to perform a hard reset.
6.2 Wi-Fi Connectivity Issues
- Ensure Wi-Fi is enabled in Windows settings.
- Restart your router and modem.
- Forget the network and reconnect, entering the password again.
- Update your Wi-Fi drivers (check XIDU's official support website).
6.3 Touchscreen Not Responding
- Restart the laptop.
- Check for any physical obstructions or debris on the screen.
- Ensure touchscreen drivers are up to date in Device Manager.
6.4 Fingerprint Reader Not Working
- Ensure your finger is clean and dry when using the reader.
- Try re-registering your fingerprint in Windows Hello settings.
- Check for updated drivers for the fingerprint sensor.
If you encounter issues not covered here, please refer to the XIDU support website or contact customer service.
7. Specifications
| Feature | Specification |
|---|---|
| Brand | XIDU |
| Model Name | QW125 |
| Item Model Number | XN1A |
| Colour | Space Gray |
| Form Factor | Convertible |
| Screen Size | 12.5 Inches |
| Display Resolution | 2560 x 1440 pixels (2K IPS) |
| Processor Brand | Intel |
| Processor Type | Celeron 3867U |
| Processor Speed | 1.8 GHz |
| RAM | 8 GB LPDDR3 |
| Hard Drive Size | 128 GB eMMC (expandable up to 1TB SSD) |
| Graphics Card | Integrated Intel Graphics |
| Operating System | Windows 10 Home |
| Wireless Communication | 802.11a/b/g/n/ac (Dual Band Wi-Fi), Bluetooth 4.2 |
| Ports | 1x Type-C, 1x USB 3.0, 1x MicroSD Card Reader, 1x Headphone Jack, 1x Charging Port |
| Average Battery Life | 8 Hours (39 Wh) |
| Product Dimensions | 29.06 x 20.14 x 1.5 cm |
| Item Weight | 2.24 kg (approx. 2.65 lbs) |
8. Warranty and Support
XIDU provides a standard warranty for its products. Please refer to the warranty card included with your purchase or visit the official XIDU website for detailed warranty terms and conditions. Keep your proof of purchase for warranty claims.
For technical support, troubleshooting assistance, or service inquiries, please visit the official XIDU support website or contact their customer service department. Contact information can typically be found on the XIDU website or in the packaging materials.
Ask a question about this manual
Ask about setup, troubleshooting, compatibility, parts, safety, or missing instructions. Manuals+ will review the question and use this page’s manual context to help answer it.