
Introduction
This manual provides comprehensive instructions for the installation, operation, and maintenance of your BOSS Audio Systems AVA1210 7-Band Pre-Amp Car Equalizer. Please read this manual thoroughly before attempting to install or operate the unit to ensure proper use and to prevent damage.
The AVA1210 is designed to enhance your car audio experience by providing precise control over your sound system's frequency response, allowing you to tailor the audio output to your personal preferences and vehicle acoustics.
Safety Information
Always observe the following safety precautions when installing or operating the AVA1210:
- Ensure all wiring is securely connected and properly insulated to prevent short circuits.
- Disconnect the vehicle's battery negative terminal before beginning any electrical work.
- Do not operate the unit in extremely high temperatures or direct sunlight.
- Avoid installing the unit in locations where it may be exposed to moisture or excessive dust.
- Consult a professional car audio installer if you are unsure about any installation steps.
- Do not attempt to disassemble or modify the unit. This will void the warranty.
Product Overview
The BOSS Audio Systems AVA1210 is a 7-band pre-amp equalizer designed for car audio systems. It features dedicated controls for front, rear, and subwoofer outputs, allowing for precise sound customization.
Front Panel Controls

- Volume Control: Adjusts the overall output level of the equalizer.
- Fader Control: Adjusts the volume balance between the front and rear speakers in a 4-speaker system.
- Sub Volume: Adjusts the output level of the subwoofer RCA jack.
- Input Selector Switch (CD/AUX): Selects between the auxiliary (AUX) or CD input source.
- Equalizer Controls: Seven rotary knobs control the frequency response (boost or cut) in specific bands:
- Front Channel: 125 Hz, 500 Hz, 3.5 kHz, 12 kHz.
- Rear Channel: 50 Hz, 600 Hz, 6.3 kHz.
Rear Panel Connections

- Inputs: Dual 2-channel RCA inputs (CD and AUX) for connecting source units.
- Outputs: Front, Rear, and Subwoofer RCA outputs for connecting to amplifiers.
- Power Connections: Terminals for +12V (Red), Ground (Black), and Remote Turn-On.
Installation
Proper installation is crucial for optimal performance. Follow these steps carefully:
Wiring Diagram
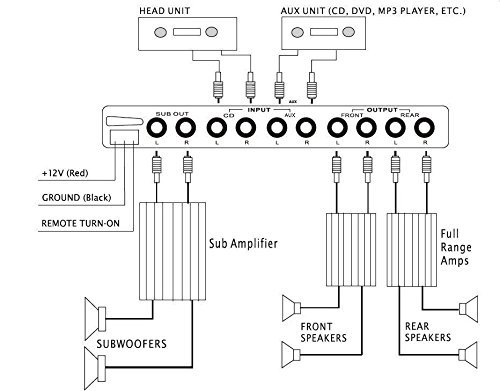
Step-by-Step Installation
- Disconnect Battery: Before starting, disconnect the negative (-) terminal of your vehicle's battery to prevent electrical shorts.
- Mounting Location: Choose a suitable mounting location for the AVA1210. It should be easily accessible for adjustments, away from direct heat or moisture, and securely mounted to prevent vibration. Common locations include under the dashboard or in the center console.
- Power Wiring:
- Connect the +12V (Red) wire to a constant +12V power source from the vehicle's battery, preferably through a fused connection (fuse not included, typically 1A).
- Connect the Ground (Black) wire to a clean, unpainted metal surface of the vehicle chassis. Ensure a good electrical connection.
- Connect the Remote Turn-On wire to the remote output of your head unit. This wire turns the equalizer on and off with your head unit.
- RCA Connections:
- Connect the RCA output from your head unit (or CD player) to the CD Input on the AVA1210.
- If using an auxiliary source (e.g., MP3 player), connect its RCA output to the AUX Input on the AVA1210.
- Connect the Front Output RCAs from the AVA1210 to your front channel amplifier input.
- Connect the Rear Output RCAs from the AVA1210 to your rear channel amplifier input.
- Connect the Sub Out RCAs from the AVA1210 to your subwoofer amplifier input.
- Reconnect Battery: Once all connections are secure, reconnect the negative (-) terminal of your vehicle's battery.
- Initial Test: Turn on your head unit and check for proper operation. Adjust volume and fader controls to ensure sound output.
Operation
Operating the AVA1210 allows you to fine-tune your car's audio system for optimal sound quality.
- Power On/Off: The equalizer will power on automatically when your head unit is turned on, provided the remote turn-on wire is correctly connected.
- Input Selection: Use the Input Selector Switch (CD/AUX) to choose between your primary audio source (CD/Head Unit) and any auxiliary input.
- Volume Adjustment: Use the Volume Control knob to set the overall listening level. Start with a low volume and gradually increase it.
- Fader Control: Adjust the Fader Control to balance the sound output between your front and rear speakers. Turn towards 'F' for more front sound, and 'R' for more rear sound.
- Subwoofer Level: Use the Sub Volume knob to control the output level of your subwoofer independently.
- Equalizer Adjustments:
- Adjust the individual frequency knobs for the Front (125 Hz, 500 Hz, 3.5 kHz, 12 kHz) and Rear (50 Hz, 600 Hz, 6.3 kHz) channels to boost or cut specific frequencies.
- Experiment with these settings to compensate for vehicle acoustics, speaker placement, and personal listening preferences. A slight boost can emphasize certain instruments, while a cut can reduce unwanted resonance.
- Subwoofer Filter: The AVA1210 features a switchable subwoofer filter (32 Hz – 128 Hz). This helps to optimize the bass output by filtering out frequencies above the selected range for the subwoofer, ensuring cleaner bass reproduction. Refer to the rear panel for specific filter settings if available.
Specifications
Technical specifications for the BOSS Audio Systems AVA1210 7-Band Pre-Amp Car Equalizer:
| Feature | Specification |
|---|---|
| Front Adjustable EQ Band Frequencies | 125 Hz, 500 Hz, 3.5 kHz, 12 kHz |
| Rear Adjustable EQ Bands Frequencies | 50 Hz, 600 Hz, 6.3 kHz |
| Switchable Subwoofer Filter | 32 Hz – 128 Hz |
| Frequency Response | 10 Hz – 15 kHz |
| Inputs | Dual 2 Channel Source (CD, AUX) |
| Outputs | Front, Rear, Subwoofer |
| Gain Adjustment Range | +/- 18 dB |
| Maximum Input Voltage | 15 Volts |
| Maximum Output Voltage | 8 Volts |
| Signal to Noise Ratio | > 110 dB |
| Channel Separation | 20 dB |
| Total Harmonic Distortion | 0.050% |
| Dimensions (Depth x Width x Height) | 4.6” x 7” x 1” |
| Item Model Number | AVA1210 |

Troubleshooting
If you experience issues with your AVA1210, refer to the following common problems and solutions:
| Problem | Possible Cause | Solution |
|---|---|---|
| No Power |
|
|
| No Sound Output |
|
|
| Distorted Sound |
|
|
| Noise/Hissing |
|
|
Maintenance
The AVA1210 requires minimal maintenance. Follow these guidelines to ensure longevity:
- Keep the unit clean by wiping it with a soft, dry cloth. Do not use harsh chemicals or abrasive cleaners.
- Ensure proper ventilation around the unit to prevent overheating.
- Regularly check all wiring connections for tightness and corrosion.
Warranty and Support
The BOSS Audio Systems AVA1210 comes with a 1 Year Warranty from the date of purchase. This warranty covers defects in materials and workmanship under normal use. Please retain your proof of purchase for warranty claims.
Legal Disclaimer: Warranty does not cover misuse of product.
For technical support, warranty service, or further inquiries, please contact BOSS Audio Systems customer service or visit their official website. Refer to your product packaging or the manufacturer's website for the most current contact information.


