1. Introduction
This manual provides essential information for the safe and efficient installation, operation, and maintenance of your Onforu 100W 14000lm LED Shop Lights. Please read this manual thoroughly before use and retain it for future reference.
2. Safety Information
Always follow basic safety precautions to reduce the risk of fire, electric shock, and personal injury.
- Ensure the power is disconnected before installation or maintenance.
- Do not look directly into the LED light when it is on, as it may cause eye damage.
- Keep the product away from flammable materials.
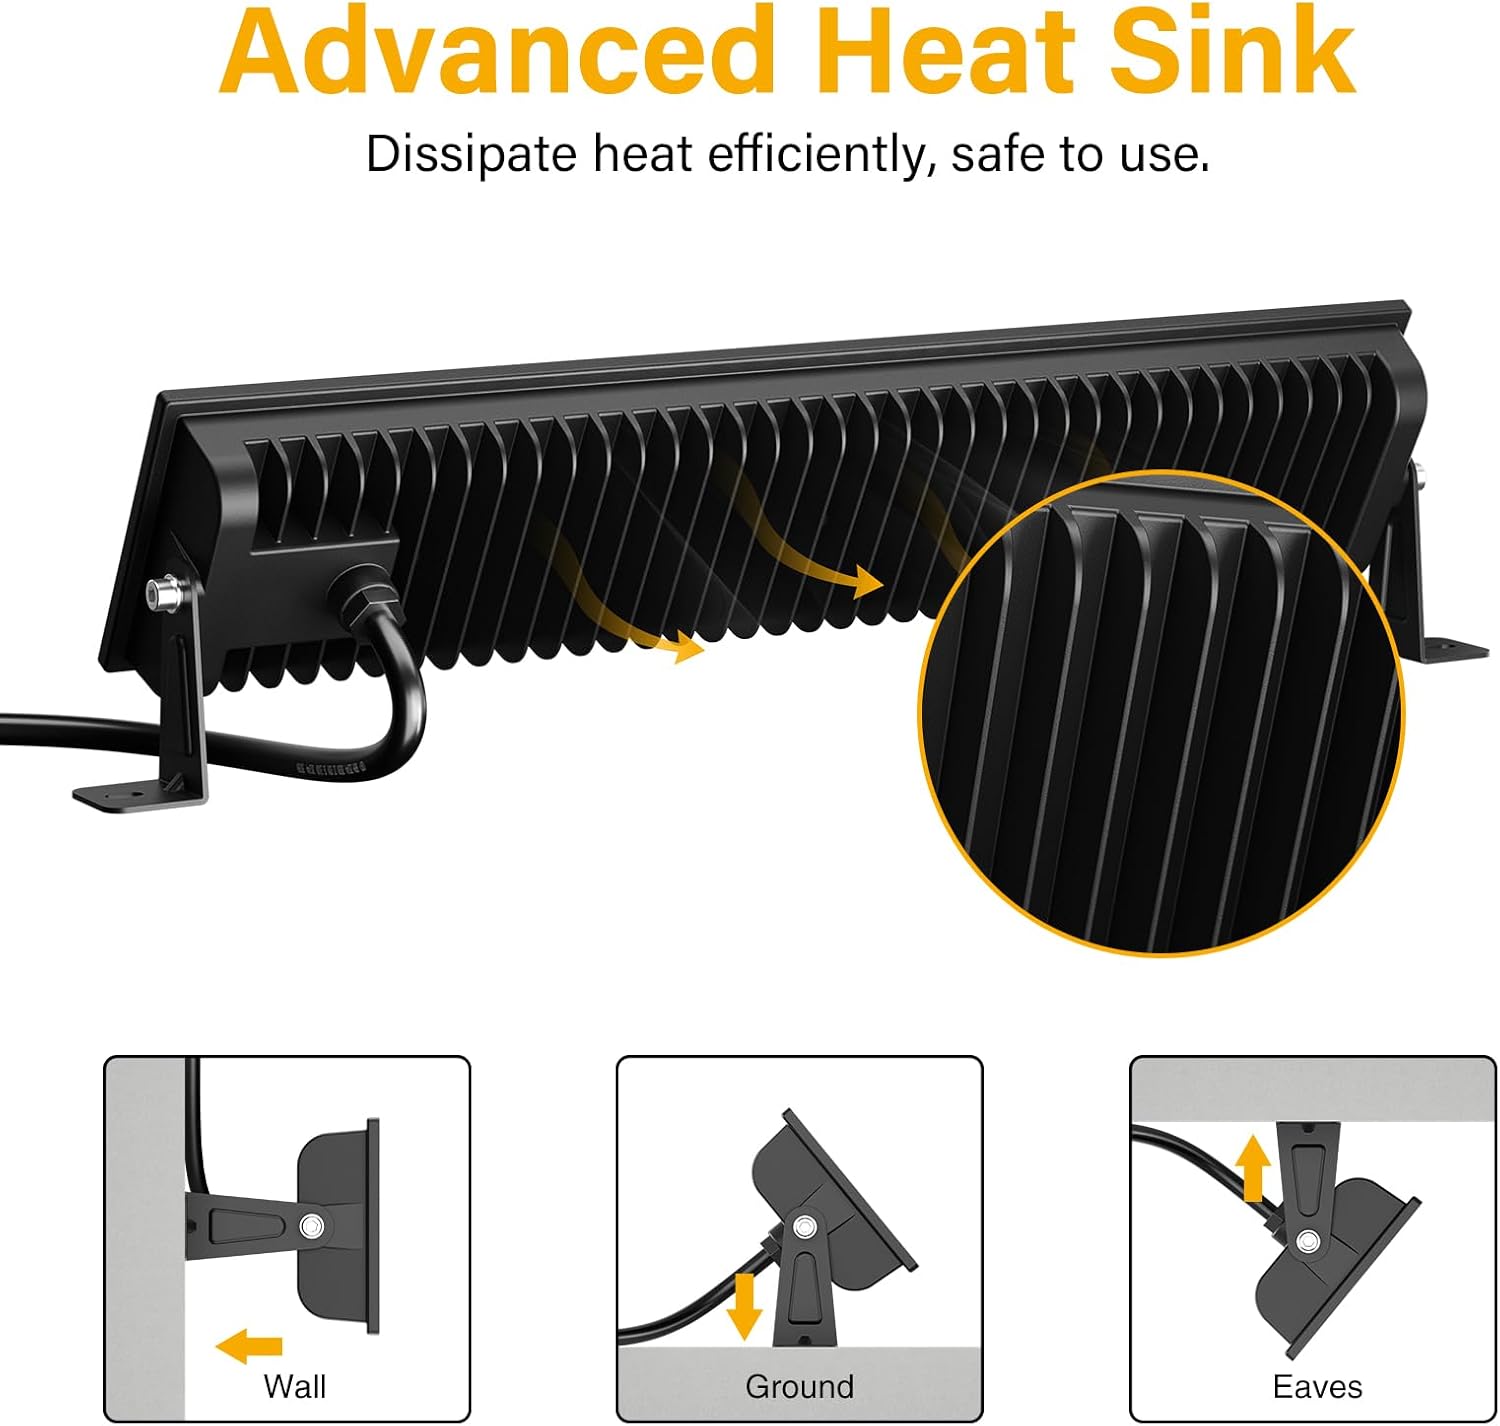
- This product is IP66 waterproof, suitable for outdoor use, but avoid submerging it in water.
- Installation should be performed by a qualified electrician if you are unsure.
- Ensure the mounting surface can support the weight of the fixture.
3. Package Contents
Verify that all components are present and undamaged upon opening the package:
- LED Shop Light (2 units)
- Lamp Brackets (2 pairs)
- M6 Hex Screw Key (1 unit)
- M6 Screws (2 units)
- Plastic Expansion Nails (2 units)
- Screws for Mounting (2 units)
- Additional connectors for linking (as shown in assembly video)

4. Setup and Installation
The Onforu LED Shop Lights are designed for easy installation and can be mounted in various configurations (wall, ground, or ceiling) and can also be linked horizontally or vertically.
4.1 Single Unit Installation
- Attach Brackets: Secure the lamp brackets to the sides of the LED light fixture using the provided M6 screws and hex key. Do not overtighten initially to allow for angle adjustment.
- Mount the Fixture: Choose your desired mounting location (wall, ground, or ceiling). Use the plastic expansion nails and mounting screws to firmly attach the brackets to the surface.
- Adjust Angle: Once mounted, adjust the angle of the light fixture to direct illumination as needed. The fixture allows for 180° adjustment. Tighten the M6 screws on the brackets to secure the angle.
- Connect Power: Plug the power cord into a standard 120V AC outlet. The light features an in-line switch for convenient power control.

Video 1: A short preview demonstrating the installation process and adjustable features of the Onforu LED Flood Light.
4.2 Linking Multiple Units
The lights can be connected horizontally or vertically to create a longer or wider lighting solution. Use the provided connectors and hex key to secure the units together.
- Horizontal Connection: Align two light units side-by-side. Use the small connecting brackets and screws to join them securely. Ensure the power cables are routed appropriately.
- Vertical Connection: Align two light units one above the other. Use the small connecting brackets and screws to join them securely.
Video 2: An official product video from Onforu demonstrating the various installation methods, including linking multiple units horizontally and vertically, and showcasing the included hardware.
5. Operating Instructions
Operating your Onforu LED Shop Light is straightforward:
- Once installed and plugged into a power outlet, locate the in-line switch on the power cord.
- Press the switch to turn the light ON.
- Press the switch again to turn the light OFF.

6. Maintenance
To ensure optimal performance and longevity of your LED Shop Lights:
- Cleaning: Periodically clean the glass cover with a soft, damp cloth. Avoid abrasive cleaners or solvents that could damage the surface.
- Inspection: Regularly check the power cord and plug for any signs of damage. Ensure all mounting screws remain tight.
- Heat Dissipation: The fixture is designed with a fin-type heat sink. Ensure it is not obstructed to allow for efficient heat dissipation.
7. Troubleshooting
If you encounter issues with your LED Shop Light, refer to the following common solutions:
| Problem | Possible Cause | Solution |
|---|---|---|
| Light does not turn on. | No power supply; faulty switch; loose connection. | Check if the plug is securely inserted and the power outlet is functional. Ensure the in-line switch is ON. Inspect the power cord for damage. |
| Light flickers. | Unstable power supply; loose connection. | Ensure the power supply is stable. Check all connections for tightness. |
| Reduced brightness. | Dirt or debris on the glass cover. | Clean the glass cover with a soft, damp cloth. |
8. Specifications
| Feature | Detail |
|---|---|
| Brand | Onforu |
| Model Number | CT08 |
| Wattage | 100 watts |
| Brightness | 14000 Lumen |
| Color Temperature | 6500 Kelvin (Daylight White) |
| Material | Aluminum, Tempered Glass |
| Water Resistance Level | IP66 Waterproof |
| Product Dimensions | 15.27"L x 3.46"W x 1.37"H |
| Beam Angle | 120° |
| Special Feature | With Plug, Thick die-cast aluminum, Waterproof, Not Dimmable |
9. Warranty and Support
Onforu products come with a limited warranty. For specific warranty details or technical support, please refer to the official Onforu website or contact customer service.
Optional protection plans are available for purchase separately:
- 3-Year Protection Plan
- 4-Year Protection Plan
- Complete Protect (monthly subscription)
For further assistance, visit the Onforu Store on Amazon.


