Introduction
This manual provides essential information for the safe and efficient operation of your BEPER P102CON001 Vacuum Sealer. This appliance is designed to extend the freshness of food by removing air from specially designed bags and sealing them, preventing freezer burn, reducing spoilage, and preserving nutritional value. Please read these instructions carefully before first use and keep them for future reference.
Safety Instructions
- Always unplug the appliance from the power outlet before cleaning or when not in use.
- Do not immerse the appliance, power cord, or plug in water or any other liquid.
- This appliance is not intended for use by persons (including children) with reduced physical, sensory, or mental capabilities, or lack of experience and knowledge, unless they have been given supervision or instruction concerning use of the appliance by a person responsible for their safety.
- Keep children away from the appliance during operation and storage.
- Do not operate the appliance if the power cord or plug is damaged, or if the appliance malfunctions or has been damaged in any manner.
- Use only original BEPER accessories and bags designed for this vacuum sealer.
- The appliance features an overheating protection system. If the device overheats, allow it to cool down before resuming operation.
- Ensure the sealing strip is clean and dry before each use to ensure a proper seal.
Product Components
Familiarize yourself with the main parts of your BEPER P102CON001 Vacuum Sealer:
- Lid: Covers the vacuum chamber and sealing strip.
- Vacuum Chamber: Area where air is removed from the bag.
- Sealing Strip: Heats up to create a secure seal on the bag.
- Releasing Valve: Used to release pressure after vacuum sealing.
- Air Suction Port: Where air is drawn out during vacuuming.
- Control Buttons:
- VAC SEAL: Initiates vacuuming and then sealing.
- STOP: Stops the current operation.
- SEAL: Initiates sealing only (without vacuuming).
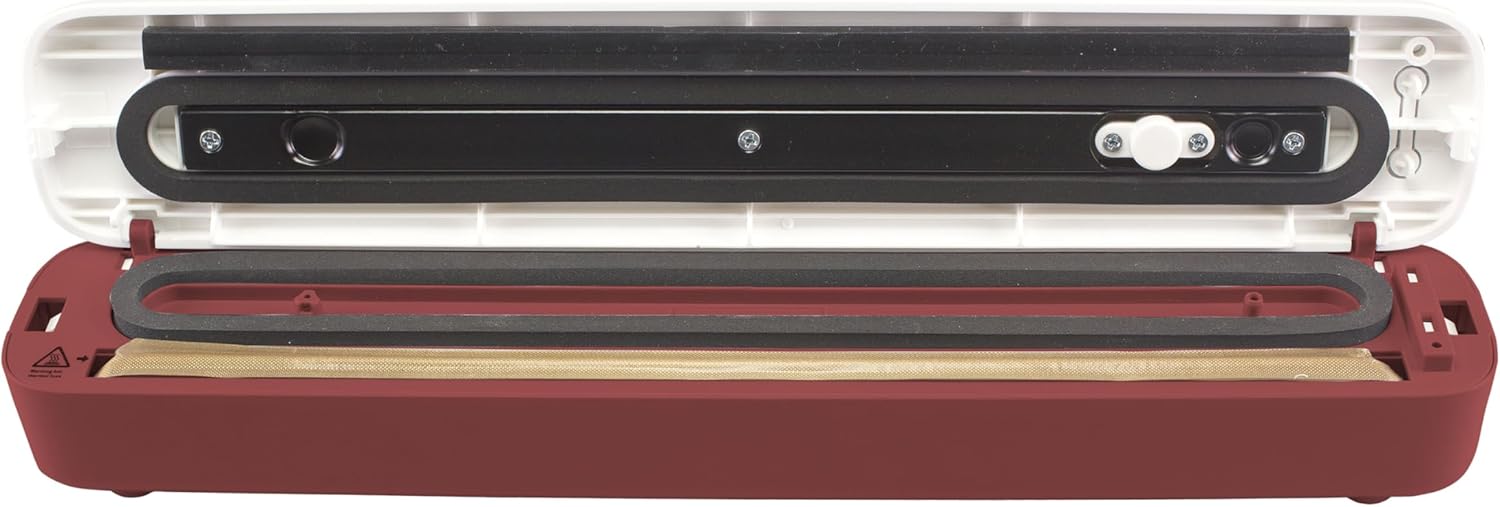
Image: The BEPER P102CON001 Vacuum Sealer with its lid open, revealing the internal components such as the sealing strip and vacuum chamber, essential for its operation.
Setup
- Unpack: Carefully remove the vacuum sealer and all accessories from its packaging.
- Inspect: Check the appliance for any signs of damage. Do not use if damaged.
- Placement: Place the vacuum sealer on a flat, stable, and dry surface. Ensure there is enough space around the unit for proper ventilation.
- Power Connection: Plug the power cord into a suitable electrical outlet.

Image: A top-down view of the BEPER P102CON001 Vacuum Sealer, illustrating its compact design and readiness for setup on a kitchen counter.
Operating Instructions
Preparing the Bag
Ensure the bag is clean and dry, especially the area where the seal will be made. Do not overfill the bag; leave at least 7-10 cm of space from the top for proper sealing. The appliance comes with 5 reusable bags measuring 25 x 30 cm.

Image: A stack of five clear, reusable vacuum sealer bags, each measuring 25x30 cm, included with the BEPER P102CON001.
Vacuum Sealing Food
- Place the food item inside a vacuum sealer bag.
- Open the lid of the vacuum sealer.
- Place the open end of the bag into the vacuum chamber, ensuring it lies flat and smooth over the sealing strip. The bag should not extend beyond the sealing strip.
- Close the lid firmly until you hear a click, indicating it is securely locked.
- Press the VAC SEAL button. The appliance will automatically vacuum the air out of the bag and then proceed to seal it.
- Once the process is complete, the indicator light will turn off. Press the Releasing Valve to release the vacuum pressure, then open the lid.
- Remove the sealed bag. Check the seal to ensure it is airtight.

Image: A close-up of a hand initiating the vacuum and seal process by pressing the 'VAC SEAL' button on the BEPER P102CON001, with a bag containing food positioned for sealing.

Image: The BEPER P102CON001 Vacuum Sealer shown with a perfectly vacuum-sealed steak in a bag, demonstrating the successful preservation of food.
Sealing Only (without Vacuum)
This function is useful for sealing bags of dry goods that do not require vacuuming, such as chips or bread, or for creating custom-sized bags from a roll.
- Place the open end of the bag directly over the sealing strip, ensuring it is flat and smooth. Do not place it inside the vacuum chamber.
- Close the lid firmly until it clicks.
- Press the SEAL button. The appliance will heat the sealing strip to create a seal.
- Once the indicator light turns off, press the Releasing Valve and open the lid.
- Remove the sealed bag.

Image: An illustrative diagram of the BEPER P102CON001 Vacuum Sealer, highlighting its dual functions (vacuum+seal, seal only), the 30 cm sealing area, and the inclusion of 5 bags.
Maintenance and Cleaning
Regular cleaning ensures optimal performance and extends the life of your vacuum sealer.
- Unplug: Always unplug the appliance before cleaning.
- Exterior: Wipe the exterior of the appliance with a soft, damp cloth. Do not use abrasive cleaners or solvents.
- Vacuum Chamber and Sealing Strip: Carefully wipe the vacuum chamber and the sealing strip with a damp cloth to remove any food residue or moisture. Ensure these areas are completely dry before closing the lid or storing the appliance.
- Storage: Store the appliance in a dry place, away from direct sunlight and out of reach of children.
Troubleshooting
| Problem | Possible Cause | Solution |
|---|---|---|
| Appliance does not turn on. | Not plugged in; power outlet malfunction. | Ensure the power cord is securely plugged into a working outlet. |
| Vacuuming is not effective. | Bag not properly placed; lid not fully closed; bag leakage. | Ensure the bag opening is flat within the vacuum chamber. Close the lid firmly until it clicks. Check the bag for holes or tears. |
| Bag does not seal properly. | Sealing strip is dirty or wet; bag is wrinkled; appliance overheated. | Clean and dry the sealing strip. Smooth out any wrinkles in the bag. Allow the appliance to cool down if it has been used continuously. |
| Air re-enters the bag after sealing. | Improper seal; food with sharp edges; bag not suitable. | Ensure a complete, even seal. Pad sharp food items. Use only bags designed for vacuum sealing. |
If you encounter issues not listed here or if problems persist, please contact customer support or a qualified service technician.
Specifications
- Brand: BEPER
- Model: P102CON001
- Power: 85 W
- Material: ABS Plastic
- Product Dimensions: 43 x 10 x 7 cm
- Sealing Strip Length: 30 cm
- Included Accessories: 5 reusable vacuum bags (25 x 30 cm)
- Special Features: Automatic vacuum and sealing function, prevents mold and bacteria, reduces food waste.
Warranty and Support
For detailed warranty information, please refer to the documentation provided with your purchase or visit the official BEPER website. If you require technical support or have questions regarding your BEPER P102CON001 Vacuum Sealer, please contact your retailer or the manufacturer's customer service department.