1. Introduction
This manual provides detailed instructions for the installation, configuration, and maintenance of your ASRock B550M Phantom Gaming 4 Micro ATX AMD Motherboard. Please read this manual thoroughly before proceeding with installation to ensure proper setup and optimal performance.
2. Product Overview
The ASRock B550M Phantom Gaming 4 is a high-performance Micro ATX motherboard designed for AMD Ryzen processors. It offers robust power delivery, high-speed connectivity, and support for advanced memory and storage technologies.
Key Features:
- Supports AMD AM4 Socket Ryzen™ 3000, 3000 G-Series, 4000 G-Series, 5000 and 5000 G-Series Desktop Processors.
- 8 Power Phase Design with Digi Power for stable power delivery.
- Supports DDR4 memory up to 4733+ (OC) MHz.
- Equipped with 1 x PCIe 4.0 x16, 1 x PCIe 3.0 x16, and 1 x PCIe 3.0 x1 slots.
- Supports AMD CrossFireX™ for multi-GPU configurations.
- Graphics Output Options: HDMI, DisplayPort.
- 7.1 CH HD Audio (Realtek ALC887/897 Audio Codec).
- Storage: 4 x SATA3, 1 x Hyper M.2 (PCIe Gen4 x4), 1 x M.2 (PCIe Gen3 x2 & SATA3).
- USB Connectivity: 8 x USB 3.2 Gen1 (4 Front, 4 Rear), 6 x USB 2.0 (4 Front, 2 Rear).

Figure 2.1: ASRock B550M Phantom Gaming 4 Motherboard and retail packaging.
Video 2.1: Product Overview of the ASRock B550M Phantom Gaming 4 Motherboard.
3. Installation Guide
3.1. CPU Installation
- Locate the AM4 CPU socket on the motherboard.
- Lift the load lever on the CPU socket.
- Carefully align the triangular marker on your AMD Ryzen CPU with the marker on the socket.
- Gently place the CPU into the socket without applying force.
- Lower the load lever to secure the CPU.

Figure 3.1: Top-down view of the motherboard, highlighting the AM4 CPU socket.
3.2. Memory (RAM) Installation
- Open the clips at both ends of the DIMM slots.
- Align the notch on the DDR4 memory module with the key in the DIMM slot.
- Press down firmly on both ends of the memory module until the clips snap into place.
- For dual-channel configuration, refer to the motherboard manual for recommended slot pairing.
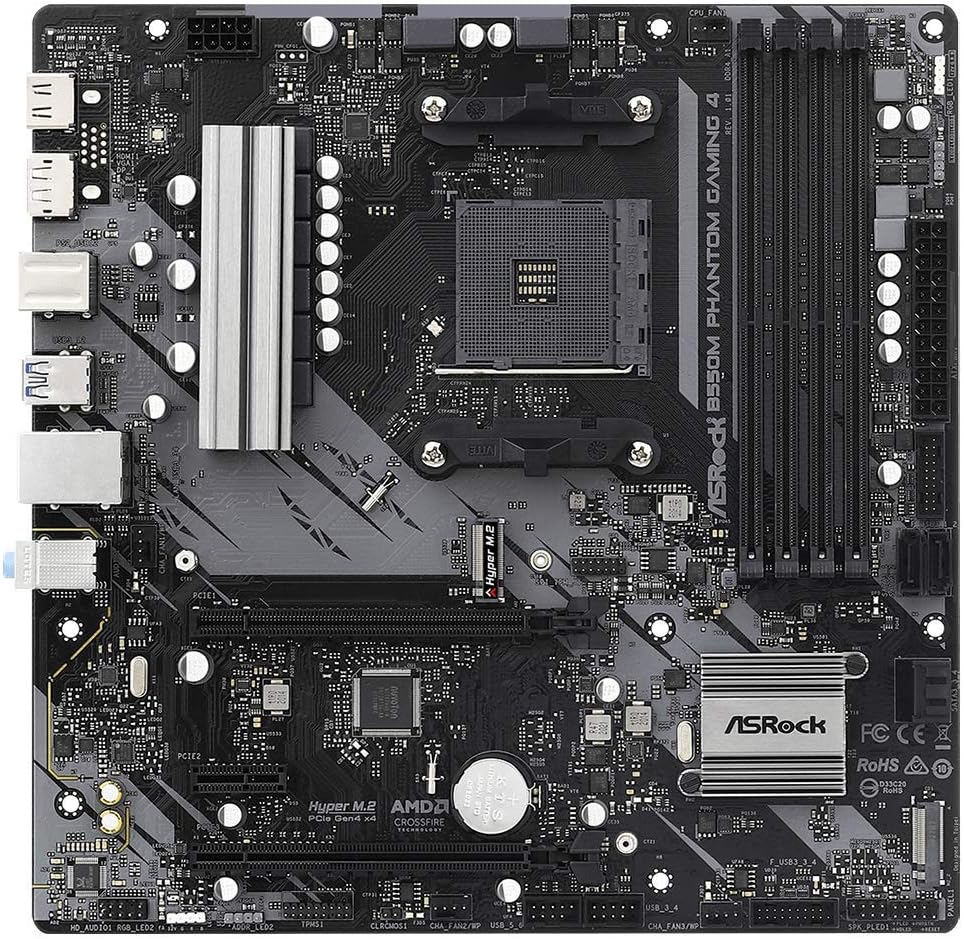
Figure 3.2: Close-up view of the DDR4 DIMM slots.
3.3. Storage Device Installation
M.2 SSD Installation:
- Locate the M.2 slots on the motherboard (Hyper M.2 and M.2).
- Remove the M.2 standoff screw.
- Insert the M.2 SSD into the slot at an angle.
- Gently push the SSD down and secure it with the standoff screw.

Figure 3.3: M.2 slots for high-speed storage devices.
SATA Drive Installation:
- Connect one end of the SATA data cable to a SATA3 port on the motherboard.
- Connect the other end of the SATA data cable to your SATA SSD/HDD.
- Connect a SATA power cable from your power supply unit (PSU) to the drive.
3.4. Expansion Card Installation (PCIe)
- Locate the PCIe slots. The primary graphics card should be installed in the PCIe 4.0 x16 slot for optimal performance.
- Remove the corresponding slot cover from your PC case.
- Align your expansion card with the PCIe slot and press down firmly until it is seated correctly.
- Secure the card with a screw to the PC case.
3.5. Connecting Peripherals
- Connect your monitor(s) to the graphics card or the motherboard's HDMI/DisplayPort if using an APU.
- Connect USB devices (keyboard, mouse, etc.) to the USB 3.2 Gen1 or USB 2.0 ports on the rear I/O panel.
- Connect your Ethernet cable to the LAN port for network access.
- Connect audio devices (speakers, headphones) to the appropriate audio jacks.
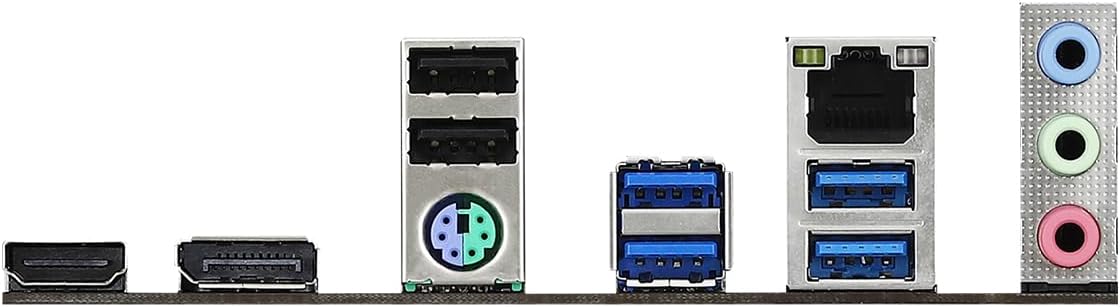
Figure 3.4: Rear I/O panel with various connectivity options.
4. Operating Instructions
4.1. BIOS/UEFI Setup
To enter the BIOS/UEFI setup utility, power on your system and repeatedly press the Del or F2 key during the Power-On Self-Test (POST) screen. From here, you can configure various system settings, including boot order, CPU/memory frequencies, and fan controls.
4.2. Drivers and Software
After installing your operating system, it is crucial to install the latest drivers for your motherboard components. These can typically be found on the ASRock official website under the support section for your specific motherboard model. Essential drivers include chipset drivers, audio drivers, LAN drivers, and any utility software provided by ASRock.
5. Maintenance
Regular maintenance helps ensure the longevity and stable operation of your motherboard and PC system.
- Dust Removal: Periodically clean dust from the motherboard and other components using compressed air. Ensure the system is powered off and unplugged before cleaning.
- BIOS Updates: Check the ASRock website for BIOS/UEFI updates. Updates can improve compatibility, stability, and performance. Follow the provided instructions carefully when updating the BIOS.
- Driver Updates: Keep your drivers updated to the latest versions to ensure compatibility and optimal performance with your operating system and applications.
6. Troubleshooting
If you encounter issues with your motherboard, consider the following basic troubleshooting steps:
- No Power: Ensure all power cables (24-pin ATX, 8-pin CPU) are securely connected to the motherboard and the power supply unit is switched on.
- No Display: Verify that your monitor is connected to the correct video output (graphics card or motherboard) and that all power cables to the graphics card are connected. Reseat the graphics card and RAM modules.
- System Instability/Crashes: Check for proper CPU and GPU cooling. Ensure RAM modules are correctly seated. Update drivers and BIOS.
- Component Not Detected: Verify that the component (e.g., M.2 SSD, SATA drive, PCIe card) is correctly installed and all necessary cables are connected. Check BIOS settings to ensure the component is enabled.
- Clear CMOS: If your system fails to boot after making BIOS changes, try clearing the CMOS. Refer to the motherboard layout diagram for the CLRCMOS jumper location or remove the CMOS battery for a few minutes.
7. Specifications
| Feature | Specification |
|---|---|
| Brand | ASRock |
| Model Name | B550M PHANTOM GAMING 4 |
| CPU Socket | Socket AM4 |
| Compatible Processors | AMD Ryzen 3000, 3000 G-Series, 4000 G-Series, 5000, 5000 G-Series Desktop Processors |
| Chipset Type | AMD B550 |
| RAM Memory Technology | DDR4 |
| Max RAM Capacity | 128 GB |
| Memory Speed (OC) | Up to 4733+ MHz |
| PCIe Slots | 1 x PCIe 4.0 x16, 1 x PCIe 3.0 x16, 1 x PCIe 3.0 x1 |
| Storage Interfaces | 4 x SATA3 6Gb/s, 1 x Hyper M.2 (PCIe Gen4 x4), 1 x M.2 (PCIe Gen3 x2 & SATA3) |
| USB 3.2 Gen1 Ports | 8 (4 Front, 4 Rear) |
| USB 2.0 Ports | 6 (4 Front, 2 Rear) |
| Graphics Output | HDMI, DisplayPort |
| Audio Codec | Realtek ALC887/897 Audio Codec (7.1 CH HD Audio) |
| Form Factor | Micro ATX |
| Dimensions (LxWxH) | 1.1 x 9.7 x 6.5 inches |
| Item Weight | 2.2 pounds |
8. Warranty and Support
ASRock provides a limited warranty for its motherboards. For specific warranty terms, conditions, and duration, please refer to the warranty card included with your product or visit the official ASRock website. For technical support, driver downloads, and BIOS updates, please visit the ASRock support page:


