1. Introduction
Thank you for purchasing the XTUGA ES602 Professional DJ Mixer. This manual provides essential information for the safe and efficient operation of your mixer. Please read it thoroughly before use and retain it for future reference.
The XTUGA ES602 is a versatile 7-channel mixing console designed for stage audio, DJ applications, and music production. It features XLR and LINE inputs, +48V phantom power, a built-in digital effect processor, USB/MP3 playback, and Bluetooth connectivity.
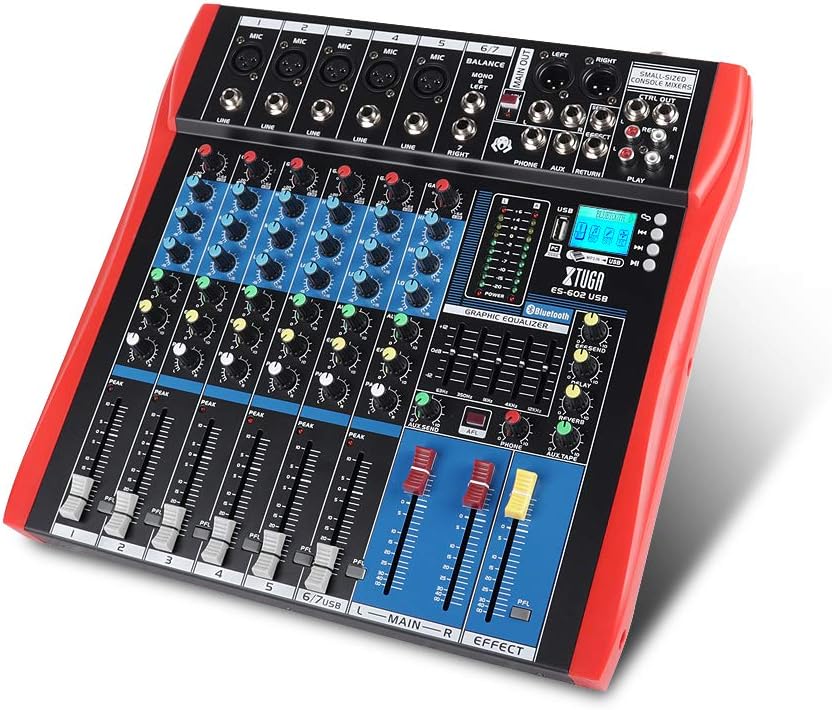
Figure 1: XTUGA ES602 Professional DJ Mixer overview. This image displays the top panel of the mixer, showing all input channels, control knobs, faders, and the master section with the USB/MP3/Bluetooth module.
2. Safety Instructions
- Power Supply: Use only the specified power adapter. Ensure the voltage matches your local power supply.
- Water and Moisture: Do not expose the unit to rain or moisture. Do not place objects filled with liquids on the unit.
- Ventilation: Ensure adequate ventilation. Do not block ventilation openings.
- Heat Sources: Keep the unit away from heat sources such as radiators, heat registers, stoves, or other heat-producing appliances.
- Cleaning: Clean only with a dry cloth. Avoid liquid cleaners.
- Servicing: Do not attempt to service this unit yourself. Refer all servicing to qualified service personnel.
- Phantom Power: When using condenser microphones, ensure +48V phantom power is activated only after connecting the microphone and before connecting to other devices to prevent damage.
3. Features
The XTUGA ES602 mixer offers a range of features for professional audio mixing:
- 7-Channel Mixing Console: Equipped with XLR and LINE inputs for versatile connectivity.
- +48V Phantom Power: Available for condenser microphones.
- Individual Channel Controls: Each channel features GAIN, 3-band EQ (HIGH, MID, LOW), AUX, EFFECT, PAN control knobs, and a volume fader.
- PFL (Pre-Fader Listen) Switch: Allows monitoring of individual channels via headphones.
- Built-in Digital Effect Processor: Includes REPEAT, EFF SEND, DELAY, SEND, and RETURN controls for integrated effects.
- USB/MP3 Playback and Recording: Direct USB input for MP3 playback from U-disk and recording capabilities.
- Bluetooth Connectivity: Seamlessly connect mobile phones, tablets, and other Bluetooth-enabled devices for audio playback.
- Main Outputs: XLR (L/R) and 1/4" (L/R) stereo output jacks.
- REC Output: Dedicated REC (L/R) output for external recording devices.
- Headset Interface: For monitoring audio.
- LED Indicators: Power and output level indicator lights for easy monitoring.
- Durable Design: Ultra-thin, all-metal chassis for high density dust resistance and durability.
4. Controls and Functions
This section details the various controls and connections on your XTUGA ES602 mixer.
4.1 Input Channels (Channels 1-7)
- MIC Input (XLR): Connects balanced microphones.
- LINE Input (1/4" Jack): Connects line-level instruments or devices.
- +48V PHANTOM Power Switch: Activates phantom power for condenser microphones on XLR inputs.
- GAIN Knob: Adjusts the input sensitivity for each channel.
- HIGH, MID, LOW EQ Knobs: 3-band equalizer for adjusting the treble, midrange, and bass frequencies of each channel.
- AUX Knob: Controls the send level to the auxiliary output.
- EFFECT Knob: Controls the send level to the internal effect processor.
- PAN Knob: Adjusts the stereo position (left/right) of the channel.
- PFL Switch: Engages Pre-Fader Listen for monitoring the channel's signal before the fader.
- PEAK LED: Illuminates when the input signal is too high, indicating potential clipping.
- Channel Fader: Adjusts the output volume of the individual channel.
4.2 Master Section
- MAIN OUT (XLR & 1/4" Jacks): Balanced stereo main outputs for connecting to amplifiers or powered speakers.
- REC OUT (RCA Jacks): Stereo output for connecting to recording devices.
- PHONES Jack (1/4"): Stereo headphone output for monitoring.
- AUX SEND/RETURN Jacks: For connecting external effects processors or monitoring systems.
- MAIN Faders (L/R): Controls the overall output volume of the mixer.
- EFFECT Level Knob: Adjusts the overall level of the internal effects.
- REPEAT, DELAY Knobs: Controls parameters of the digital effect processor.
- LEVEL Meter: LED display showing the main output level.

Figure 2: Detailed view of the XTUGA ES602 mixer's channel controls and LED level meters. This image highlights the individual channel knobs for GAIN, EQ, AUX, EFFECT, PAN, and the main output level indicators.
4.3 USB/MP3/Bluetooth Module
- USB Port: For connecting a USB flash drive for MP3 playback or connecting to a computer for recording/playback.
- LCD Display: Shows current mode, track information, and Bluetooth status.
- Control Buttons: Play/Pause, Stop, Previous/Next Track, Mode selection (USB/Bluetooth/PC).
- Bluetooth Indicator: Shows Bluetooth connection status.

Figure 3: Close-up of the Bluetooth and MP3 connection section on the XTUGA ES602 mixer. This image shows the USB port, LCD display, and control buttons for media playback and Bluetooth pairing.
5. Setup
Follow these steps to set up your XTUGA ES602 mixer.
5.1 Power Connection
- Ensure the mixer's power switch is in the OFF position.
- Connect the provided power adapter to the mixer's power input.
- Plug the power adapter into a suitable AC power outlet.
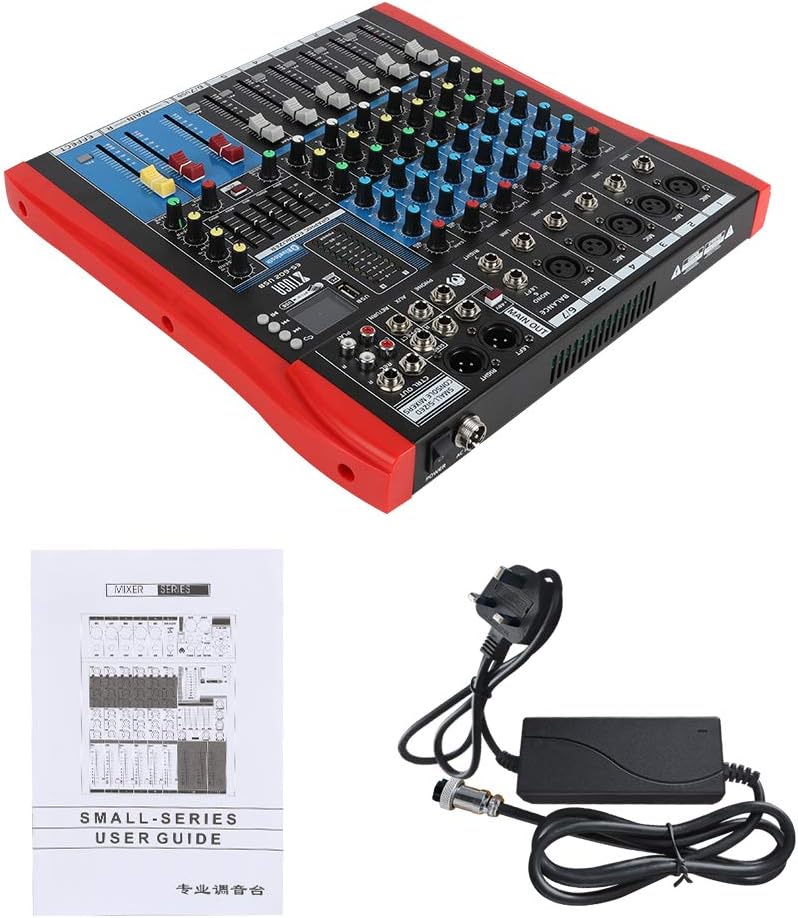
Figure 4: XTUGA ES602 mixer shown with its power adapter and user guide. This illustrates the components included for initial setup.
5.2 Connecting Microphones and Instruments
- For microphones, connect XLR cables to the MIC Input jacks. If using condenser microphones, activate the +48V PHANTOM Power Switch for the respective channel.
- For line-level instruments (keyboards, guitars with preamps, etc.), connect 1/4" TS/TRS cables to the LINE Input jacks.
- Ensure all channel GAIN knobs are set to their minimum position before connecting.
5.3 Connecting Output Devices
- Connect your main speakers or amplifier to the MAIN OUT (XLR or 1/4") jacks.
- For recording, connect an external recording device to the REC OUT (RCA) jacks.
- Plug headphones into the PHONES jack for monitoring.
5.4 Connecting to a Computer for Recording
- Connect a USB cable from the mixer's USB port to your computer.
- The mixer should be recognized as an audio device by your operating system.
- Select the mixer as the input device in your digital audio workstation (DAW) or recording software.
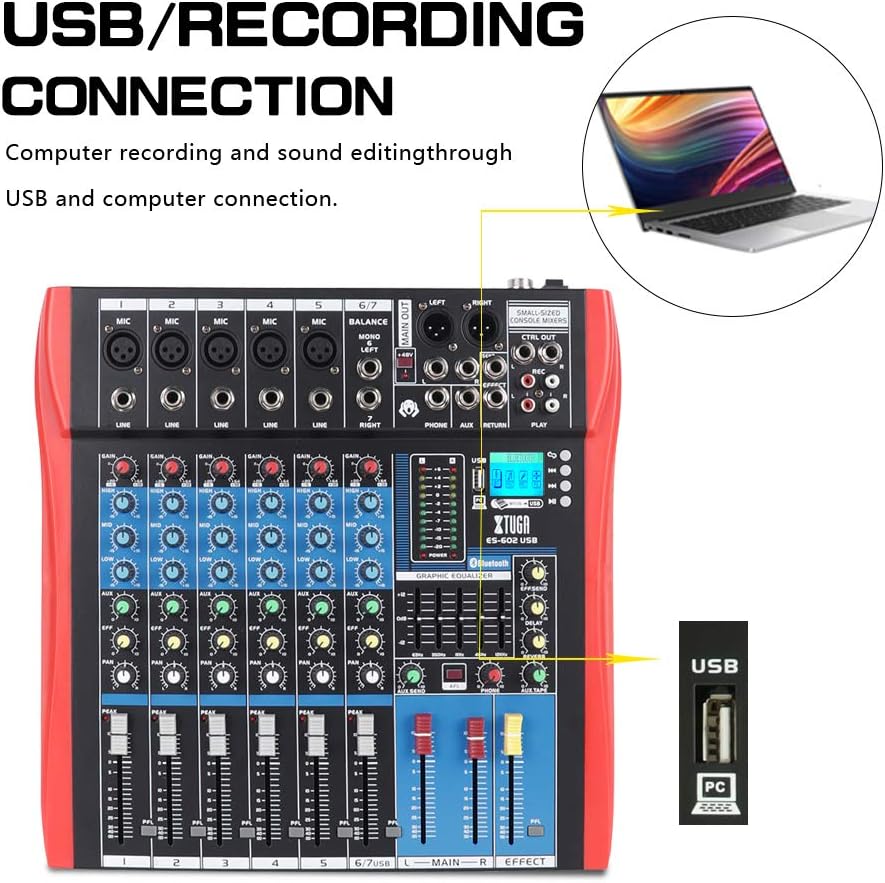
Figure 5: Illustration of the XTUGA ES602 mixer connected to a laptop via USB for recording and sound editing. This highlights the USB input port and its function.
6. Operating
This section covers the basic operation of your XTUGA ES602 mixer.
6.1 Powering On and Initial Level Setting
- After all connections are made, turn on your mixer's power switch.
- Slowly raise the MAIN Faders to a comfortable listening level.
- For each active input channel, gradually increase the GAIN knob until the PEAK LED flashes only occasionally during the loudest parts of the signal.
- Adjust individual Channel Faders to balance the mix.
6.2 Using Bluetooth
- Press the MODE button on the USB/MP3/Bluetooth module until "Bluetooth" appears on the LCD display. The Bluetooth indicator will flash.
- On your mobile device, search for Bluetooth devices and select "XTUGA MIXER" (or similar).
- Once paired, the Bluetooth indicator will become solid. You can now play audio from your device through the mixer.
- Use the module's control buttons for Play/Pause, Next/Previous track.
6.3 USB/MP3 Playback
- Insert a USB flash drive containing MP3 audio files into the USB port.
- The mixer should automatically switch to USB mode and begin playback. If not, press the MODE button to select USB.
- Use the control buttons to navigate tracks and control playback.
6.4 Recording
- To USB Drive: In USB/MP3 mode, press the REC button on the module to start recording the main mix to the connected USB drive. Press again to stop.
- To Computer: Ensure the mixer is connected to your computer via USB. Open your recording software and select the mixer as the input device. Start recording within your software.
6.5 Using Effects
- Adjust the EFFECT knob on individual channels to send a portion of that channel's signal to the internal effect processor.
- Use the EFFECT Level knob in the master section to control the overall volume of the applied effect.
- Adjust the REPEAT and DELAY knobs to fine-tune the characteristics of the digital effect.
7. Maintenance
Proper maintenance ensures the longevity and optimal performance of your mixer.
- Cleaning: Use a soft, dry cloth to clean the exterior of the mixer. Do not use abrasive cleaners, solvents, or waxes.
- Dust Protection: When not in use, cover the mixer to protect it from dust and debris.
- Storage: Store the mixer in a cool, dry place away from direct sunlight and extreme temperatures.
- Cable Management: Avoid bending or crimping cables excessively. Disconnect cables by pulling the plug, not the cable itself.
8. Troubleshooting
If you encounter issues with your mixer, refer to the following common problems and solutions.
- No Sound Output:
- Check if the mixer is powered on.
- Ensure all MAIN Faders and individual Channel Faders are raised.
- Verify that output cables are securely connected to your amplifier/speakers.
- Check the volume on your amplifier/speakers.
- No Input Signal:
- Ensure microphones/instruments are properly connected to the correct input jacks.
- Check if the GAIN knob for the respective channel is sufficiently turned up.
- If using a condenser microphone, ensure +48V PHANTOM Power is activated.
- Test input sources (microphones, instruments) with another device to confirm they are working.
- Distorted Sound:
- Reduce the GAIN knob for the offending channel if the PEAK LED is constantly lit.
- Lower the MAIN Faders if the output level meter is consistently in the red.
- Check for damaged cables.
- Bluetooth Connection Issues:
- Ensure the mixer is in Bluetooth mode (LCD shows "Bluetooth").
- Make sure your mobile device's Bluetooth is enabled and within range.
- Try unpairing and re-pairing the device.
- USB Playback Not Working:
- Ensure the USB drive is properly inserted and contains compatible MP3 files.
- Press the MODE button to ensure the mixer is in USB mode.
- Try a different USB drive.
9. Specifications
| Feature | Specification |
|---|---|
| Model Number | ES602 (also ES802/1202 series) |
| Number of Channels | 7 |
| Connectivity Technology | Auxiliary, Bluetooth, USB |
| Audio Input | Auxiliary, USB, XLR |
| Output Connector Type | Auxiliary, XLR |
| Power Source | Corded Electric |
| Item Weight | 3.59 kg |
| Product Dimensions | 46 x 46 x 14 cm |
| Manufacturer | XTUGA |
| UPC | 784124158754 |
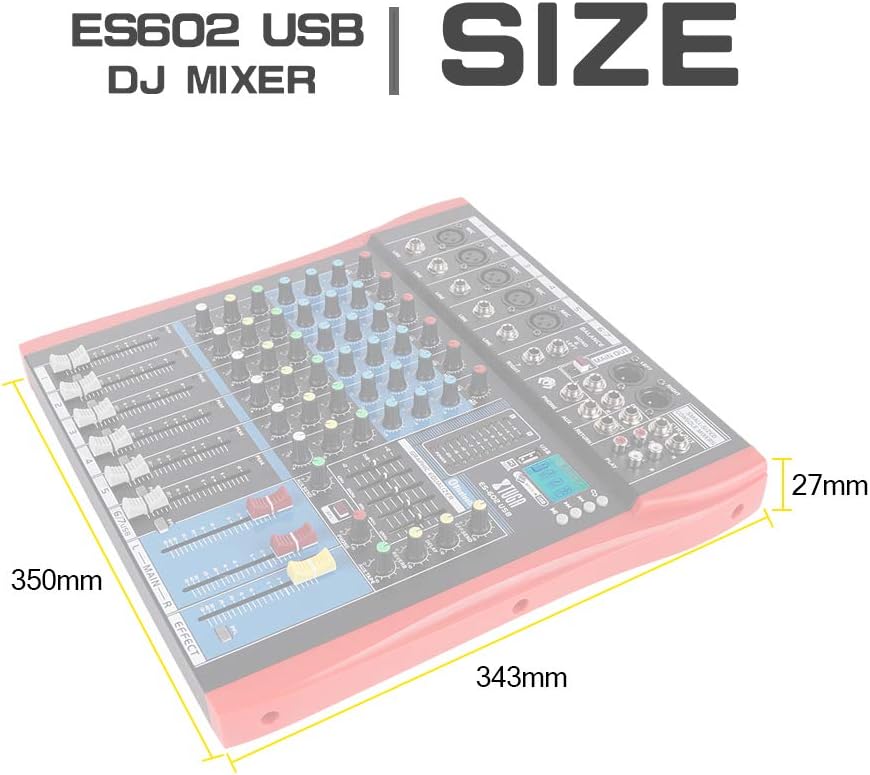
Figure 6: Dimensions of the XTUGA ES602 USB DJ Mixer, showing measurements of 350mm length, 343mm width, and 27mm height.
10. Warranty and Support
XTUGA products are designed for reliability and performance. For warranty information and technical support, please refer to the warranty card included with your product or visit the official XTUGA website. Keep your purchase receipt as proof of purchase for any warranty claims.


