1. Product Overview
The Weelko Hightech Professional Pressotherapy system is a digital device designed for professional use, featuring a touch screen display and four distinct working programs. This system is equipped with a comprehensive suit including boots, leggings, an abdominal band, and armrests, along with a cable blanket for organized storage. It is engineered to enhance circulation and aid in fat removal through lymphatic drainage activation.

Image 1.1: The Weelko Hightech Pressotherapy main unit with its various attachments, including leg, arm, and abdominal cuffs.
2. Included Components
The Weelko Hightech Pressotherapy system comes with the following components:
- Main Unit (1)
- Right Leg Cuff (1)
- Left Leg Cuff (1)
- Right Arm Cuff (1)
- Left Arm Cuff (1)
- Right Foot Cuff (1)
- Left Foot Cuff (1)
- Abdominal Cuff (1)
- Cable Blanket (1)
- Tubes (1 set)
- Power Cable (1)
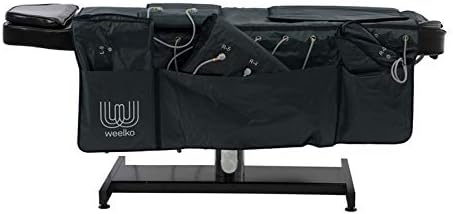
Image 2.1: The cable blanket provided for organizing and storing the system's tubes and cables.
3. Setup Instructions
Follow these steps to set up your pressotherapy system:
- Connect Power: Connect the power cable to the designated port on the rear panel of the main unit.
- Connect Tubes: Correctly connect the air tubes to the corresponding ports on the rear panel. Refer to the numerical instructions next to each port to ensure proper connection.
- Prepare Blanket: Place the cable blanket on a flat surface where the patient can comfortably lie down.
- Ensure Hygiene: Cover the blanket with disposable paper or a hygienic sheet to maintain optimal sanitary conditions for each use.
- Apply Suit: Carefully wrap the pressotherapy suit (composed of the chosen cuffs) around the user's body. Always ensure the user wears a disposable garment underneath the suit for hygiene.

Image 3.1: A user lying on the blanket with the pressotherapy suit applied, demonstrating proper setup for a session.
4. Operating Instructions
Once the system is set up, follow these steps to operate the device:
- Power On: Activate the power button located on the front panel of the main unit.
- Access Menu: Click on the Weelko logo displayed on the touch screen to access the main menu and select desired settings.
- Select Program (MODE): Navigate to the "MODE" menu. This allows you to choose from four available programs. It is recommended to begin with program 'C' and then select other programs based on the patient's specific needs.
- Adjust Intensity (LEVEL): Use the "LEVEL" menu to set the inflation intensity. There are 3 levels of intensity available. Adjust using the '+' and '-' buttons.
- Set Treatment Time (TIME): Use the "TIME" menu to adjust the duration of the treatment. The default treatment duration is 30 minutes.
- Start/Pause Treatment: Press the "PLAY / PAUSE" button to initiate or temporarily halt the pressotherapy treatment.
5. Maintenance
Proper maintenance ensures the longevity and optimal performance of your Weelko Pressotherapy system:
- Cleaning: After each use, wipe down the main unit and the exterior of the cuffs with a soft, damp cloth. Use a mild, non-abrasive disinfectant if necessary. Ensure all surfaces are dry before storage.
- Cuff Hygiene: Always use disposable liners or garments under the cuffs to maintain hygiene and prevent direct skin contact. Clean the interior of the cuffs periodically according to professional hygiene standards.
- Storage: Store the main unit and all components in a clean, dry place, away from direct sunlight and extreme temperatures. Utilize the provided cable blanket to neatly store tubes and cuffs.
- Tube Inspection: Regularly inspect the air tubes for any kinks, cracks, or damage. Replace damaged tubes immediately to ensure proper air pressure and function.
- Professional Servicing: For any complex issues or routine professional checks, contact authorized Weelko service centers.
6. Troubleshooting
If you encounter issues with your pressotherapy system, consider the following common solutions:
- No Power:
- Ensure the power cable is securely connected to both the unit and a working power outlet.
- Check if the power switch on the unit is in the 'ON' position.
- Verify the power outlet is functional by plugging in another device.
- Cuffs Not Inflating/Deflating Properly:
- Check all air tube connections to the main unit and to the cuffs. Ensure they are securely attached and not kinked.
- Inspect the tubes and cuffs for any visible damage or leaks.
- Verify that the selected program and intensity settings are appropriate.
- Touch Screen Unresponsive:
- Try restarting the unit by turning it off and then on again.
- Ensure the screen is clean and free of debris or moisture.
- Unusual Noises:
- A slight humming sound during operation is normal. If you hear loud or unusual noises, turn off the unit immediately and contact customer support.
If the problem persists after attempting these solutions, please contact Weelko customer support for assistance.
7. Technical Specifications
| Category | Specification |
|---|---|
| Model Number | 2418ef53-2aca-4897-b2c8-1fbe68f4aaf3 |
| Packaging Dimensions | 66 x 45 x 40 cm |
| Gross Weight | 18.5 kg |
| Product Dimensions | 34 x 38 x 15 cm |
| Working Power | 50 W |
| Air Pressure | 0 - 0.4 kg/cm² |
| Air Flow | 0.40 L/min |
| Air Pressure Rhythm | 0 - 15 s |
| Air Channels | 10 (20 bags) |
| Rated Voltage | 220 V ~ 240 V |
| Frequency | 50Hz / 60Hz |
| Rated Power | 50 W |
8. Warranty and Support
For information regarding product warranty, returns, or technical support, please refer to the documentation provided with your purchase or contact Weelko customer service directly. Ensure you have your model number (2418ef53-2aca-4897-b2c8-1fbe68f4aaf3) and purchase details ready when contacting support.
For further assistance, please visit the official Weelko website or contact your local distributor.


