
1. Introduction
This manual provides detailed instructions for the installation, setup, and operation of your EMOS P5606OT Wired Digital Programmable OpenTherm Room Thermostat. This device is designed for intelligent and time-dependent control of heating systems in various residential and commercial environments. Please read this manual thoroughly before installation and use to ensure proper function and safety.
2. Safety Information
- Professional Installation: Installation of this thermostat involves electrical wiring. It is strongly recommended that installation be performed by a qualified electrician or heating technician to prevent electric shock or damage to the device and heating system.
- Power Disconnection: Always disconnect power to the heating system at the main circuit breaker before performing any wiring or maintenance.
- Voltage: This device can switch 230 V AC. Ensure all connections are secure and insulated.
- Battery Handling: Use only specified AA batteries. Do not mix old and new batteries or different types of batteries. Dispose of used batteries according to local regulations.
- Operating Environment: Do not expose the thermostat to extreme temperatures, humidity, or direct sunlight.
3. Package Contents
Verify that all items are present in the package:
- 1x EMOS P5606OT Digital Room Thermostat
- 2x AA Batteries
- Mounting screws and wall plugs
- User Manual (may be in German; refer to this English guide)
4. Product Overview
The EMOS P5606OT thermostat features a clear, backlit digital display and intuitive controls for managing your heating system.

Figure 4.1: Front view of the EMOS P5606OT thermostat, showing the digital display with current time, room temperature, and set temperature. The display also indicates heating status (flame icon) and manual mode (MAN).
Key Features:
- Digital Display: Large, backlit display showing time, actual room temperature, and set temperature.
- OpenTherm Compatibility: Supports the OpenTherm communication protocol for efficient boiler control.
- Programmable: User-adjustable time programming with up to 6 temperature changes per day.
- Operating Modes: Manual, Program, Holiday, and ON/OFF modes.
- Frost Protection: Automatically activates heating if the temperature drops too low to prevent freezing.
- Temperature Calibration: Allows adjustment of the displayed temperature for accuracy.
- Thermostat Lock: Prevents unauthorized changes to settings.
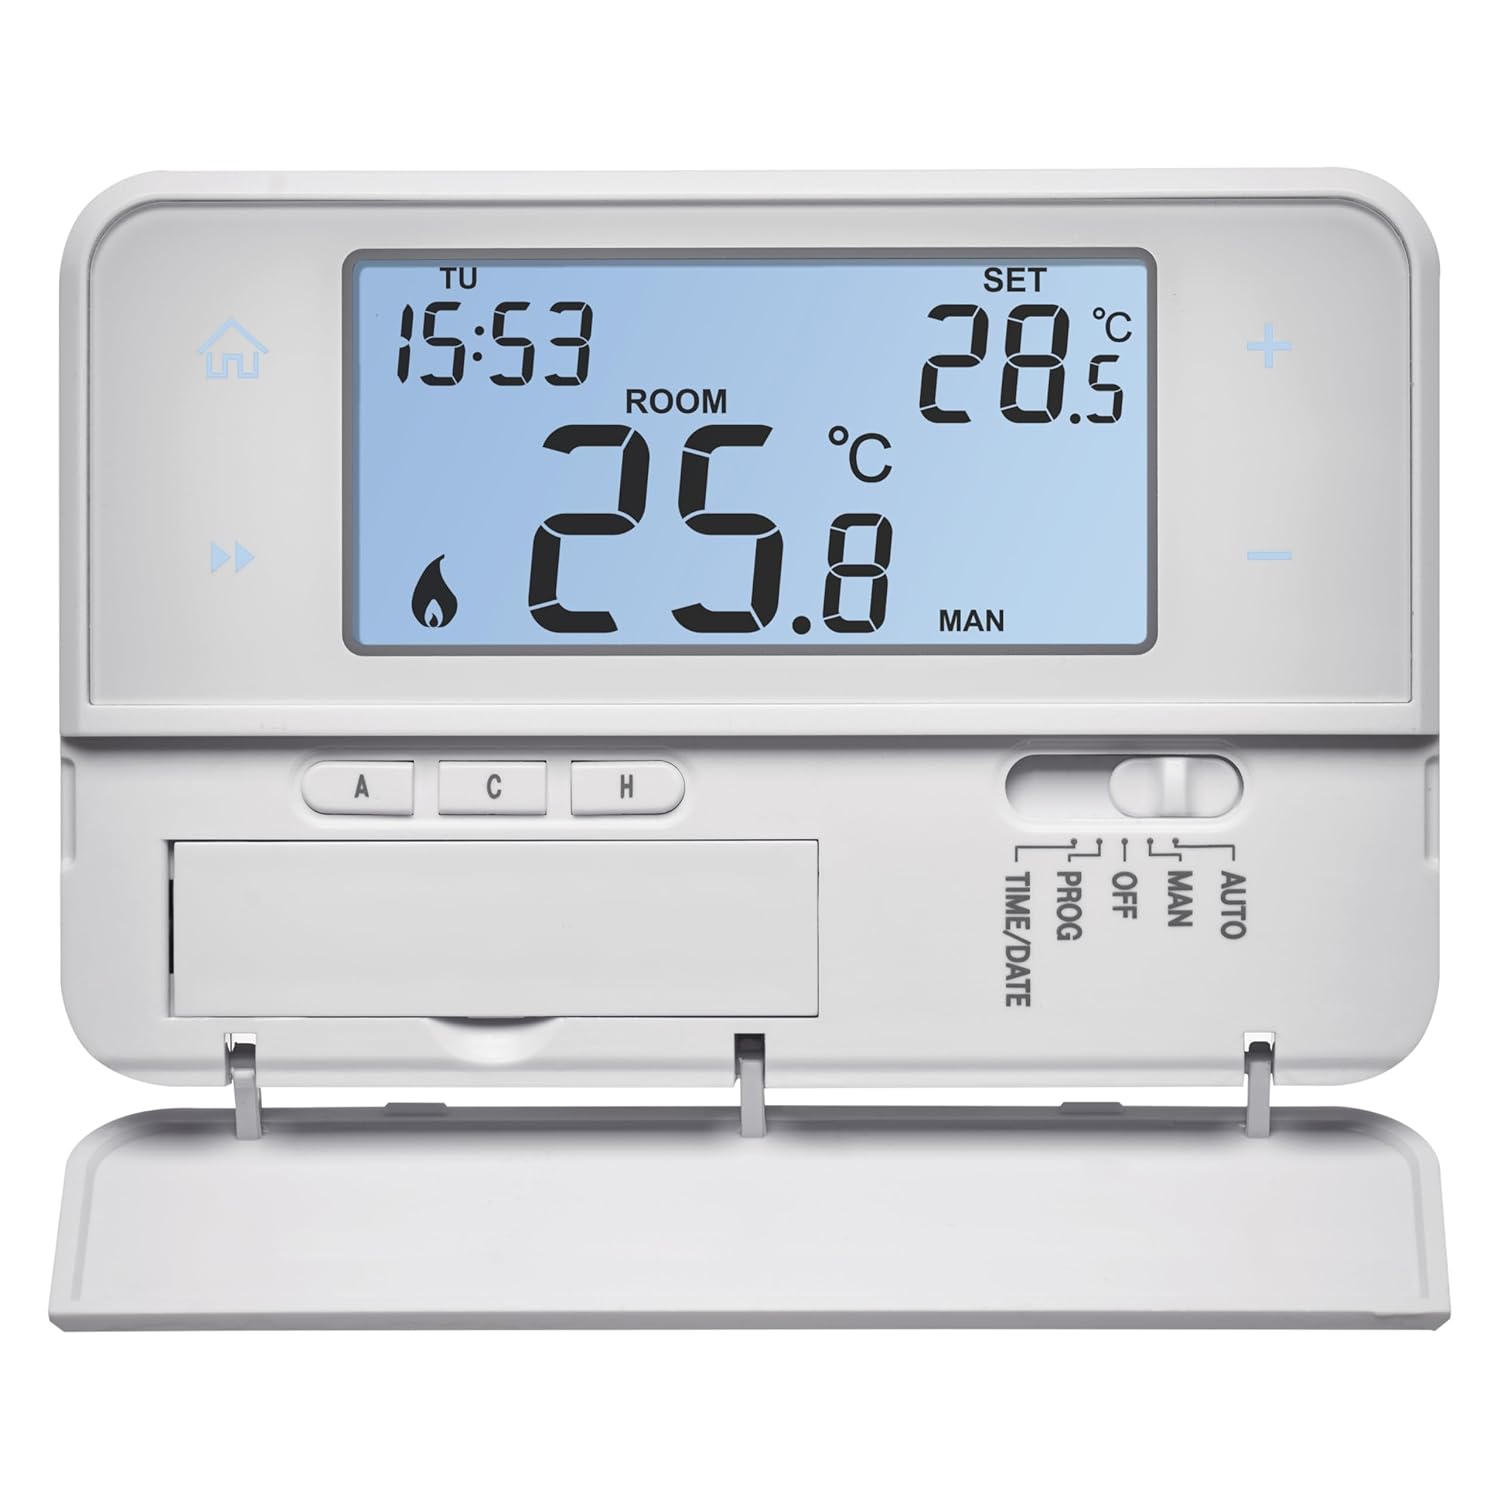
Figure 4.2: The thermostat with its front flap open, revealing the control buttons for programming and mode selection. These buttons include 'A', 'C', 'H', and a slider for 'PROG', 'OFF', 'MAN', 'AUTO', 'TIME/DATE'.
5. Installation
Important: Installation should be carried out by a qualified professional. Ensure power is disconnected before proceeding.
5.1 Mounting Location
Choose a suitable location on an interior wall, away from direct sunlight, drafts, heat sources (e.g., radiators, lamps), and windows. The recommended height is approximately 1.5 meters (5 feet) from the floor.
5.2 Wiring
- Disconnect Power: Turn off the main power supply to your heating system at the circuit breaker.
- Remove Front Cover: Carefully detach the front cover of the thermostat to access the wiring terminals.
- Connect Wires: Refer to the wiring diagram below and connect the wires from your heating system to the appropriate terminals on the thermostat.
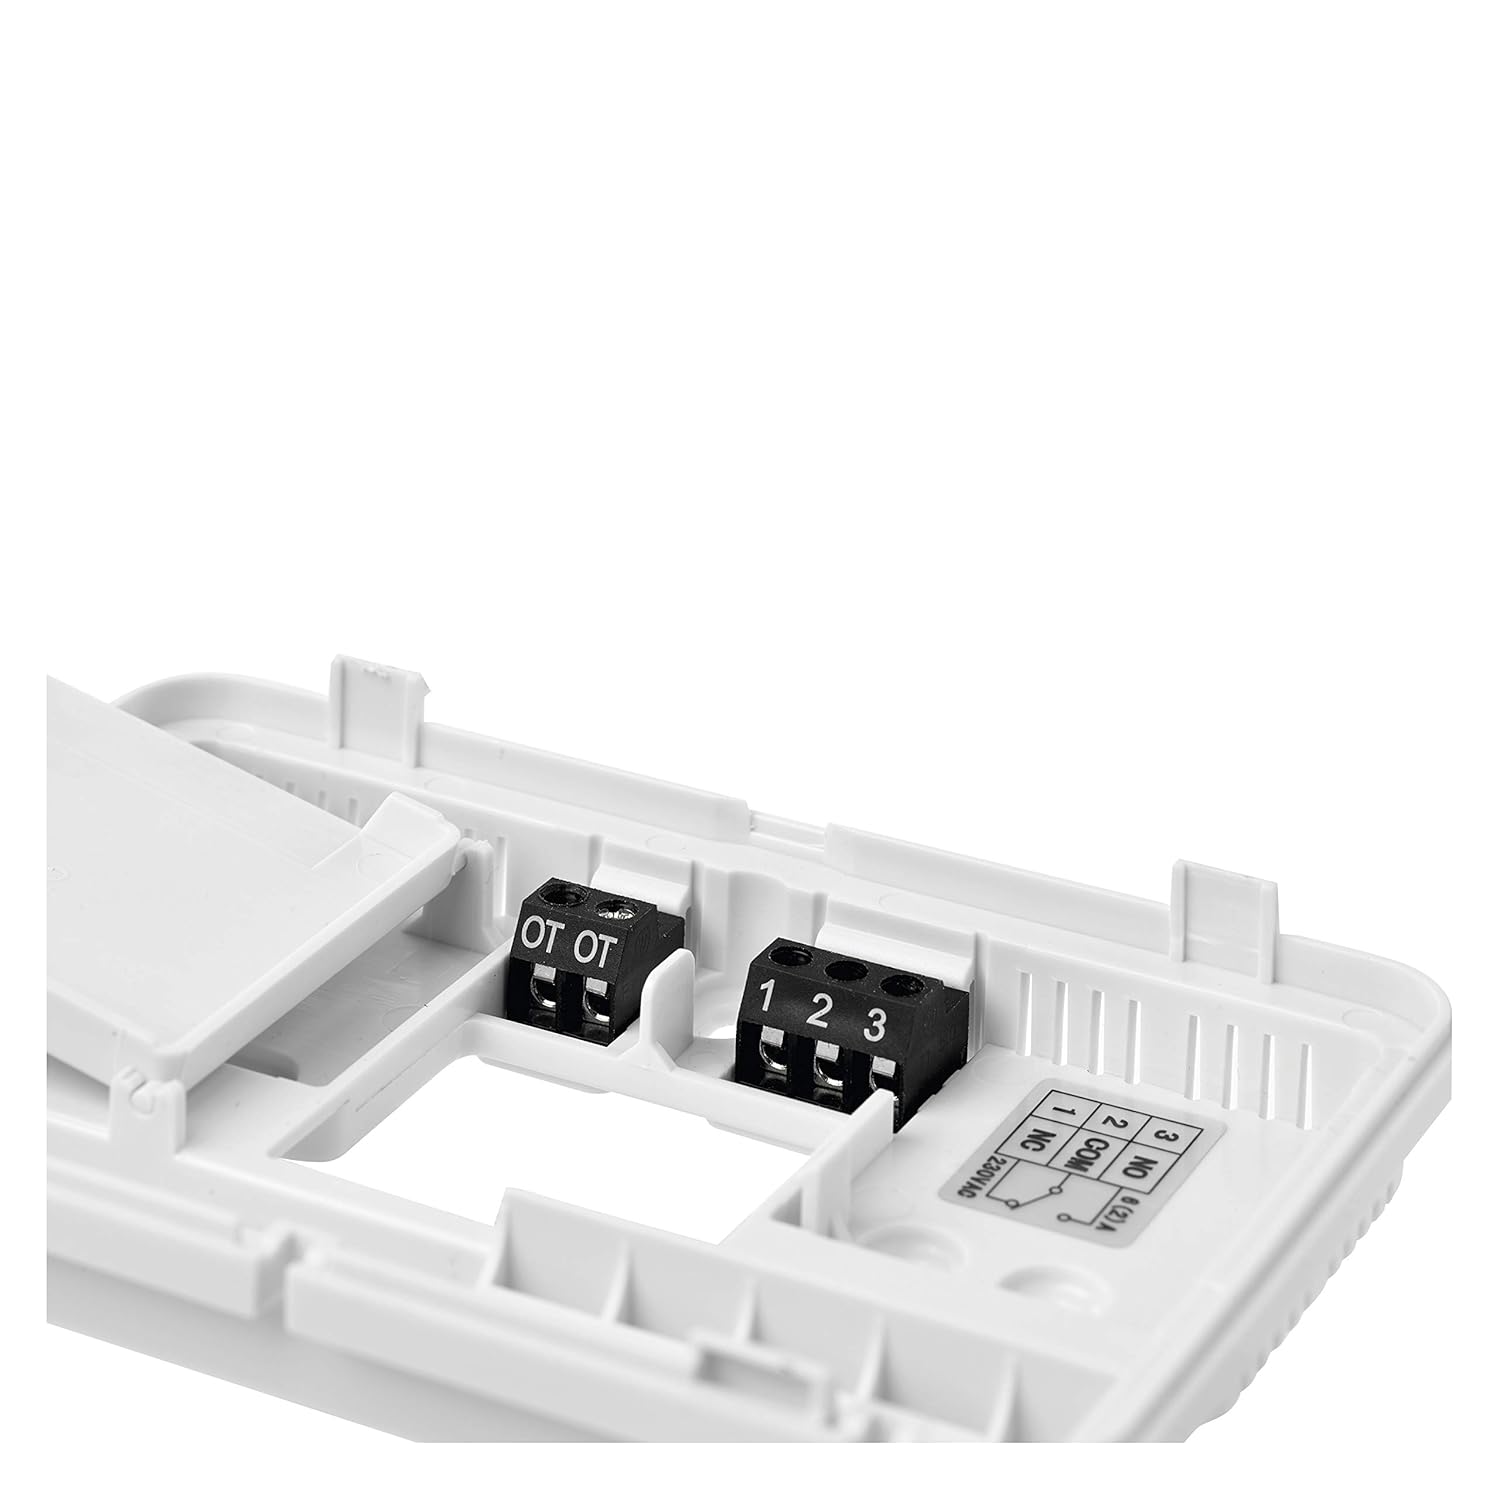
Figure 5.1: Close-up view of the wiring terminals. The 'OT OT' terminals are for OpenTherm connections. Terminals '1', '2', '3' are for standard switching relays (e.g., 230V AC or potential-free). Terminal '1' is NO (Normally Open), '2' is COM (Common), '3' is NC (Normally Closed). For most heating systems, you will use COM and NO.
- OpenTherm Connection: Connect the two OpenTherm wires from your boiler to the 'OT OT' terminals. Polarity typically does not matter for OpenTherm.
- Standard Relay Connection (if not using OpenTherm): Connect the common wire from your heating system to terminal '2' (COM). Connect the switched live wire (for heating activation) to terminal '1' (NO - Normally Open). If your system requires a Normally Closed contact, use terminal '3' (NC).
- Power Supply: The thermostat is battery-powered (2x AA batteries). Ensure batteries are inserted correctly.
- Secure Thermostat: Mount the backplate of the thermostat to the wall using the provided screws and wall plugs.
- Attach Front Cover: Carefully reattach the front cover to the backplate, ensuring it clicks securely into place.
- Restore Power: Turn the main power supply back on at the circuit breaker.
6. Initial Setup
After installation and power-up, the thermostat will require initial configuration.
6.1 Setting Time and Date
- Slide the mode switch to 'TIME/DATE'.
- Use the '+' and '-' buttons to adjust the year, month, day, hour, and minute. Press 'A' (or a similar confirmation button) to confirm each setting and move to the next.
- Once time and date are set, slide the mode switch to 'AUTO' or 'MAN' to exit.
6.2 Temperature Calibration (Optional)
If you believe the displayed temperature is inaccurate, you can calibrate it:
- Access the calibration menu (refer to the detailed product manual for specific button combinations, often involves holding a button for several seconds).
- Use '+' and '-' buttons to adjust the temperature offset.
- Confirm the setting.
7. Operating Instructions
The thermostat offers several operating modes to suit your needs.
7.1 Mode Selection
Use the slider switch on the thermostat to select one of the following modes:
- PROG (Program Mode): The thermostat follows the pre-set weekly heating schedule.
- OFF: The heating system is turned off. Frost protection may still be active depending on settings.
- MAN (Manual Mode): The thermostat maintains a constant temperature set by the user, overriding any programmed schedule.
- AUTO: Similar to PROG, but may offer additional automatic adjustments based on internal logic.
7.2 Setting Temperature in Manual Mode
- Slide the mode switch to 'MAN'.
- Use the '+' and '-' buttons to adjust the desired temperature. The thermostat will maintain this temperature until the mode is changed.
7.3 Programming a Schedule (PROG Mode)
The thermostat allows for up to 6 temperature changes per day. The programming steps are generally as follows:
- Slide the mode switch to 'PROG'.
- Press the 'A' button (or similar) to enter programming mode.
- The display will show the day of the week and the first time period. Use '+' and '-' to set the start time and desired temperature for this period.
- Press 'A' to confirm and move to the next time period.
- Repeat for all 6 time periods for the current day.
- After setting all periods for one day, the thermostat will typically move to the next day. Repeat the process for all days of the week (Monday-Sunday or weekdays/weekends).
- Exit programming mode by sliding the switch to 'AUTO' or 'MAN', or by waiting for a timeout.
7.4 Holiday Mode
Holiday mode allows you to set a specific temperature for a defined period (e.g., when you are away). Refer to the detailed product manual for activation steps, which usually involve setting a duration and a target temperature.
7.5 Thermostat Lock Function
This feature prevents unauthorized changes. Consult the full manual for instructions on how to activate and deactivate the lock function, typically by holding down a combination of buttons.
8. Maintenance
8.1 Battery Replacement
When the battery low indicator appears on the display, replace the batteries promptly. The thermostat uses 2x AA batteries.
- Carefully open the battery compartment, usually located on the front or bottom of the thermostat.
- Remove the old batteries.
- Insert new AA batteries, ensuring correct polarity (+/-).
- Close the battery compartment. Your settings should be retained during battery replacement.
8.2 Cleaning
Clean the thermostat with a soft, dry cloth. Do not use abrasive cleaners, solvents, or spray directly onto the device.
9. Troubleshooting
If you encounter issues with your thermostat, try the following solutions:
- No Display: Check if batteries are inserted correctly and are not depleted. Replace batteries if necessary.
- Heating Not Activating:
- Ensure the thermostat is in 'PROG' or 'MAN' mode and the set temperature is above the current room temperature.
- Check the wiring connections to the boiler.
- Verify the boiler is powered on and functioning correctly.
- Incorrect Temperature Reading: Perform a temperature calibration as described in Section 6.2. Ensure the thermostat is not exposed to drafts or direct heat sources.
- Thermostat Not Responding: Remove batteries, wait for 1 minute, then reinsert them to perform a soft reset. If issues persist, consult a professional.
10. Specifications
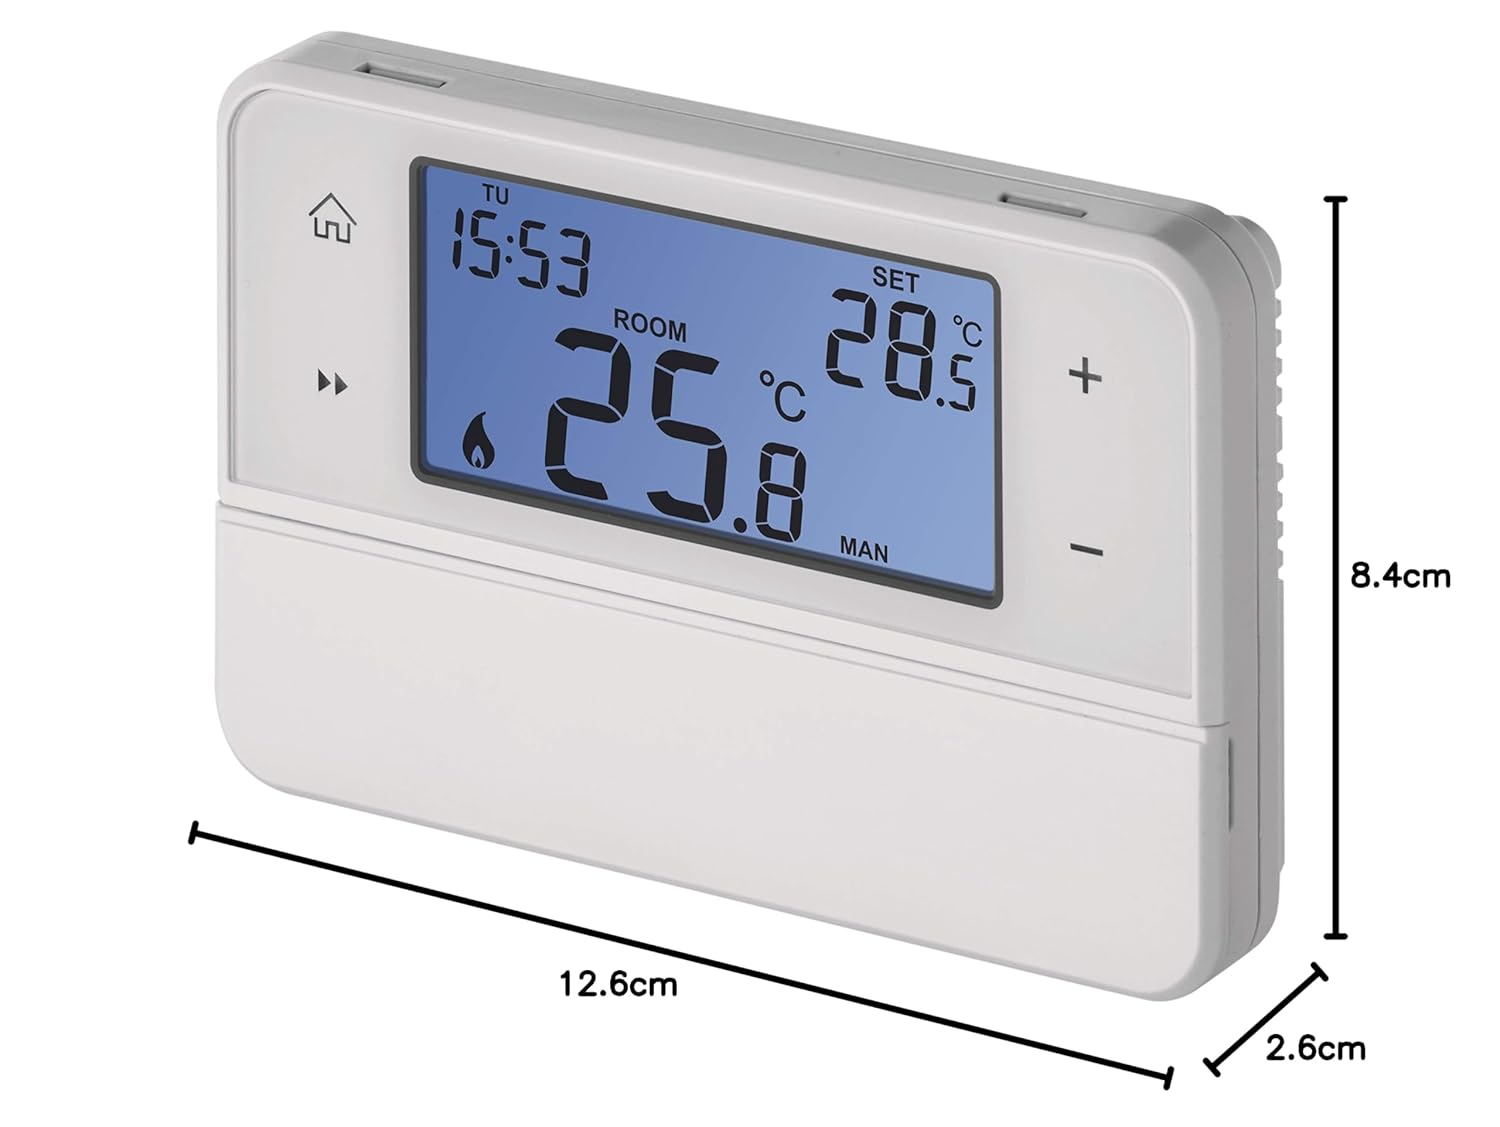
Figure 10.1: Dimensions of the EMOS P5606OT thermostat: 12.6 cm (width) x 8.4 cm (height) x 2.6 cm (depth).
| Feature | Specification |
|---|---|
| Model Number | P5606OT |
| Dimensions (L x W x H) | 12.6 x 8.4 x 2.6 cm |
| Weight | 220 g |
| Power Supply | 2x AA Batteries |
| Switching Current | 6 (2) A |
| Switching Voltage | 230 V AC or Potential-free |
| Temperature Control Type | Programmable |
| Connectivity | Wired (OpenTherm compatible) |
| Color | White |
11. Warranty and Support
For warranty information, please refer to the documentation provided at the time of purchase or contact your retailer. For technical support, please visit the official EMOS website or contact their customer service department.


