Introduction
Thank you for choosing the Homdox Digital Security Safe. This manual provides essential information for the proper setup, operation, and maintenance of your safe. Please read it thoroughly before use and retain it for future reference.

Image: The Homdox Digital Security Safe, featuring a keypad and key lock, positioned on a desk next to a plant and a mug.
The Homdox Digital Security Safe is designed to protect your valuables such as cash, jewelry, documents, passports, and heirlooms. It features a double deadbolt electronic lock with a 3-8 digit programmable password and an emergency key override for reliable security.

Image: An illustration showing the types of items that can be securely stored in the Homdox safe, including a diamond ring, gold bars, camera lens, cash, and documents.
Safety Information
- Do not store emergency keys inside the safe. Keep them in a secure, separate location.
- This safe is designed for security against theft, not fire or water.
- Keep the safe out of reach of children to prevent unauthorized access.
- Ensure the safe is mounted securely if intended for permanent installation.
Package Contents
Verify that all components are present:
- 1 x Homdox Digital Security Safe
- 2 x Emergency Override Keys
- 2 x Expansion Screws (for mounting)
- 1 x User Manual
- 4 x AA Batteries (may not be included, check packaging)
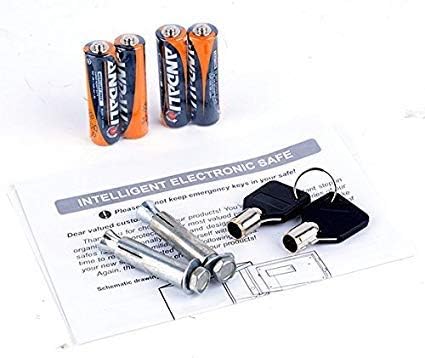
Image: Contents of the safe package, showing two emergency keys, two expansion screws, and four AA batteries, alongside a user manual.
Setup
1. Initial Opening and Battery Installation
- Locate the emergency keyhole, usually hidden behind the keypad cover or a small plate.
- Insert one of the emergency keys and turn it clockwise while simultaneously turning the knob to open the safe door.
- Open the battery compartment located on the inside of the safe door.
- Insert 4 AA batteries, ensuring correct polarity (+/-).
- Close the battery compartment.
2. Setting Your Personal Code
- With the safe door open, press the red reset button located on the inside of the door, near the hinge. You will hear a beep.
- Within 5 seconds, enter your desired 3 to 8 digit code on the keypad.
- Press the "A" or "#" button to confirm your new code. The safe will beep again to confirm.
- Test your new code with the door open before closing it. Enter your code, then turn the knob to ensure it locks and unlocks correctly.
3. Mounting the Safe (Optional)
The safe can be mounted to a wall or floor for added security.
- Choose a suitable location. Ensure there are no electrical wires or pipes behind the drilling area if mounting to a wall.
- Open the safe door and locate the pre-drilled mounting holes on the back or bottom of the safe.
- Place the safe in the desired position and mark the drilling points through the holes.
- Drill pilot holes using an appropriate drill bit for your wall or floor material.
- Align the safe with the drilled holes and secure it using the provided expansion screws or other suitable fasteners.

Image: Rear view of the Homdox Digital Security Safe, highlighting the pre-drilled holes for wall or floor mounting.

Image: The Homdox Digital Security Safe securely installed on a shelf above a bedside table in a bedroom setting.
Operating Instructions
Opening the Safe with Your Code
- Enter your 3 to 8 digit personal code.
- Press the "A" or "#" button.
- If the code is correct, a green light will illuminate, and you will hear a beep.
- Within 5 seconds, turn the knob clockwise to open the safe door.
Closing and Locking the Safe
- Close the safe door firmly.
- Turn the knob counter-clockwise to lock the safe.
Using the Emergency Override Key
In case of forgotten code or dead batteries, the safe can be opened using the emergency key.
- Locate the emergency keyhole.
- Insert the emergency key and turn it clockwise.
- While holding the key turned, rotate the knob to open the safe door.
- Once open, you can replace batteries or reset the code.
Maintenance
Battery Replacement
When the batteries are low, the red light on the keypad may flash or the safe may not respond. Replace all four AA batteries promptly.
- Open the safe door (using your code or emergency key).
- Open the battery compartment on the inside of the door.
- Remove the old batteries and insert new 4 AA batteries, observing correct polarity.
- Close the battery compartment.
Cleaning
Wipe the safe's exterior with a soft, damp cloth. Avoid abrasive cleaners or solvents that could damage the finish or electronic components.
Troubleshooting
| Problem | Possible Cause | Solution |
|---|---|---|
| Safe does not open with code. | Incorrect code entered. Batteries are low or dead. | Re-enter the code carefully. Replace batteries or use the emergency key. |
| Keypad does not respond. | Batteries are completely dead. | Use the emergency key to open the safe and replace the batteries. |
| Door does not lock. | Obstruction in the door frame. Locking mechanism issue. | Check for any items blocking the door. Ensure the knob is fully turned counter-clockwise. If problem persists, contact support. |
| Forgotten code. | Code was not recorded or remembered. | Use the emergency key to open the safe, then reset the code following the "Setting Your Personal Code" instructions. |
Specifications
| Brand | Homdox |
| Model Number | CS-0385 |
| Material | Alloy Steel |
| External Dimensions (D x W x H) | 6.7" x 9" x 6.7" |
| Internal Dimensions (W x D x H) | 8.6" x 6.4" x 6.4" |
| Item Weight | 6.78 pounds |
| Lock Type | Digital Keypad with Emergency Key |
| Mounting Type | Floor Mount, Wall Mount |
| Power Source | 4 x AA Batteries (not included) |
| Alarm | Anti-theft |
| Water Resistance Level | Not Water Resistant |

Image: A visual diagram illustrating the safe's dimensions. External measurements shown are approximately 8.9" (22.5cm) wide, 6.7" (17cm) high, and 6.7" (17cm) deep. Internal measurements shown are approximately 8.2" (21cm) wide and 6.4" (16.5cm) high.
Warranty and Support
For warranty information or technical support, please refer to the contact details provided with your purchase documentation or visit the official Homdox website. Please have your model number (CS-0385) and purchase date available when contacting support.


