
1. Introduction
This manual provides detailed instructions for the safe and efficient operation of your Yaesu FTM-300DE Dual-Band Digital and Analog Transceiver. Please read this manual thoroughly before using the device to ensure proper functionality and to prevent damage. Keep this manual for future reference.
2. Safety Information
- Power Supply: Use only the specified 12V DC power supply. Incorrect voltage can damage the unit and pose a fire hazard.
- Antenna: Connect a suitable antenna before transmitting. Transmitting without an antenna or with a mismatched antenna can damage the transceiver.
- Location: Install the transceiver in a well-ventilated area, away from direct sunlight, excessive heat, moisture, and dust. Ensure it is not near flammable materials.
- Water Resistance: This device is not waterproof. Avoid exposure to rain, splashes, or high humidity.
- Servicing: Do not attempt to open or repair the unit yourself. Refer all servicing to qualified Yaesu technicians.
- RF Exposure: Observe all applicable regulations regarding RF exposure. Maintain a safe distance from the antenna during transmission.
3. Package Contents
Verify that your package contains the following items:
- Yaesu FTM-300DE Transceiver Unit
- Hand Microphone
- Power Cable with Fuse
- Mounting Bracket
- User Manual (this document)
4. Product Overview
The Yaesu FTM-300DE is a high-performance dual-band transceiver designed for amateur radio enthusiasts. It supports both digital C4FM and traditional analog FM modes across VHF (144-146 MHz) and UHF (430-440 MHz) bands.
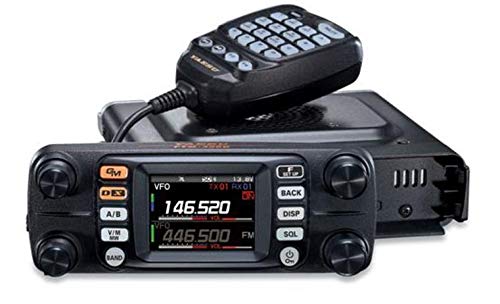
Figure 1: Front view of the Yaesu FTM-300DE Transceiver, showing the 2-inch QVGA full-color TFT display and primary control buttons.
Key Features:
- Dual-Band Operation: Independent receivers for simultaneous V+V, U+U, V+U, U+V operation.
- C4FM Digital Mode: Advanced digital communication with AMS (Automatic Mode Select) and DG-ID (Digital Group ID).
- High-Resolution Display: 2-inch QVGA full-color TFT display with Band Scope function for real-time frequency monitoring.
- Bluetooth Connectivity: Built-in Bluetooth for hands-free operation with optional Yaesu SSM-BT10 headset.
- Powerful Audio: 3W audio output from the internal speaker, with dual external speaker jacks.
- Robust Design: FACC (Funnel Air-Convection Conductor) heatsink for stable 50W RF power output.
- Memory Management: Automatic Memory Band Grouping (MBAG) for organized channel recall.
- WiRES-X Support: Compatible with WiRES-X Portable Digital Node and Fixed Node functions (requires HRI-200).
5. Setup
5.1 Mounting the Transceiver
Use the supplied mounting bracket to securely install the FTM-300DE in your vehicle or desired location. Ensure adequate ventilation around the unit.
5.2 Antenna Connection
Connect a suitable VHF/UHF dual-band antenna to the antenna connector on the rear panel. Ensure the connection is tight and secure. Never transmit without an antenna connected.
5.3 Power Connection
- Connect the supplied DC power cable to the power input jack on the rear of the transceiver.
- Connect the other end of the power cable to a stable 12V DC power source (e.g., vehicle battery or regulated power supply). Ensure correct polarity (red to positive, black to negative).
- The power cable includes an inline fuse for protection. Do not bypass or replace with an incorrect fuse rating.
5.4 Microphone Connection
Plug the hand microphone into the microphone jack on the front panel of the transceiver.
5.5 Initial Power On
Press and hold the POWER button to turn on the transceiver. The display will illuminate, and the unit will perform a self-test.
6. Operating Instructions
6.1 Basic Operation
- Volume Control: Use the VOL knob to adjust the audio output level.
- Frequency Selection: Use the main DIAL knob to change the operating frequency. Press the BAND button to switch between VFO A and VFO B.
- Mode Selection: Press the MODE button to cycle through available modes (e.g., FM, C4FM Digital).
- Transmit: Press the PTT (Push-To-Talk) button on the microphone to transmit. Release to receive.
6.2 C4FM Digital Operation
The FTM-300DE supports Yaesu's C4FM digital mode for clear voice and data communication.
- AMS (Automatic Mode Select): When enabled, the transceiver automatically detects whether an incoming signal is C4FM digital or analog FM and switches to the appropriate mode.
- DG-ID (Digital Group ID): Use DG-ID to communicate with specific groups of users. Set a matching DG-ID number on both transmitting and receiving radios.
6.3 Memory Channels
Store frequently used frequencies and settings into memory channels for quick recall.
- Storing a Channel: Tune to the desired frequency and settings, then follow the menu instructions to save it to a memory channel.
- Recalling a Channel: Press the MEM button to enter memory mode, then use the DIAL knob to select a channel.
- MBAG (Memory Band Grouping): Memory channels are automatically grouped into categories like Airband, VHF, UHF, and General for easier navigation.
6.4 Bluetooth Operation
The built-in Bluetooth allows for hands-free operation with compatible headsets, such as the Yaesu SSM-BT10.
- Pairing: Access the Bluetooth menu in the transceiver settings. Put your Bluetooth headset into pairing mode and select it from the FTM-300DE's list of discoverable devices.
- VOX/PTT: Once paired, you can use VOX (Voice Operated Transmit) or the PTT button on your Bluetooth headset for transmission.
6.5 WiRES-X Functionality
The FTM-300DE supports WiRES-X for internet-linked communication. This requires an optional HRI-200 interface unit.
- Portable Digital Node: Connect the FTM-300DE to a computer with the HRI-200 to create a portable WiRES-X node.
- Fixed Node: For permanent installations, the FTM-300DE can function as a fixed WiRES-X node.
- Simultaneous Monitoring: You can monitor a local channel on one VFO while engaging in WiRES-X communications on the other VFO.
7. Maintenance
- Cleaning: Use a soft, dry cloth to clean the exterior of the transceiver. For stubborn dirt, dampen the cloth slightly with water. Do not use abrasive cleaners or solvents.
- Display Care: The display is a sensitive component. Avoid pressing it with sharp objects. Clean with a soft, lint-free cloth.
- Fuse Replacement: If the transceiver does not power on, check the fuse in the power cable. Replace it only with a fuse of the same type and rating.
- Storage: When not in use for extended periods, disconnect the power cable and store the transceiver in a cool, dry place.
8. Troubleshooting
| Problem | Possible Cause | Solution |
|---|---|---|
| No power | Power cable disconnected; Blown fuse; Incorrect voltage. | Check power cable connections; Replace fuse; Verify 12V DC power source. |
| Cannot transmit | Antenna not connected; High SWR; Incorrect frequency/mode. | Connect antenna; Check antenna system for high SWR; Verify operating frequency and mode. |
| No audio output | Volume too low; Squelch too high; Speaker disconnected. | Increase volume; Adjust squelch level; Check speaker connections. |
| Bluetooth headset not pairing | Headset not in pairing mode; Out of range; Interference. | Ensure headset is in pairing mode; Move closer to transceiver; Reduce interference sources. |
9. Specifications
| Feature | Specification |
|---|---|
| Model Number | FTM-300DE |
| Frequency Range | 144-146 MHz (VHF), 430-440 MHz (UHF) |
| Number of Channels | 63 (Band Scope monitors up to 63 channels) |
| Output Power | 50 Watts (RF) |
| Operating Voltage | 12V DC |
| Connectivity Protocol | Bluetooth |
| Special Feature | Stable operation, FACC heatsink |
| Water Resistance Level | Not waterproof |
| Compatible Devices | YAESU SSM-BT10 Bluetooth headset |
| Included Components | Hand Microphone, Power Cable with Fuse |
10. Warranty and Support
For warranty information and technical support, please refer to the warranty card included with your product or visit the official Yaesu website. Do not attempt to repair the unit yourself, as this may void your warranty.
Official Yaesu Website: www.yaesu.com


