1. Introduction
Thank you for purchasing the BRUNO Electric Coffee Maker with Mill, model BOE080-KH. This all-in-one device combines an electric coffee mill, dripper, and cup, allowing you to enjoy freshly ground coffee anytime, anywhere. Its compact, cordless, and rechargeable design makes it ideal for home, office, or outdoor use. Please read this manual thoroughly before use to ensure proper operation and maintenance.
2. Important Safety Instructions
To reduce the risk of fire, electric shock, or injury, always follow basic safety precautions when using electrical appliances.
- Read all instructions before using the appliance.
- Do not immerse the motor unit in water or other liquids.
- Keep the appliance out of reach of children. Close supervision is necessary when any appliance is used by or near children.
- Use only the provided USB cable for charging. Ensure the power source is compatible (DC5V/1A or higher).
- Do not operate the appliance if it has a damaged cord or plug, or if it malfunctions or has been dropped or damaged in any manner.
- Avoid contact with moving parts.
- Do not use attachments not recommended or sold by the manufacturer.
- Unplug from outlet when not in use, before putting on or taking off parts, and before cleaning.
- This appliance is for household use only. Do not use outdoors.
3. Product Components
Familiarize yourself with the parts of your BRUNO Electric Coffee Maker with Mill:
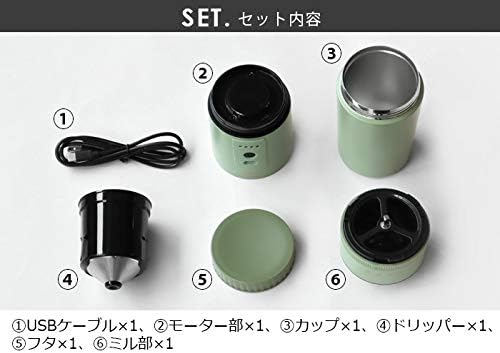
Image: All components of the BRUNO Electric Coffee Maker with Mill, including the USB cable, motor unit, cup, dripper, lid, and mill unit.
- USB Charging Cable
- Motor Unit (with integrated grinder and controls)
- Coffee Cup (stainless steel interior)
- Dripper (with mesh filter)
- Lid
- Mill Unit (grinding chamber)
4. Setup and First Use
4.1 Initial Charging
Before first use, fully charge the device. A full charge takes approximately 4 hours and allows for about 15 grinding cycles.

Image: The coffee maker being charged using a wall adapter and a portable power bank, demonstrating its versatility.
- Connect the provided USB cable to the charging port on the motor unit.
- Plug the other end into a USB power adapter (not included) or a mobile battery (not included) with a DC5V/1A or higher output.
- The indicator lights on the motor unit will show charging status. All lights will illuminate when fully charged.
4.2 Assembly
Assemble the coffee maker as follows:
- Place the mill unit onto the coffee cup and twist clockwise until it locks securely.
- Attach the motor unit to the top of the mill unit and twist clockwise until it locks. Note: The mill unit and motor unit are designed with a secure lock for safety and may require firm twisting to attach/detach.
5. Operating Instructions
5.1 Grinding Coffee Beans

Image: A visual guide demonstrating the four main steps of using the coffee maker: adding beans, selecting grind size, viewing ground coffee, and pouring hot water for brewing.
- Remove the lid and the motor unit.
- Add up to 15g of whole coffee beans into the mill unit's hopper.
- Reattach the motor unit.
- Adjust the grind size by rotating the adjustment ring located between the motor unit and the mill unit. There are 5 levels of grind adjustment, from fine to coarse.
- Press the power button on the motor unit to start grinding. The grinder will automatically stop when the beans are fully ground.
5.2 Brewing Coffee
After grinding, proceed with brewing:
- Remove the motor unit from the mill unit. The ground coffee will be in the mill unit, which is now attached to the cup.
- Place the dripper into the cup, ensuring it is seated correctly.
- Carefully pour hot water (from a separate kettle, not included) over the ground coffee in the dripper.
- Allow the coffee to drip into the cup. Once brewing is complete, remove the dripper.
- Your freshly brewed coffee is ready to enjoy.
6. Maintenance and Cleaning
Regular cleaning ensures optimal performance and longevity of your coffee maker.

Image: Close-up views of the coffee maker's parts, illustrating that all parts except the motor unit are washable, the double-layer mesh filter is reusable, the cup has a non-slip base, and the cup opening is approximately 6.5 cm.
- Motor Unit: Do not wash the motor unit with water. Wipe it clean with a damp cloth.
- Mill Unit, Dripper, Cup, Lid: All these parts are washable. Disassemble them from the motor unit. Wash with warm soapy water and rinse thoroughly.
- Mesh Filter: The double-layer mesh filter in the dripper is reusable. Clean it after each use to prevent clogging.
- Ensure all parts are completely dry before reassembling or storing.
7. Troubleshooting
If you encounter issues with your BRUNO Electric Coffee Maker, refer to the following common problems and solutions:
- Device not turning on or grinding: Ensure the device is fully charged. Check if the motor unit and mill unit are securely locked in place.
- Grinding is slow or inconsistent: Check if the coffee beans are too oily or if there are foreign objects in the mill. Clean the mill unit thoroughly. Ensure the grind size setting is appropriate for the beans.
- Coffee not dripping properly: Ensure the dripper is clean and not clogged. Check if the ground coffee is too fine, which can impede water flow.
- Battery not charging: Verify that the USB cable is properly connected and the power source (adapter/power bank) is functioning and provides at least DC5V/1A.
If the problem persists after attempting these solutions, please contact customer support.
8. Product Specifications

Image: Detailed specifications including dimensions, weight, cord length, battery type, charging time, and materials, alongside diagrams for assembly and disassembly.
| Feature | Specification |
|---|---|
| Brand | BRUNO |
| Model Number | BOE080 |
| Product Dimensions | 2.95 x 2.95 x 9.21 inches (approx. 7.5 x 7.5 x 23.4 cm) |
| Item Weight | 1.54 pounds (approx. 602g) |
| Capacity | 200 Milliliters |
| Voltage | 5 Volts |
| Cord Length | Approx. 1m (USB cable) |
| Built-in Battery | Lithium-ion 7.4V 800mAh |
| Charging Time | Approx. 4 hours |
| Materials | Motor unit: Stainless steel/ABS resin; Mill unit: Stainless steel/Polypropylene/Ceramic; Dripper: Polypropylene/Stainless steel; Cup: Stainless steel; Cap: Polypropylene |
9. Warranty and Support
This product comes with a manufacturer's warranty. Please refer to the warranty card included with your purchase for specific terms and conditions. For technical support, troubleshooting assistance, or warranty claims, please contact the retailer or BRUNO customer service through their official website or contact information provided with the product packaging.


